Categorized in: 

New User Training | Cvent

Express Sunsetting

  • September 30 | All created/launched Express events must be complete.
  • September 30 - December 31 | Completed Express events will remain available for post-event wrap-up.
  • December 31 & beyond | All Express events will be archived.

Get started right away by learning to create an event website and registration process with Cvent.

Get Started | 0:00 - 10:40

  • Help & Support | Cvent not only provides a large knowledgebase to search step-by-step tutorials but support you can contact directly. Request a call, instant message, or submit a case. 
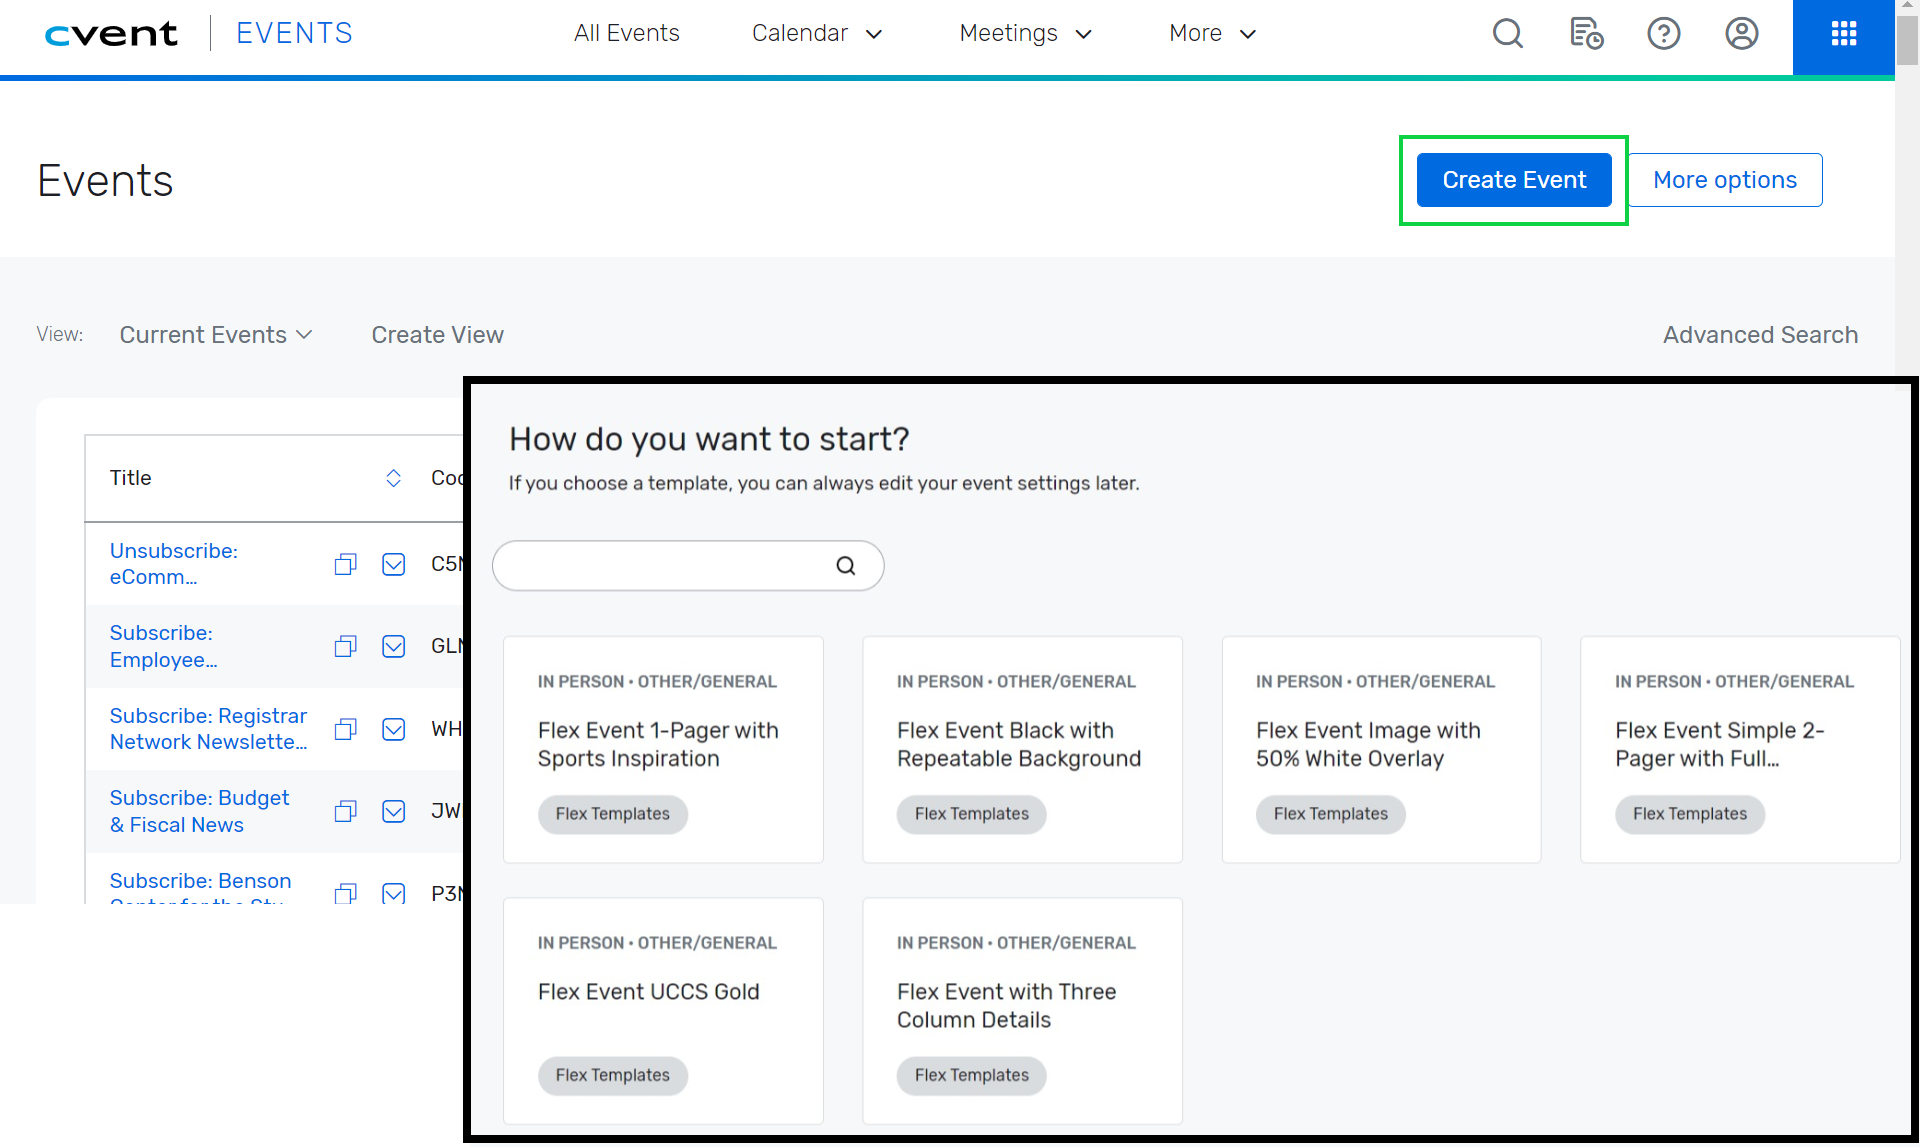
  • View Templates | We've made six different CU-branded templates available to all users to clone. They provide a great start but can be fully customized.
  • Create Event | The event creation process starts with providing basic event information (title, date, location, etc.). Once created, enable additional features like guest registration, sessions, or speakers before customizing further.

null

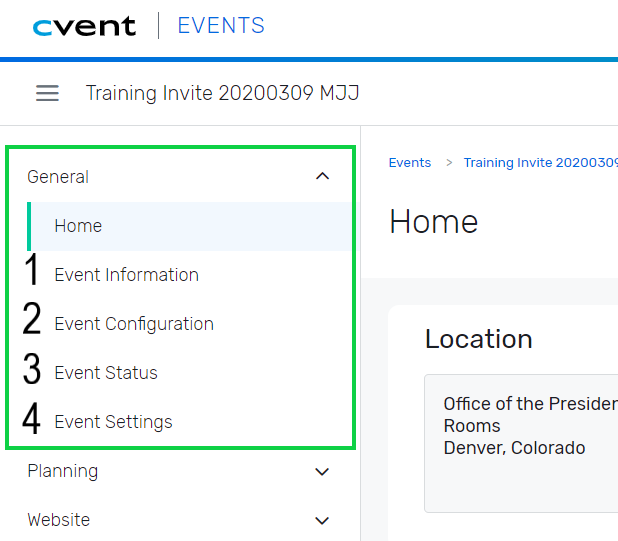
General | 10:40 - 13:39

  1. Event Information | For your basic event details, such as: event title, start/end date, event planner, etc.
    • This also includes our Custom Contact Fields which play a role in getting money to your account if you're hosting a paid event.
  2. Event Configuration | For enabling additional event features, like: guests, sessions, speakers, social media, etc.
  3. Event Status | For testing your event and requesting approval from your eComm specialist.
  4. Event Settings | For sharing your event with other Cvent users.
null


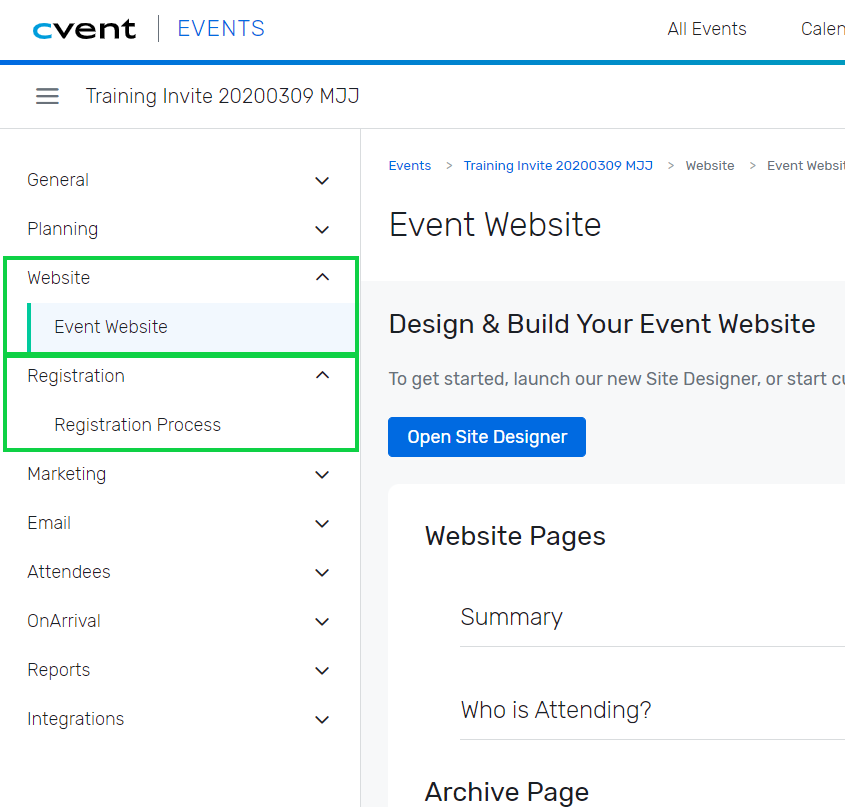
Website & Registration | 13:39 - 23:55

You can open the Site Designer to customize your website and registration process in two ways. In the left navigation, either:

  • Click Event Website after expanding the Website section.
  • Click Registration Process after expanding the Registration section.

Each path will present you with a blue button to the Open Site Designer

null


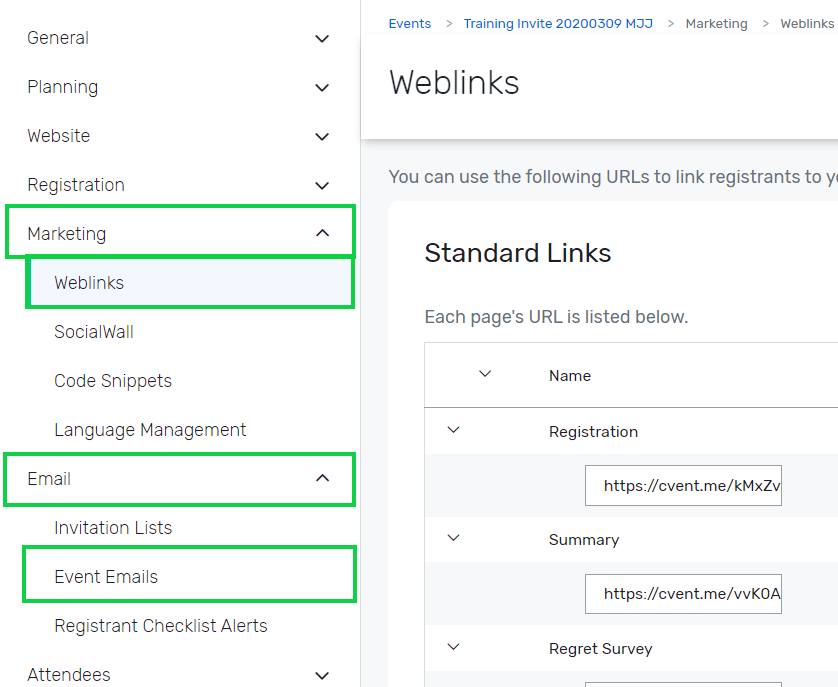
Marketing & Email | 23:55 - 29:48

  • Weblinks | Weblinks can be found after expanding the Marketing section.
  • Emails |  Event Emails are found after expanding the Email section.
null


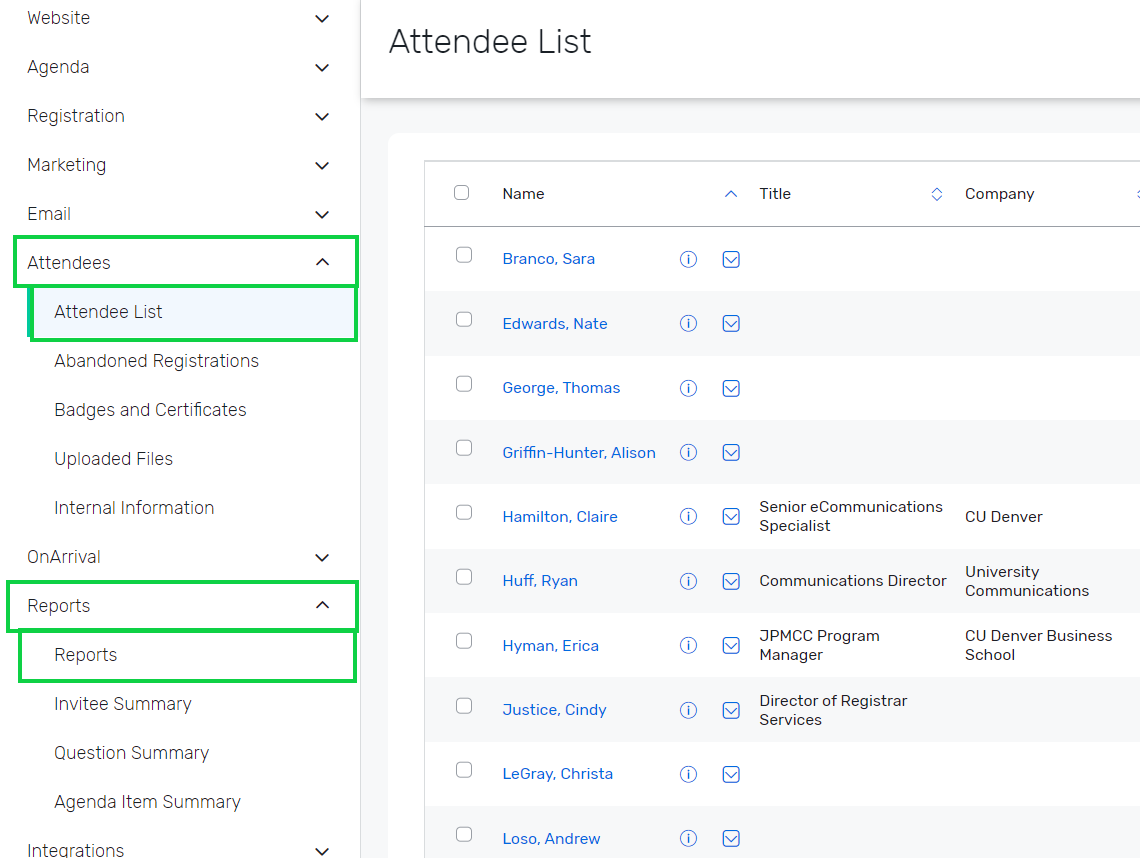
Attendees & Reports | 29:48 - 31:08

  • Registrant Management | Attendee List found under Attendees present a list of registrants to view, search and modify.
  • Reports | Reports under the Reports section can provide details on registrants, email engagement, financials and more.  
    • Report Portal | Take it a step further by working with your eComm specialist to get Reports published to the Portal so others can view and export Reports in real-time, for free.
null


Test, Request Approval & Launch | 31:08 - 33:30

Once your event has been customized you can move into the testing phase, replicating the registrant experience. Once finalized, send a request for approval to your eComm specialist. After they review and approve your event, you will be able to launch your event. 

Expand the to General section, then click Event Status

  • Testing | The List found under Attendees presents a list of registrants to view, search, and modify.
  • Request Approval & Launch | All events must be approved by an eComm specialist before you'll be able to launch them.


Test your knowledge with the quiz below.

Cvent's Training Courses

Cvent's online training will teach you how to build your first event, organize sessions, promote your event, manage attendees, record payments, and run reports. This article lists all our Flex courses in the order we recommend taking them.

Cvent Flex Training


Express Sunsetting

  • September 30 | All created/launched Express events must be complete.
  • September 30 - December 31  | Completed Express events will remain available for post-event wrap-up.
  • December 31 & beyond | All Express events will be archived.

Need a streamlined registration but still want invitees to use tickets, free or paid? Try Express Ticketing Registration. One step up from Express Registration, this type of event lets you offer different registration items and even charge for them.

1 | Create

  • Login to Cvent
  • Select the green Create button on the top-right
  • Keep the default radio button selected: Create using a template
  • Select the ellipsis next to the template box

null

  • A pop-up will appear with a variety of CU-branded templates to selectExpress Ticketing templates provide a streamlined registration but with tickets, free or paid. It's one step up from Express Registration, allowing different registration items that can be charged for.

When & Where

  • In the When section, set the time zone to match the venue's. Select the dates and times. The Registration Deadline is the last day invitees will be able to register.
  • Add your event location to the Where section.

NOTE: Your event will close automatically when it reaches capacity or the Registration Deadline passes.

Event Planner

  • In the Event Planner section, enter the planner's first and last name. This will appear by default in the From Name field of event emails by way of data tags.

null

NOTE: You can change anything you've created during the wizard later. This is just the start.

Advanced Settings

  • In the Advanced Settings section, leave the default radio button so Registration is open to: Anyone (Public)

Custom Event Fields

  • Your Campus: Based on where you are employed, not where you are hosting an event.
  • Select a Payment Path:
    • CU Cvent if collecting payment
    • Free Event if not charging for event registration
    • CU Foundation Cvent is used only for fundraising-specific events and requires authorization.
  • SpeedType: If charging for your event, your department's speedtype must be added to the Cvent.
    • For free events, No Speed Type Required
  • Account Code: If charging for your event, your account code must be added to the Cvent.
    • For free events, N/A
  • Allocation Fund # is for fundraising-specific events.
    • For non-fundraising events, N/A

Registration Items

  • Add a free ticket. Scroll down to the Registration Items section, and click Add Free Ticket.
    • Name the ticket, then set a capacity.
    • If limiting how many tickets an invitee can select, enter a Max Quantity in the field.
    • You can also limit when this ticket is available. Simply enter an "Automatically closes" date. If you leave these fields blank, the tickets will become available when you launch the event and close with the registration deadline.
  • Or add a ticket with a fee. Scroll down to the Registration Items section, and click Add Paid Ticket.
    • Name the ticket, then establish the capacity. Enter the price, then determine if you want to add a general ledger code.
    • If limiting how many tickets an invitee can purchase, enter a Max Quantity in the field. Enter a refund amount if you plan to refund cancellations.
    • You can also limit when this ticket is available. Simply enter an automatically opens and automatically closes date. If you leave these fields blank, the tickets will become available when you launch the event and close with the registration deadline.

null

Want to create a discount for registrants? Navigate to the Advanced tab.

Payment Options

  • In the Payment Options section, check which payment methods will be available. If collecting credit cards, select a merchant account from the dropdown that appears.
    • CU Cvent is for paid events
    • CU Foundation Event is for fundraising-specific events only
  • To add a service fee, switch Charge a service fee for certain payment methods to Yes. Check which payment methods it will apply to. Determine whether the fee will be calculated by amount or percentage then enter the number.

Learn more about fees, such as setting up a discount, taxes, or service charges.

Save Event

  • Click Finish. Your event is being saved and might take a minute.

2 | Customize

Website & Registration Design

  • Customize the registration process. With your event open, click the Website & Registration tab. Click Customize next to Registration.
    • Click and drag fields, questions, widgets, and content from the Design Tools sidebar onto the page. Play around!
    • When you hover over something you just added, options may appear to edit text, adjust settings, or remove the element entirely.

NOTE: Contact info is automatically collected once per order, but you can always decide to collect it for each ticket purchased.

  • To design the fonts and colors, click Launch Theme Designer
  • When adding a background image, click Edit Section in the top right corner of the section you want to customize. Use the Background Options to determine how the image will be positioned, then establish the image's width and height compared to the section's size. Depending on which option you select, the image will take up that percentage of the section, such as an image with a 50% width and height will take up half of the section. Then determine how the background will repeat.
  • Preview your work, viewing the desktop, tablet, and mobile sized versions.

null

Communication Design & Weblink

  • Tailor your emails by navigating to the neighboring tab, Promotion & Communication.
    • Select an email. The Details tab opens by default. Click the neighboring tab, Content, then Edit.
    • Preview your work, viewing the Canvas, Desktop, and Mobile sized versions with the View dropdown in the top-right.

NOTE: You'll find your Weblink in Promotions & Communications. Embed this link in your Marketing Cloud invitation to remain CAN-SPAM compliant.

NOTE: To test your event, click Perform Test on the Overview tab. Once you're happy with how it looks, send your event to your eComm specialist for approval. Once approved, a Launch Event button on the Overview tab will appear for you to select. There is also a Launch button located at the bottom of the other tabs.

Advanced Tab

  • By design, templates are designed to not appear in search engines. To change this setting, navigate to the Advanced tab and set the Search Engine setting on.
  • If you wish to provide discounts, you can configure them in the Advanced tab.

3 | Test & Launch

Test

Approval & Launch

4 | Manage

Invitee Management

Reports

Express Sunsetting

  • September 30 | All created/launched Express events must be complete.
  • September 30 - December 31 | Completed Express events will remain available for post-event wrap-up.
  • December 31 & beyond | All Express events will be archived.

Have a simple, free event that needs a simple setup? Then Express Events is the answer. If you need advanced features (like sessions or allowing a primary guest to register additional guests), you'll need to use Flex.  

1 | Create

  • Login to Cvent
  • Select the green Create button on the top-right
  • Keep the default radio button selected: Create using a template
  • Select the ellipsis next to the template box

null

  • A pop-up will appear with a variety of CU-branded templates to select. Express Events are great when your event needs a simple head count without charging for the event.

1.1 | When & Where

  • In the When section, set the time zone to match the venue's. Select the dates and times. The Registration Deadline is the last day invitees will be able to register.
  • Add your event location to the Where section.

NOTE: Your event will close automatically when it reaches capacity or the Registration Deadline passes.

1.2 | Event Planner

  • In the Event Planner section, enter the planner's first and last name. This will appear by default in the From Name field of event emails by way of data tags.

null

NOTE: You can change anything you've created during the wizard later. This is just the start.

1.3 | Advanced Settings

  • In Advanced Settings, leave the default radio button so Registration is open to: Anyone (Public)

1.4 | Custom Event Fields

  • Your Campus: Select based on where you are employed, not where you are hosting an event.
  • Leave the Payment Path: Free Event 
  • Leave the SpeedType: No Speed Type Required
  • Leave the Account Code: N/A 
  • Leave the Allocation Fund #: N/A

1.5 | Create Event

  • Click Finish at the bottom to create your event.

2 | Customize

2.1 | Website & Registration Design

  • Customize your website and registration. With your event open, click the tab, Website & Registration. Click Customize next to the page you want to create.

  • When adding a background image, click Edit Section in the top right corner of the section you want to customize. Use the Background Options to determine how the image will be positioned, then establish the image's width and height compared to the section's size. Depending on which option you select, the image will take up that percentage of the section, such as an image with a 50% width and height will take up half of the section. Then determine how the background will repeat.
  • When adding a background image, we suggest starting out with a 1200 x 700px image. But don't just take our word for it! Preview your work, viewing the desktop, tablet, and mobile sized versions.
    • Also be aware that any text included in the image may become distorted as the screen size changes, so it's safer to add the text separate from the image.

null

2.2 | Email Design & Weblink

  • Tailor your emails by navigating to the neighboring tab, Promotion & Communication.
    • Select an email. The Details tab opens by default. Click the neighboring tab, Content, then Edit.
    • Preview your work, viewing the Canvas, Desktop, and Mobile sized versions with the View dropdown in the top-right.

NOTE: You'll find your event URL in Promotions & Communications. Embed this link in your Marketing Cloud invitation to remain CAN-SPAM compliant.

2.3 | Advanced Tab

By design, templates are designed to not appear in search engines. To change this setting, navigate to the Advanced tab and set the Search Engine setting on.

3 | Test & Launch

3.1 | Test

3.2 | Approval & Launch

4 | Manage

4.1 | Invitee Management

4.2 | Reports