


How-To Manage Reports in the Portals
NOTE The following are instructions for Portal Managers. Users can submit a request for a report to be published to the portal by following three easy steps.
One of the eComm specialist’s roles (and Super Users) in Cvent includes managing how stakeholders can access Cvent data in real-time, without a cost. Portal Managers can follow the steps below to create Portal Users and Publish Reports to the Portal for easy access.
STEP 1 | Add User(s) to Portal
Having trouble adding a portal user? If the person is a current test user, it might indicate the username is already taken. Submit a help ticket to remedy the issue.
For someone to access reports via the portal, they will need to be a Portal User (a free license). Portal Managers can follow the next steps to create new Portal Users or check if they already exist.
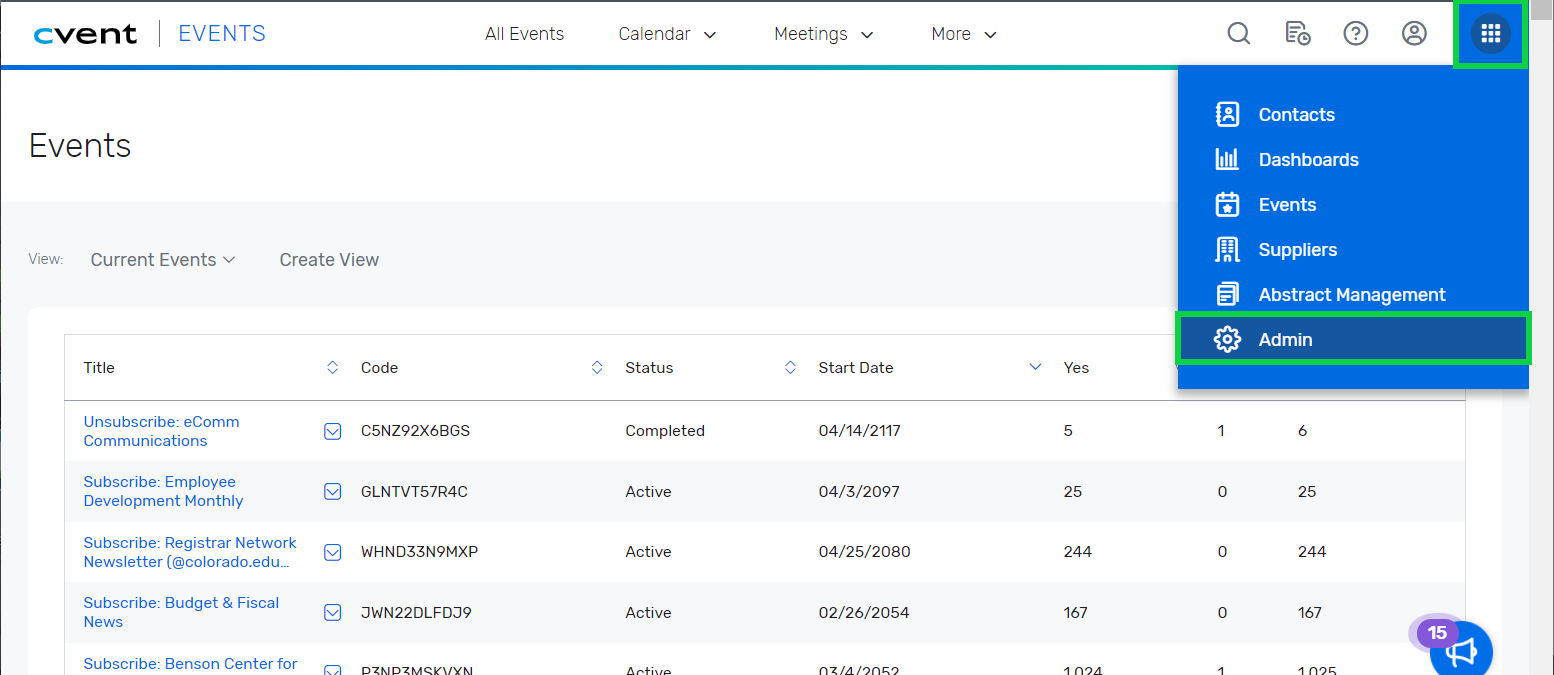
- Hover the dot menu in the top right
- Click Admin in the dropdown
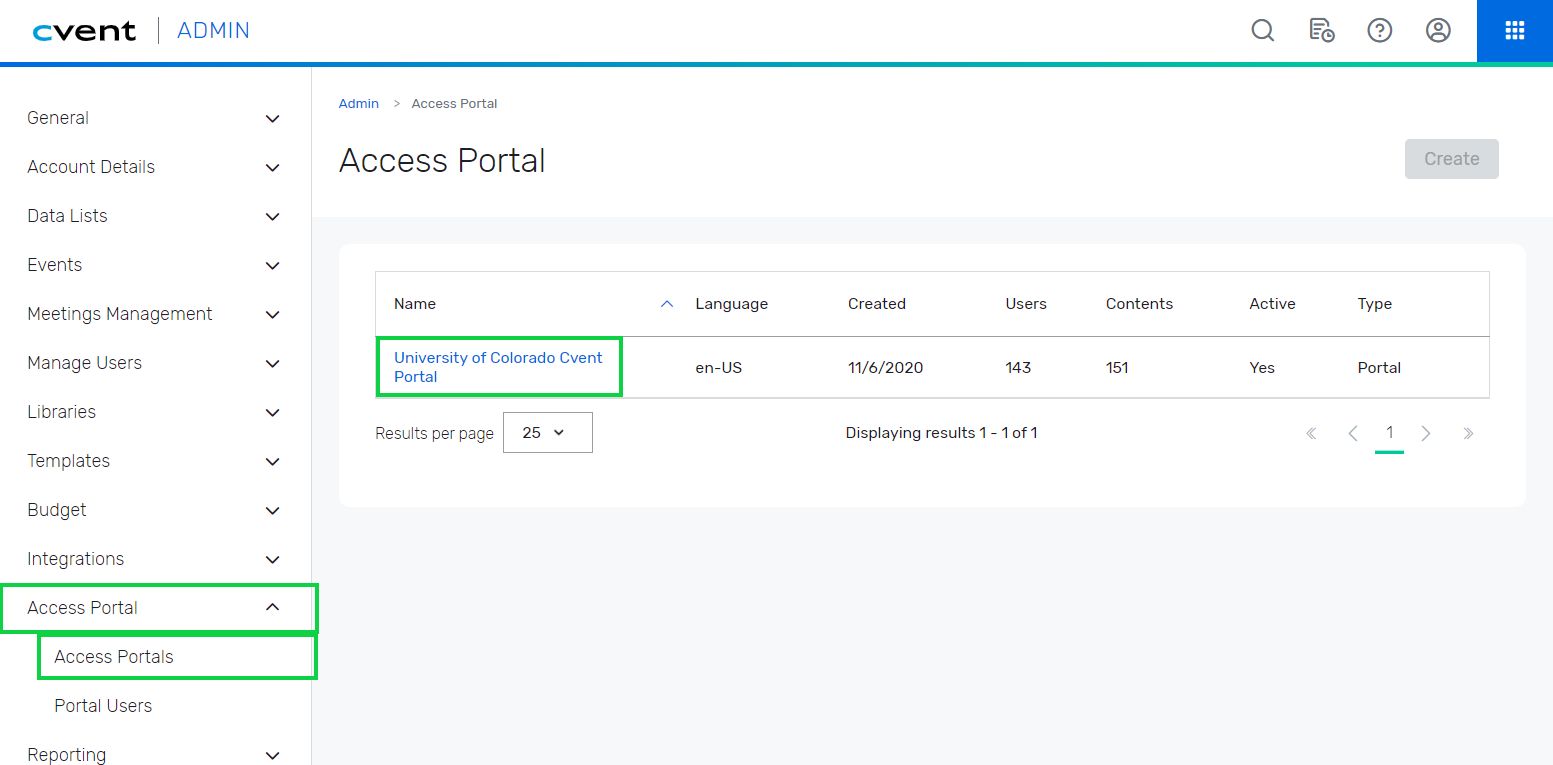
- Click the Access Portal tab on the left
- Once expanded, click Access Portals
- The access portal page will appear. Click the University of Colorado Cvent Portal name
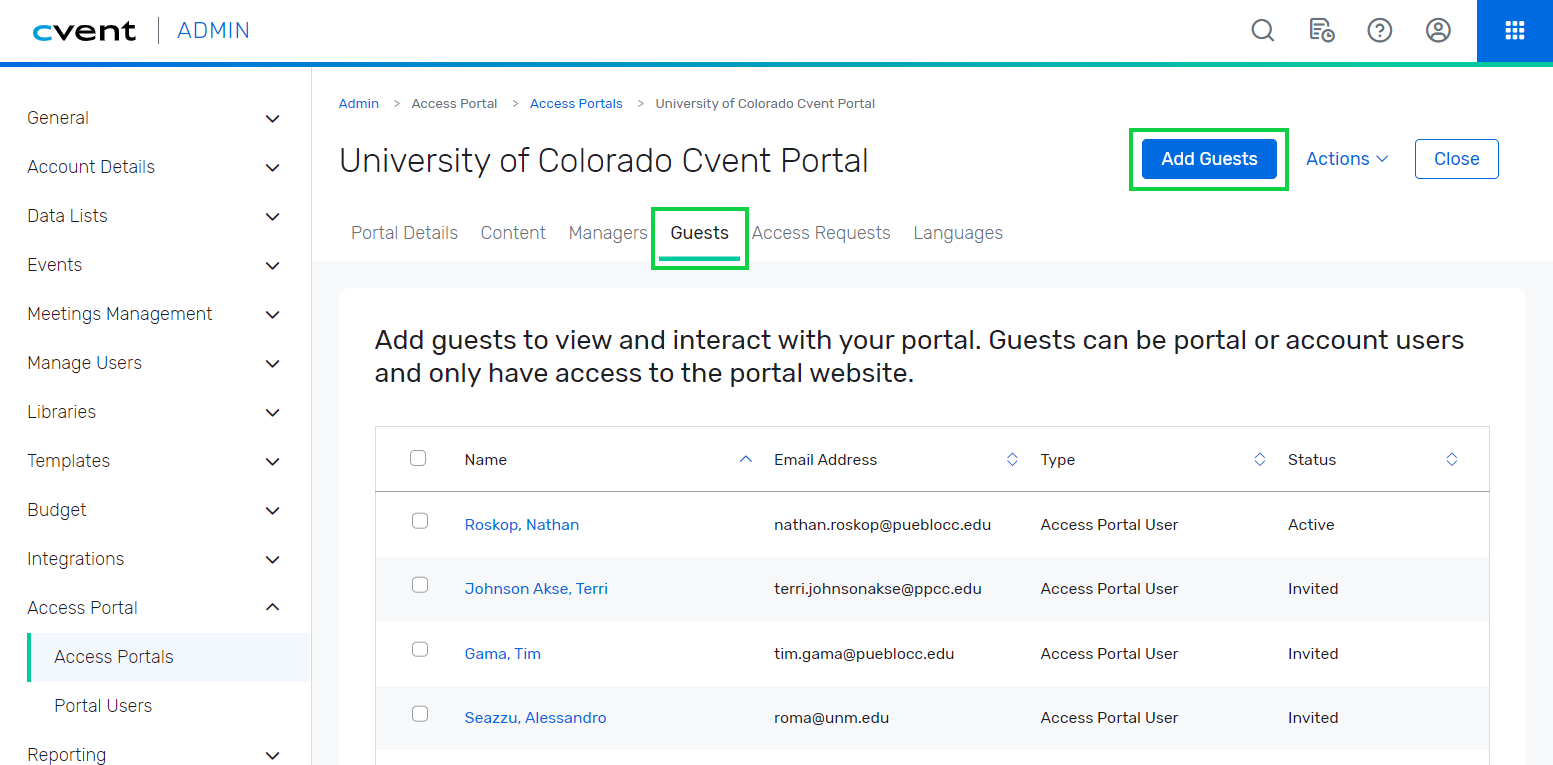
- With the portal open, click the Guests tab. You can view existing Portal Users on this page by searching or scrolling.
- Select the blue Add Guests button in the top-right
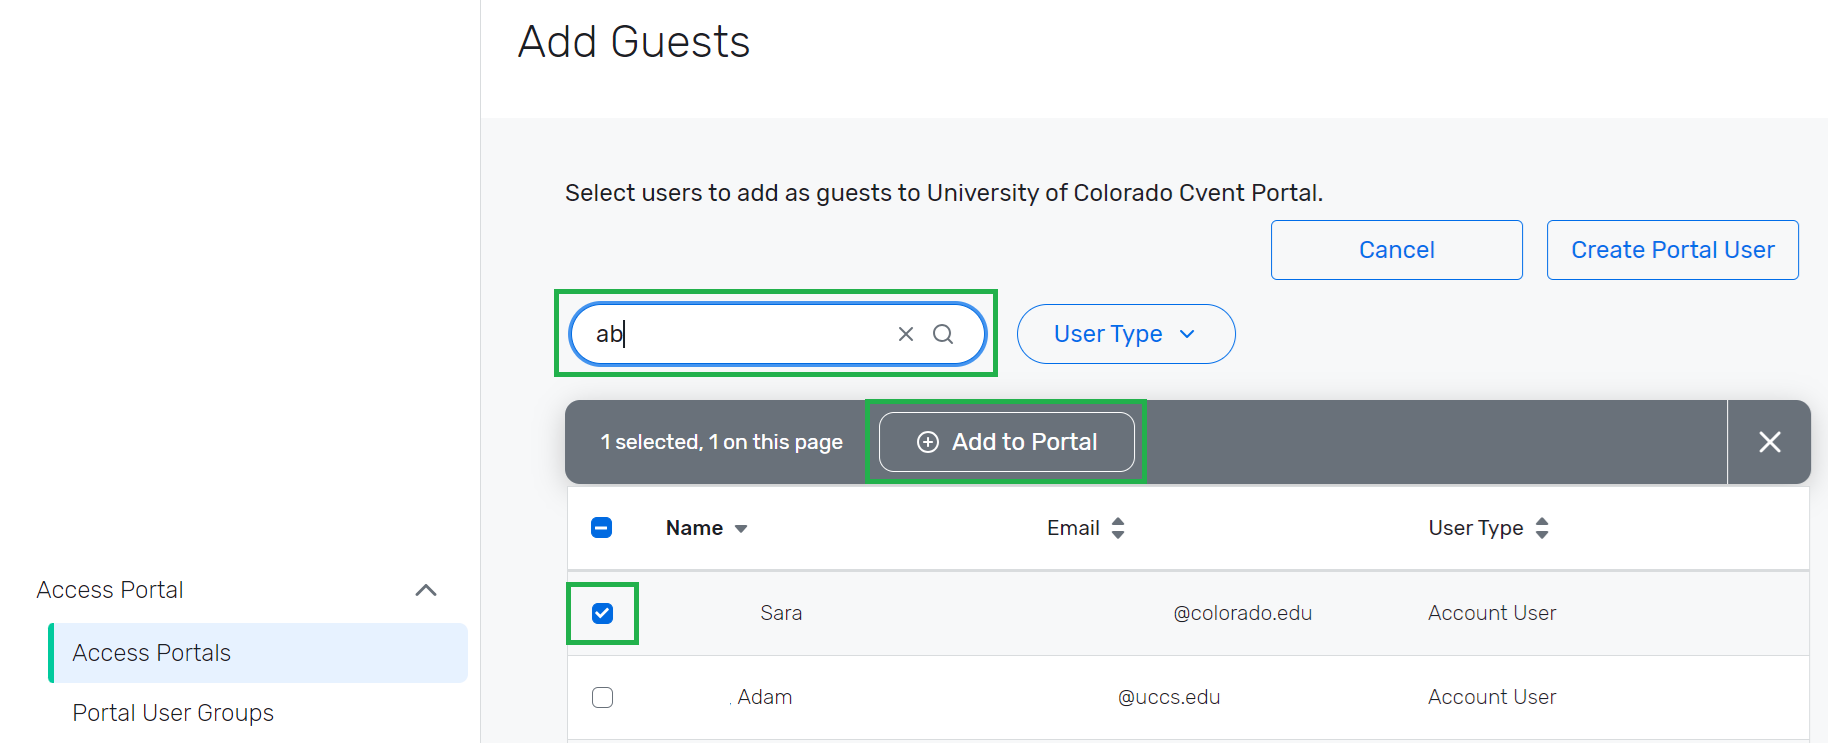
- It's worth confirming if the Portal User already exists and needs to be added to the University of Colorado Portal.
- To do so, check the box next to their name, then select Add to Portal (image below).
- Another pop-up appears. You can Send invitation or Don't send invitation (and send later).
- Portal users need to create their password through the invitation, which expires after 24 hours. See Troubleshooting below if you need to resend the Portal Invitation.
- Once a password is set, they will be an Active Portal User within the University of Colorado Portal (meaning you can complete step 3 - granting them access to a specific Report).
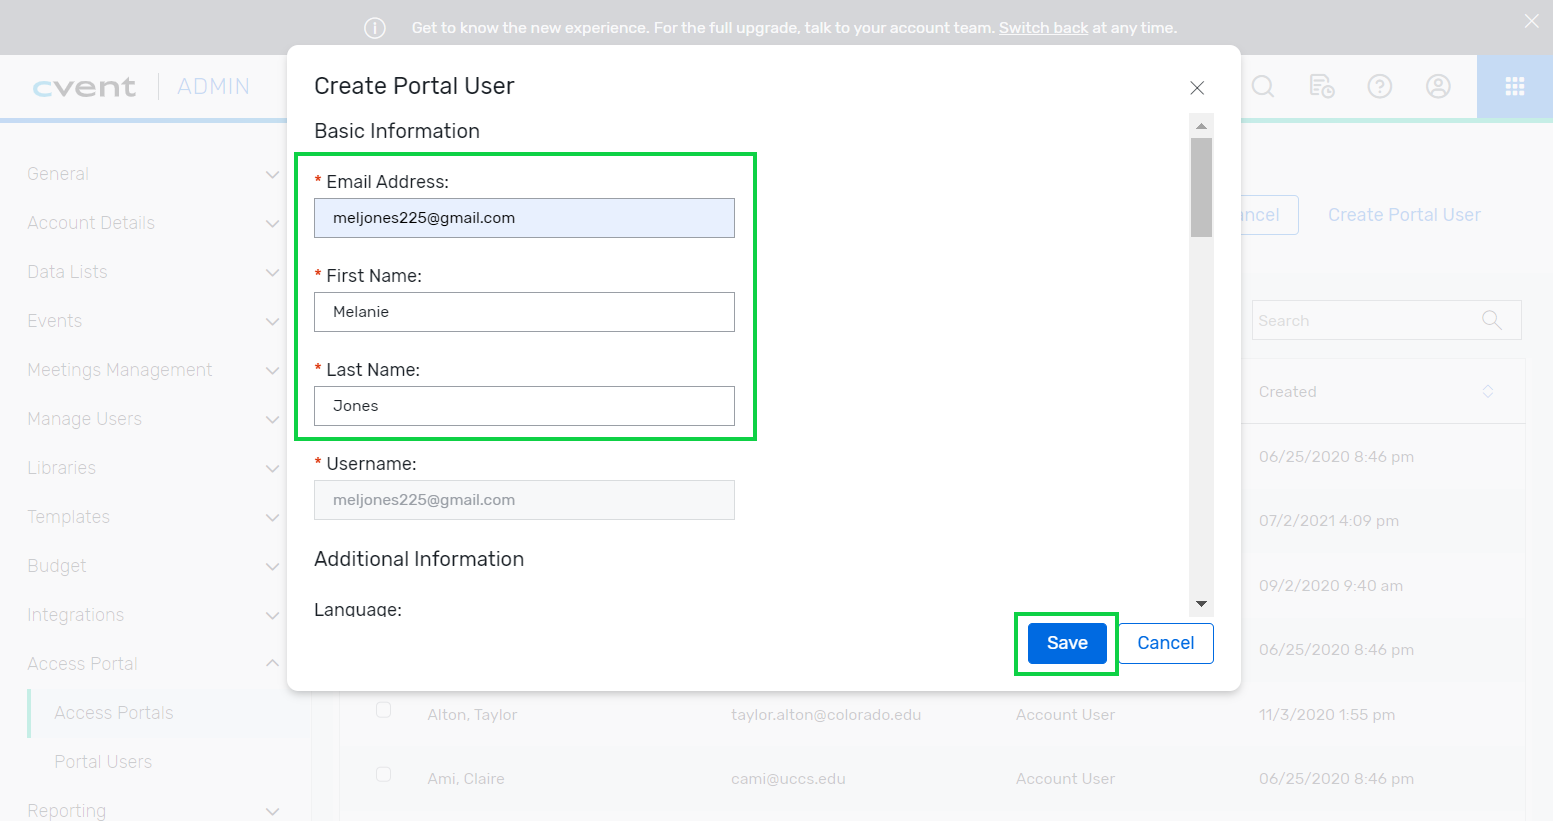
- If the user is not already listed, select the Create Portal User button in the top-right.
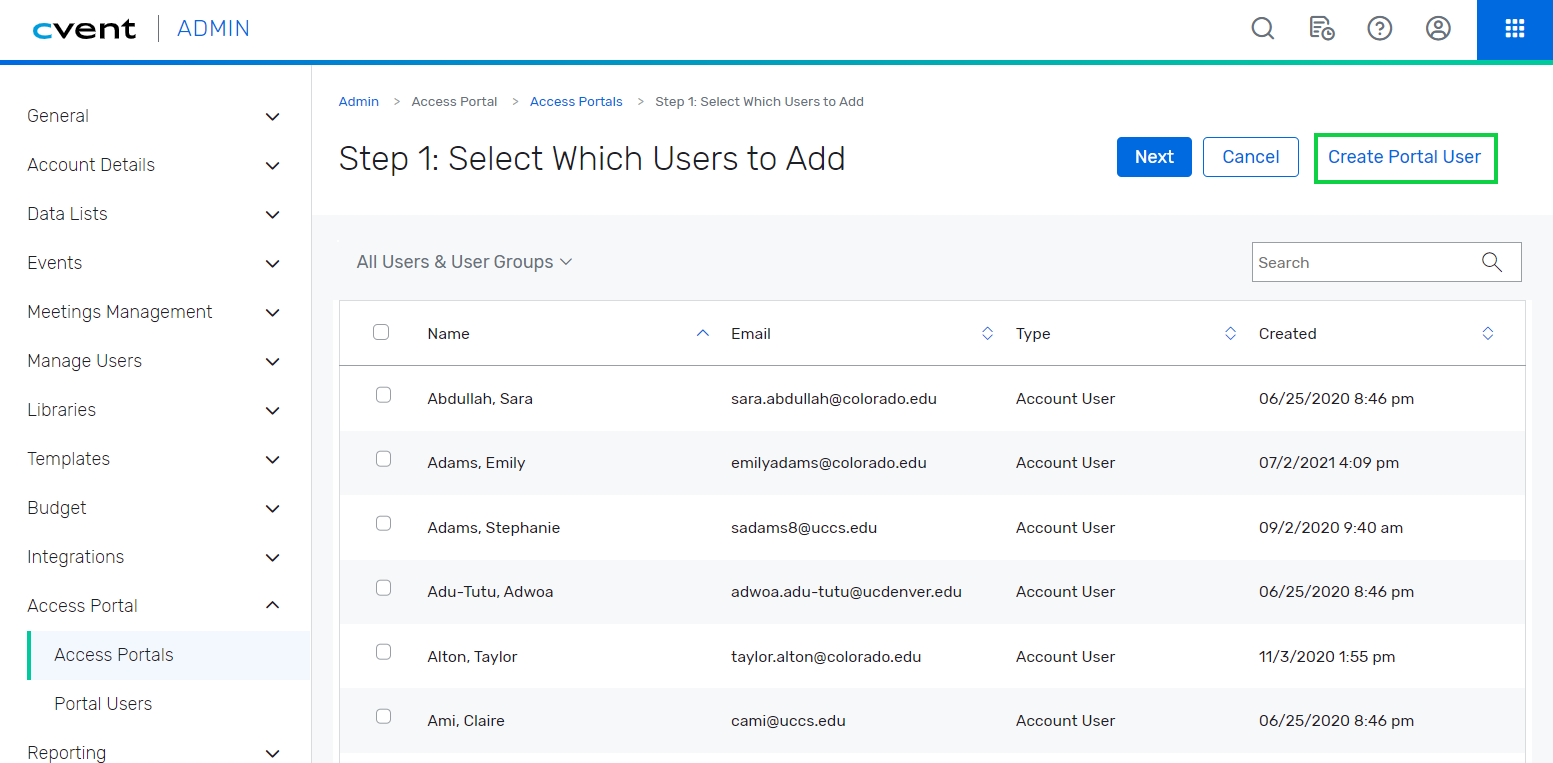
- A pop-up appears. Provide Email, First Name, and Last Name
- Select the blue Save button.
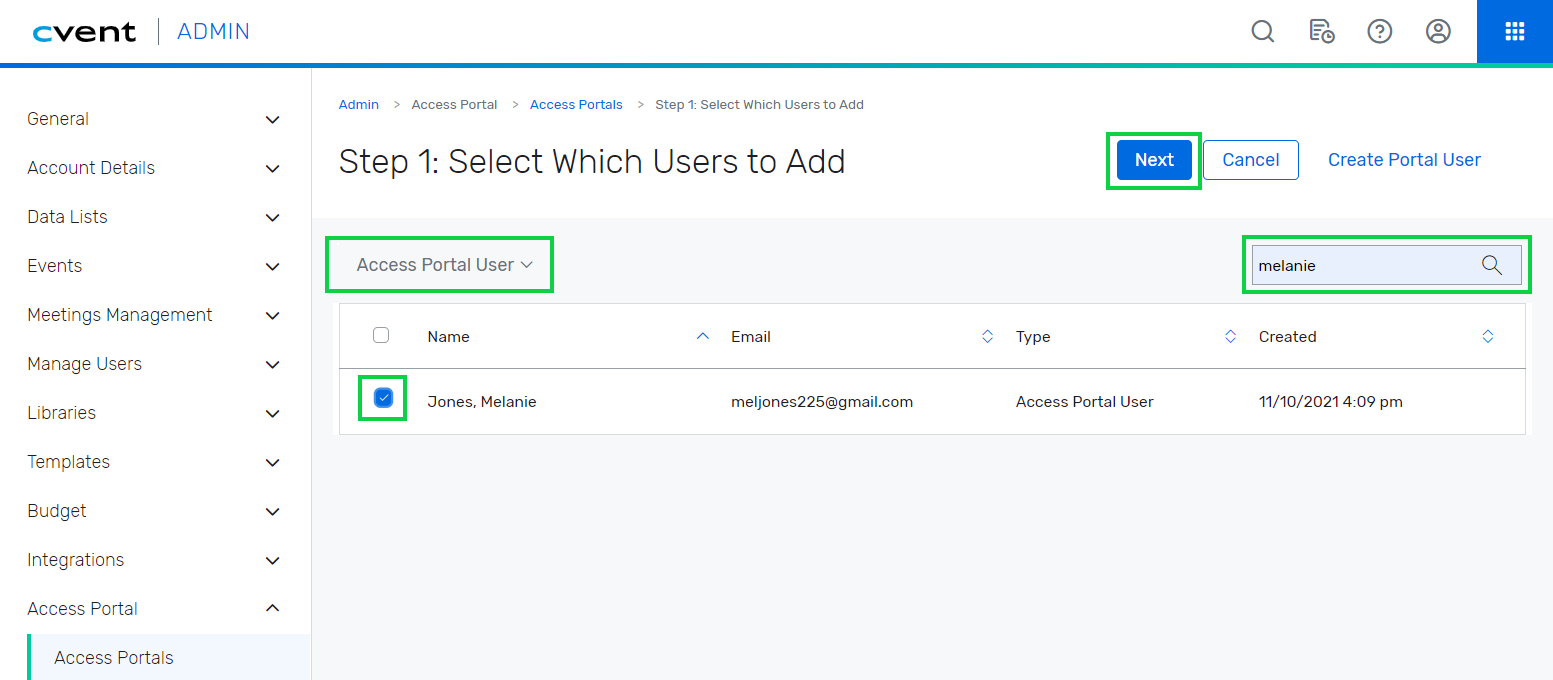
- The pop-up will disappear. Change the dropdown to Access Portal Users
- Check the box next to the User(s) you want to add to the Portal
- Use the search function to find a user with ease.
- Select the blue Next button in the top-right
- Another pop-up appears. You can Send invitation or Don't send invitation (and send later).
- Portal users need to create their password through the invitation, which expires after 24 hours. See Troubleshooting below if you need to resend the Portal Invitation.
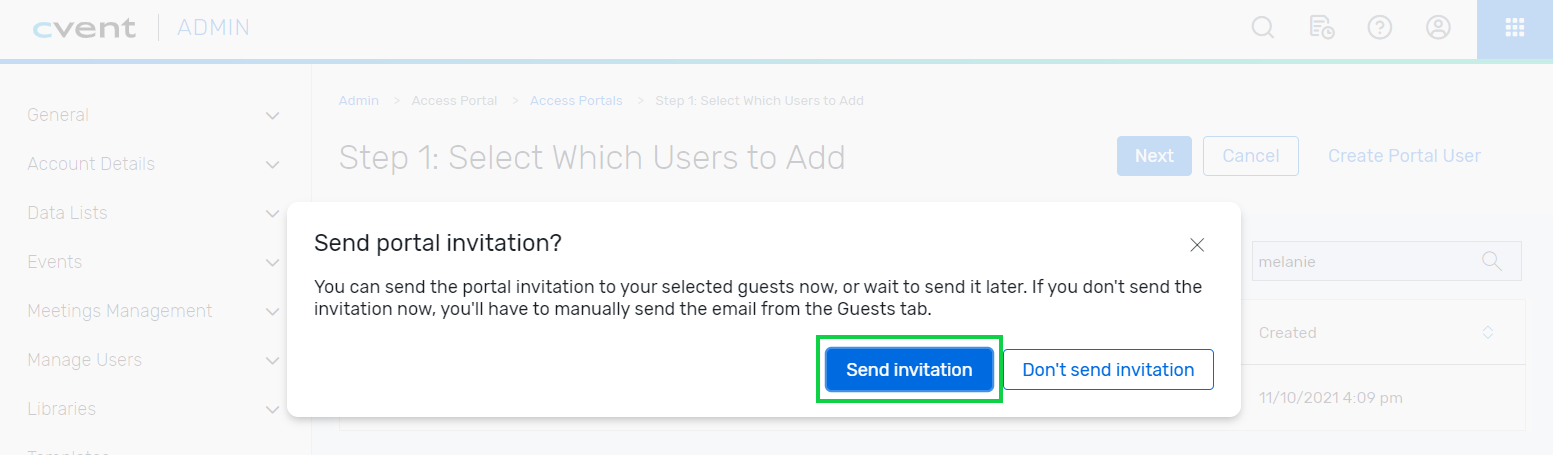
- Once a password is set, they will be an Active Portal User in the University of Colorado Portal (meaning you can complete step 3 - granting them access to a specific Report).
- Click the Guests tab >> Select the green Add Guests button in the top-right
- Active Users will display in a list
- Check the box next to the User(s) you want to add to the Portal
- Next, select the green Next button in the top-right
- License users who are also Portal users will not get an email because they do not need to set a password. These users will sign in with the same username and password for their Cvent account, so no need to remember two sets of credentials.
IMPORTANT FOR STEP 3 Licensed Users (who are also Portal Users) can not be notified of a Report being published to the Portal via Cvent. Otherwise, all eComm specialists will also be emailed. You'll have to let these users know the old-fashioned way - through a separate message.
IMPORTANT FOR STEP 3 Licensed Users (who are also Portal Users) must have the event shared with them AND the Portal Report shared with their Portal User to access data. If only the Report is shared with the Portal User (who also has a real, paid license), they will see the Report but when they run it, no data will display.
STEP 2 | Save Report with Naming Convention
Did a user create the Report?
They need to share the Report Visibility with their Portal Manager. Otherwise, the Portal Manager will not be able to view the Report or Publish it to the Portal.
A Portal Manager can publish the saved Report to the Portal and share it with specific users.
Create Event or Cross-Event Report and Save Report per naming convention.
- Naming Convention: 0X_DEPT_Event Name_Report Description
- Where X indicates your campus number
- DEPT indicates the department or unit
- Indicate the Event Name or Cross if it's a Cross-Event Report
- Add an _OG at the end if the report should never expire
Rename Report
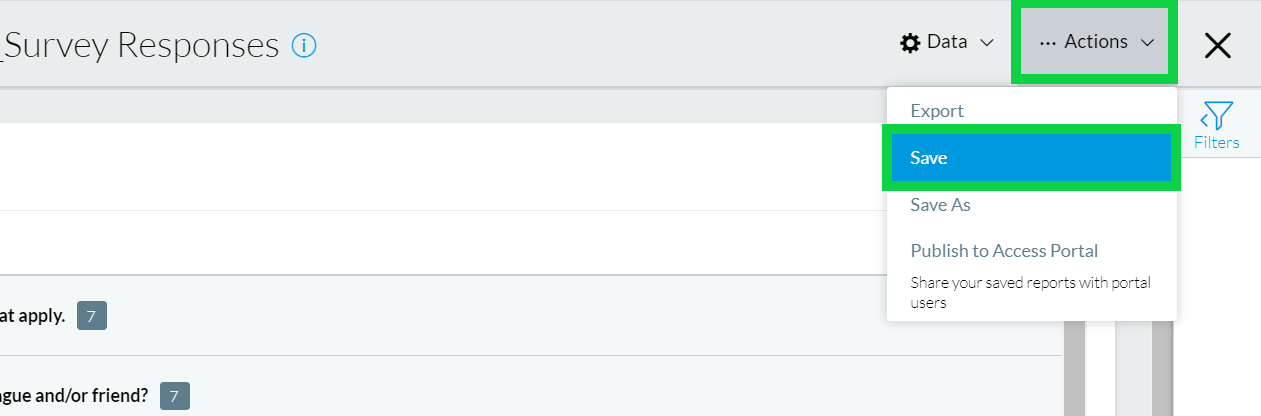
- Rename a saved Report by navigating to the event and running the Report.
- Once run, hover Actions in the top right >> Click Save in the dropdown (image below)
- In the pop-up, rename the Report and click Save.
Visibility
Edit the Visibility if you wish to share this Report with another full licensed user to access when they login to Cvent. This is not the same as getting a report published to the Portal and shared with a (free) Portal User.
- To successfully share an event report with a licensed user, you must share the event and the event report.
STEP 3 | Publish to Portal
There are two different paths to Publish a Report to the Portal:
- After saving and running the Report (per the correct naming convention), hover Actions in the top-right
- Click Publish to Access Portal in the dropdown

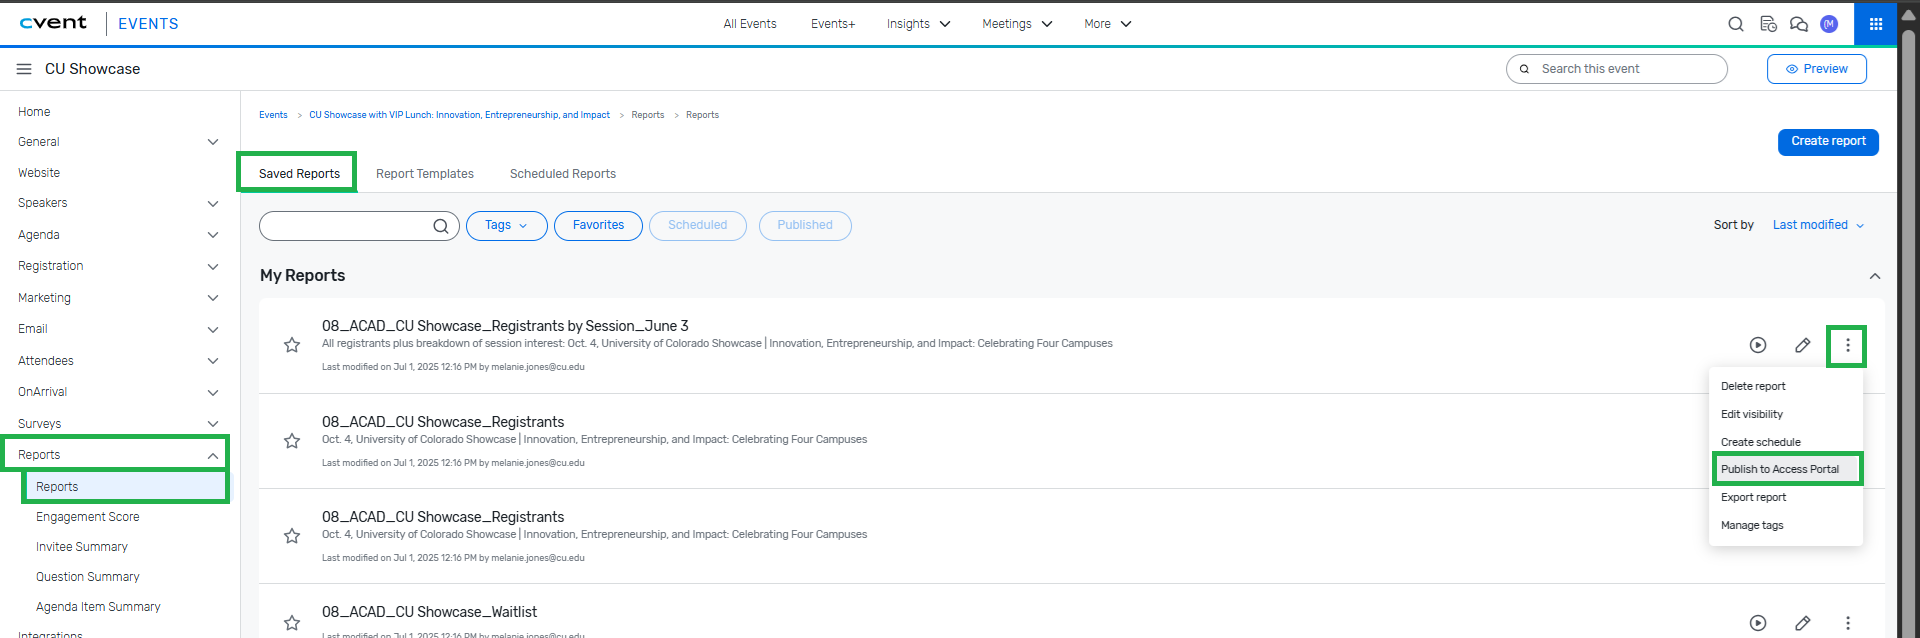
- Navigate to your event >> Reports >> Reports >> Saved Reports tab
- Click the three vertical dots to the far left of a Saved Report. Select Publish to Access Portal in the dropdown.*
- *Be sure your Report follows the correct naming convention (from step 2).
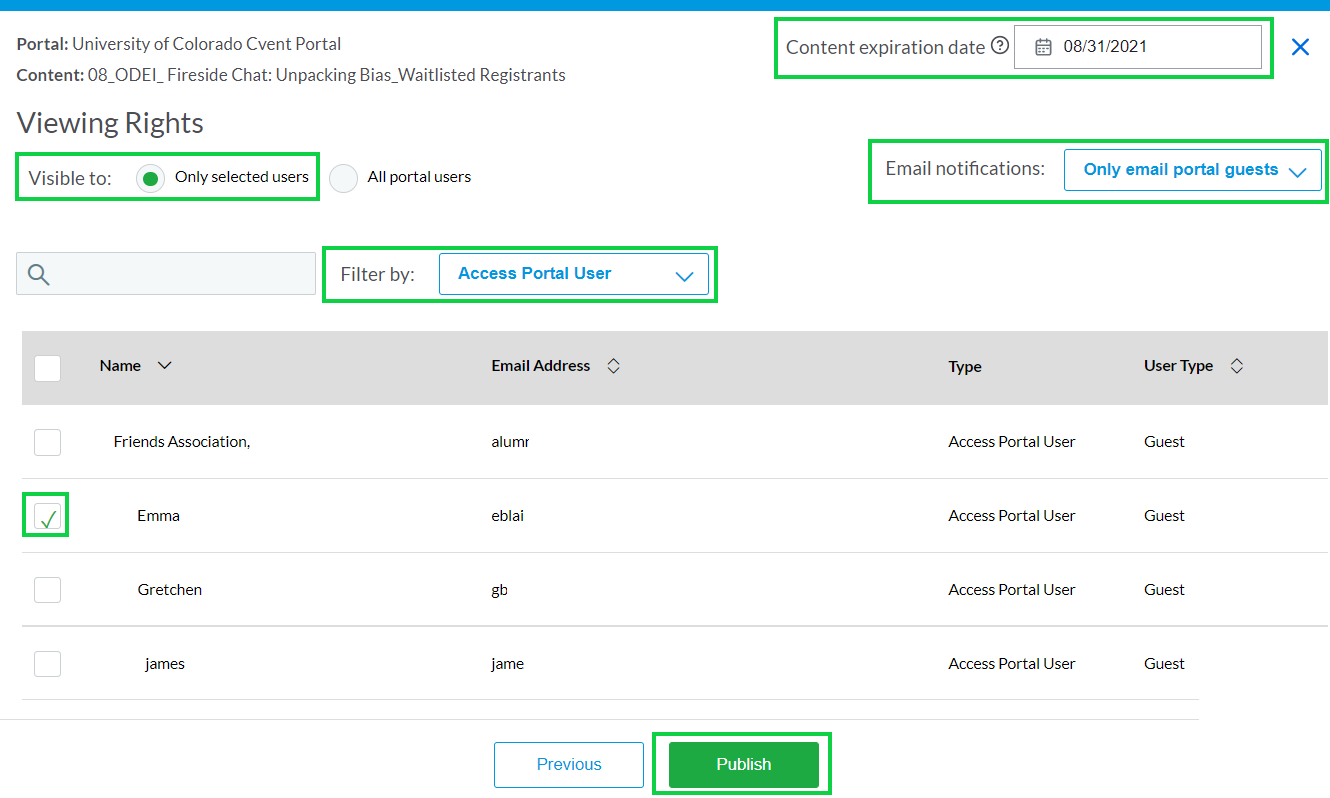
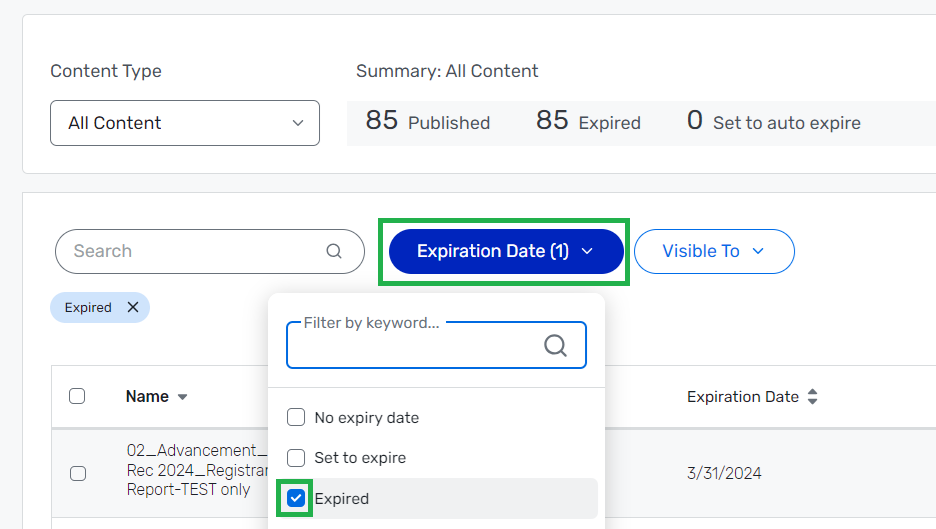
Content Expiration
Required Set a Content expiration date in the top right corner for automatic unpublishing - minimizing clutter for the Portal User. Remember to end the report name with _OG if no expiration date is set.
NOTE Portal Managers will still see the Published Report in Admin >> Access Portal >> Access Portals >> Content tab after the expiration date. To avoid clutter, it's a best practice to remove published Reports after they expire (instructions below in step 4).
Viewing Rights
- Keep default Visible to: Only selected users
- Keep default Email notifications to: Only email portal guests
- Change Filter by dropdown to: Access Portal User
- Check the box next to the individuals who should have access
- *If you do not see a portal user here, it means they are not active yet. You might need to re-trigger the invite so they can set their password (once set, they are an active Portal User and can be selected).
- TIP! Add a Content expiration date (usually 30 days after the event closes) for the Report to automatically be removed from the portal user's view. You'll still need to Unpublish the Content to clean up the backend of Cvent.
- Click the green Publish button at the bottom of the page.
Important Note: Licensed Users (who are also Portal Users) must have the event shared with them AND the Portal Report shared with their Portal User to access data. If only the Report is shared with the Portal User (who also has a real, paid license), they will see the Report, but when they run it, no data will display.
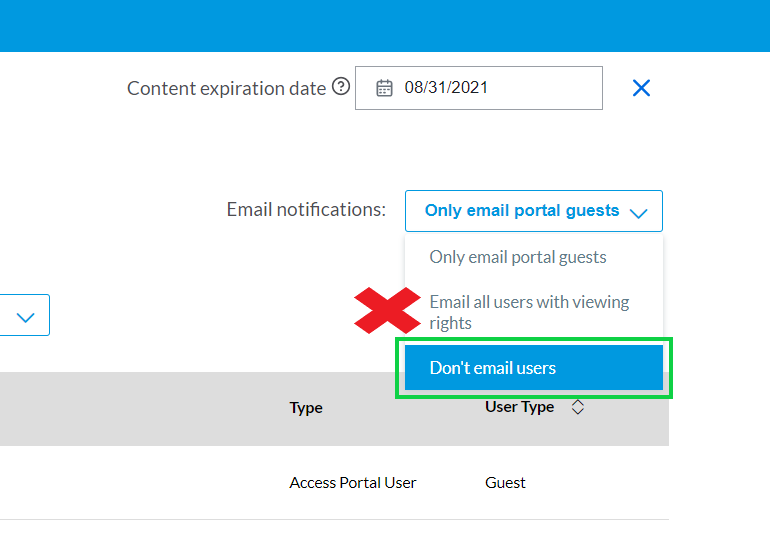
- If you do not want to notify anyone when a Report is Published, set Email notifications: Don't email users
!TIP! NEVER Email all users with viewing rights. This will email all Cvent admins and eComm specialists, in addition to the selected Portal User.
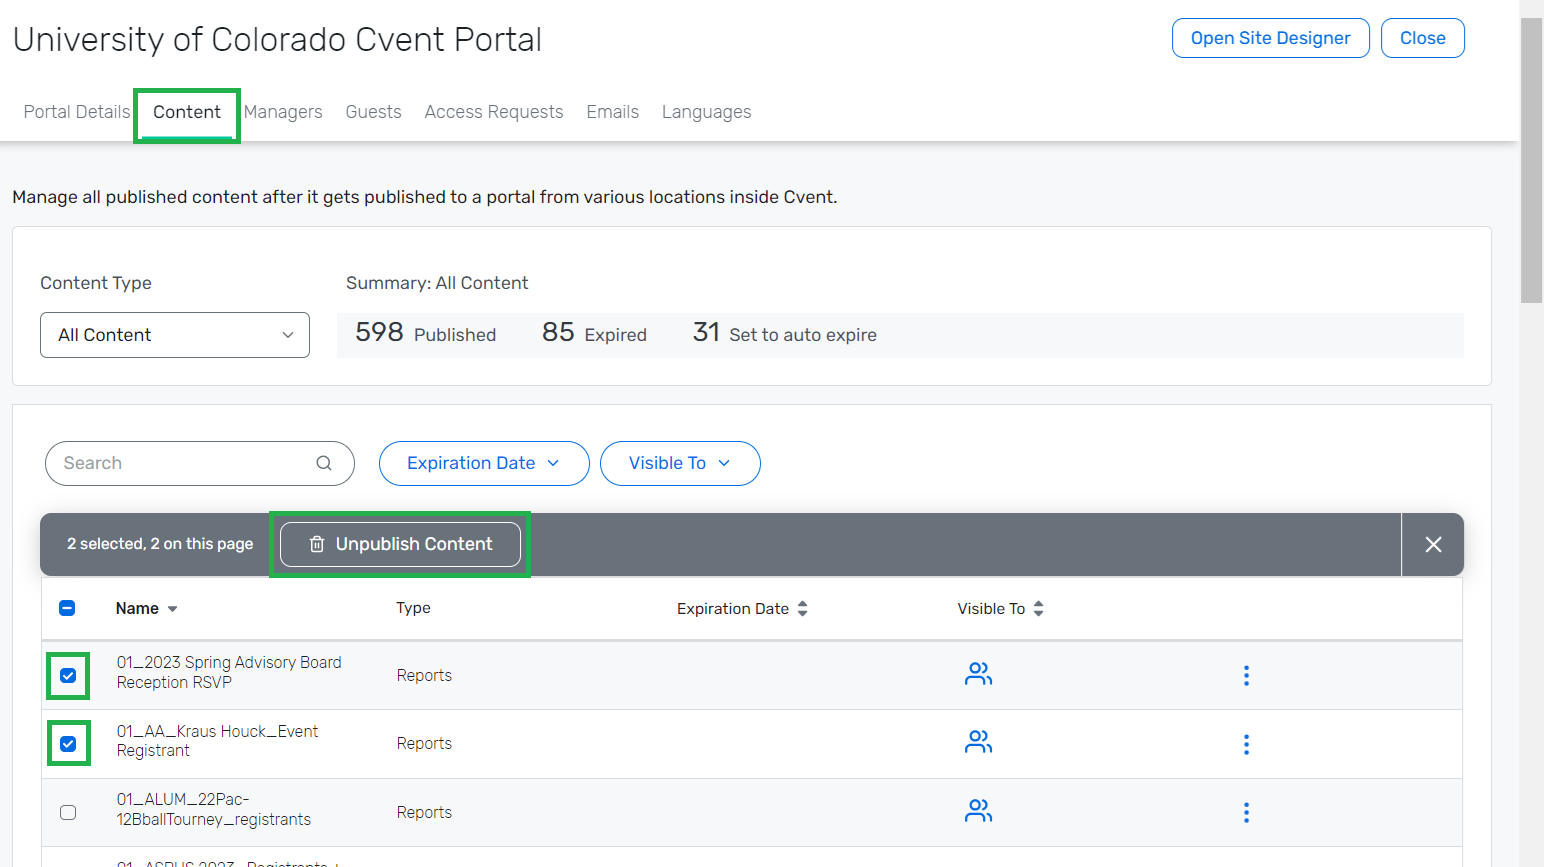
STEP 4 | Un-Publish from Portal
!TIP! Set a content expiration date when publishing a report (step 2) for automatic unpublishing from the Portal Users perspective.
NOTE Setting a content expiration on a published report (step 2) will NOT remove the report from the Portal Managers' perspective. automatic unpublishing from the Portal Users perspective. To avoid clutter for Portal Managers, it's a best practice to remove published Reports after they expire.
Manually Un-Publish Report
- Click the dot menu in the top right
- Select Admin in the dropdown
- Hover Access Portal in the navigation
- Click Access Portals on the left
- Select the University of Colorado Cvent Portal
- Navigate to the second tab: Content
- Scroll/Search for Report name
- Check the box next to the Report(s) you wish to unpublish
- Select Unpublish Content, which will pop up across the top
- !TIP! Assuming you set a Content Expiration Date when publishing, applying this filter can make Unpublishing Content even easier.
Troubleshooting
Need to resend a Portal Invitation or Remove a Portal User?
- Navigate to Admin >> Access Portals
- Select the only Portal listed
- Navigate to the Guests tab
- Check the box next to the person
- The Invited Status in the last column indicates they did not activate their account.
- Then you can Send Portal Invitation or Remove them.
