


Create Marketing Cloud Data Extensions
If you need to send communications to internal audiences (faculty, staff or students) you'll want it delivered to their campus email addresses (eg; @colorado.edu, @ucdenver.edu, @cu.edu or @uccs.edu), To do so, you'll need to send to a Data Extension. eComm specialist create Data Extensions (as part of the audience creation process) but it's the sender's responsibility to re'Start' them before each send.
APPLY YOURSELF
Those tasked with creating audiences can apply the entire process by cloning the eComm specialist Training Plan. After reading the instructions below, navigate to the Reports & Data Extensions tab to practice creating Data Extensions (populate Columns D & E).Create Salesforce Report
In Salesforce, create or modify the report that will be used to create the Data Extension. You MUST include:
- Contact ID and
- email field the message should be delivered to, like:
- UCB Email
- UCD Email
- UCCS Email
- SYS Email
- Other personalization fields, like:
- First name
- Preferred Student Name
- Preferred Employee Name
- Last name
- others
Examples of Reports prepared for Data Extensions:
CU Boulder Students | Communications for students are sent to their university email, in this case UCB Email.

CU Denver Employees | Communications for employees are sent to their university email, in this case UCD Email.

Create Data Extension
Follow along with the detailed instructions below and use the 1-pager as a quick reference moving forward.
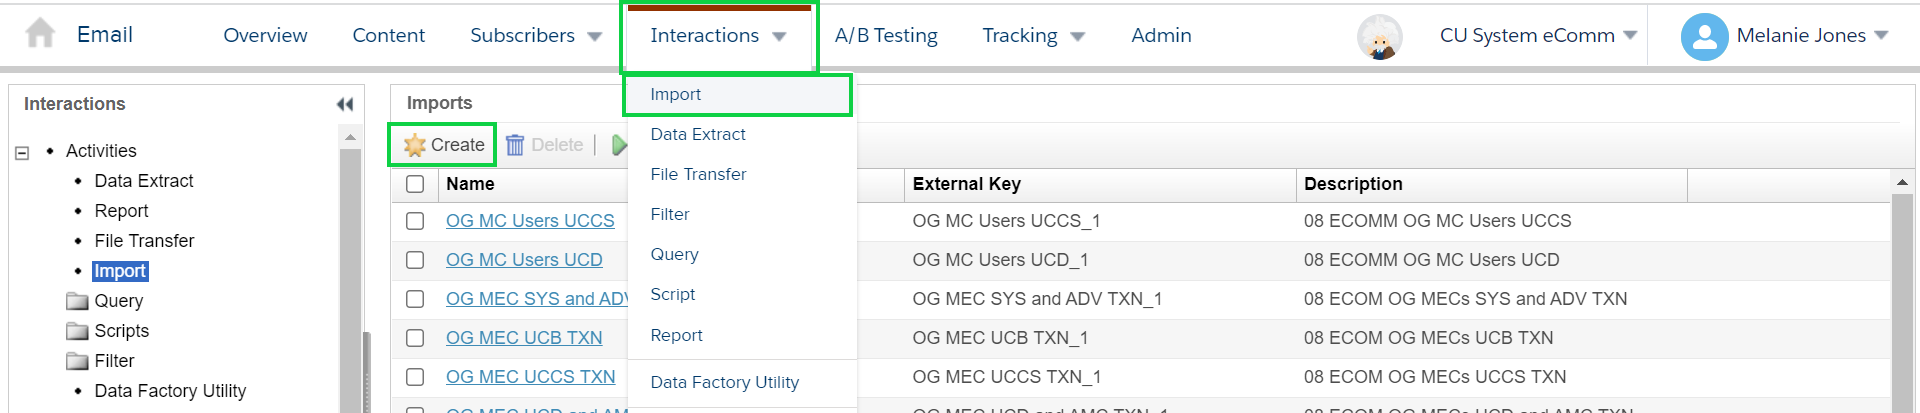
- From the Email app, hover Interactions in the navigation, then select Import in the dropdown
- Click the Create button
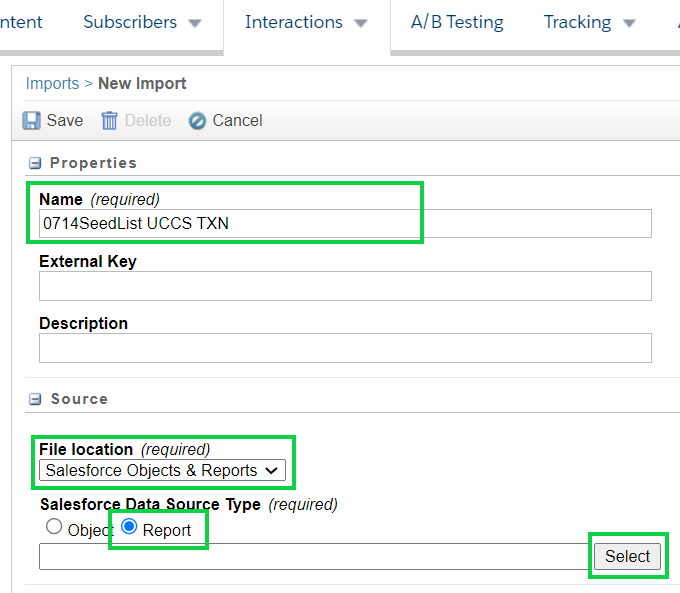
Properties
- Name your Data Extension
- Use a name similar to the Report, that aligns with the naming convention of other Data Extensions (DE)
- !IMPORTANT! Data Extension names can’t exceed 35 characters. Accidently doing so creates an unusable Data Extension that will be seen when sending, and should be deleted (instructions below).
- Leave External Key blank
- Adding a Description is encouraged but not required
Source
- Choose Salesforce Objects & Reports in the File Location dropdown
- Select the Report radio button under Salesforce Data Type
- Click the Select button
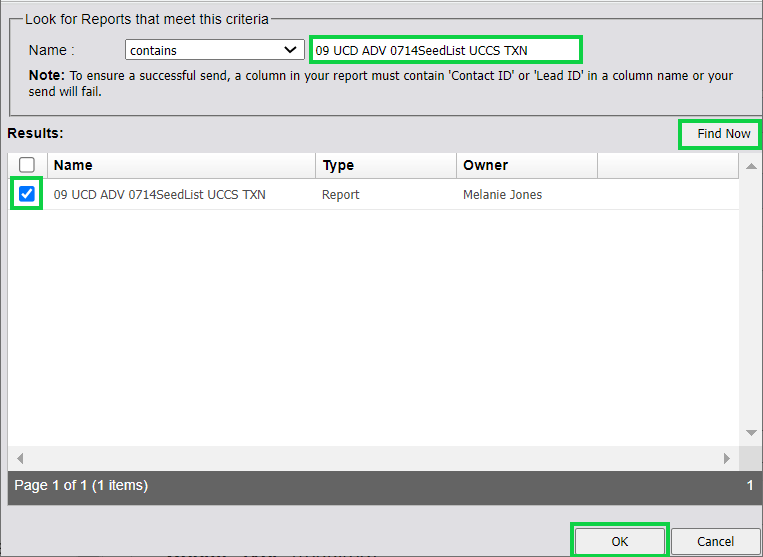
- Search for the Report name in the popup window by pasting the Report name and selecting the Find Now button
- Once found, check the box next to the Report name and select the OK button at the button of the pop-up.
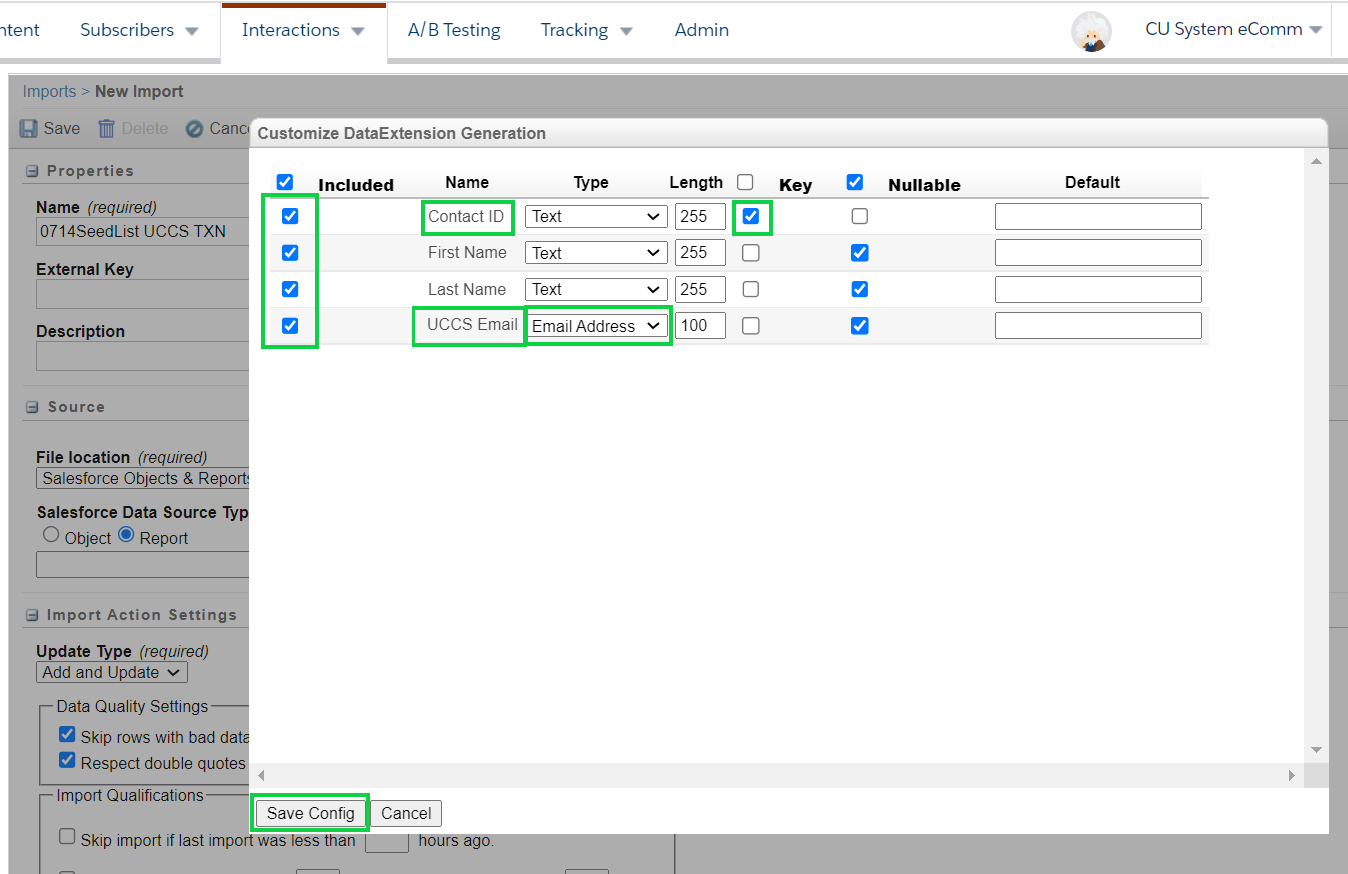
Configure Data Extension
- Included
- Contact ID
- Email Address (might be UCCS Email, UCB Email, UCD Email, Sys Email, or Email)
- Any other fields used for personalization
- Type=Email Address
- Whatever email address you are using must have the Type set to Email Address
- Key
- Contact ID will ALWAYS be the key
- Select the Save Config button in the bottom left
Import Action Settings & Import Completion Settings:
- Select Update Type of Overwrite
- Scroll to the bottom and check the box for Send notification email to and enter the email address for the user running the Data Extension
- This email address will be notified when the import completes, indicating success or failure.
- Select the Save button at the top of the screen

Run Data Extension
After the Data Extension is created, it's the sender's responsibility to re'Start' it before each send. Users can also update the notification settings (if needed) and view the Data Extension history and status.
View Data Extension Data & Configuration
NOTEBasic users cannot do the following.
Interested in seeing how a Data Extension is configured or the Data that is present after being started?
- Hover Subscriber and select Salesforce Data Extensions in the dropdown
- Click the name of the Data Extension
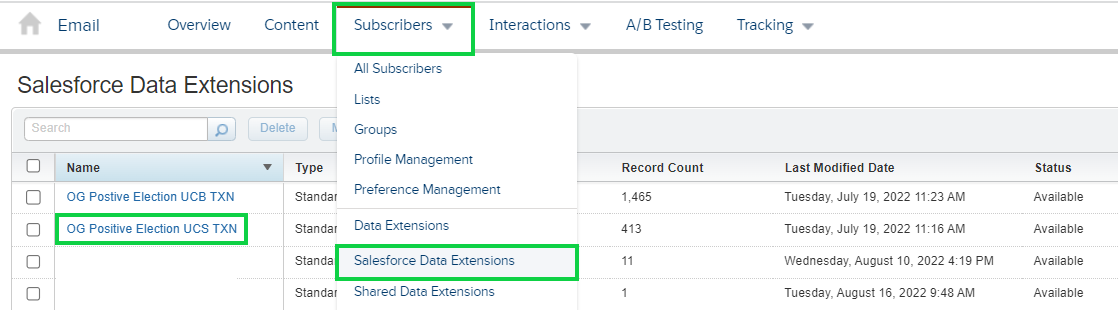
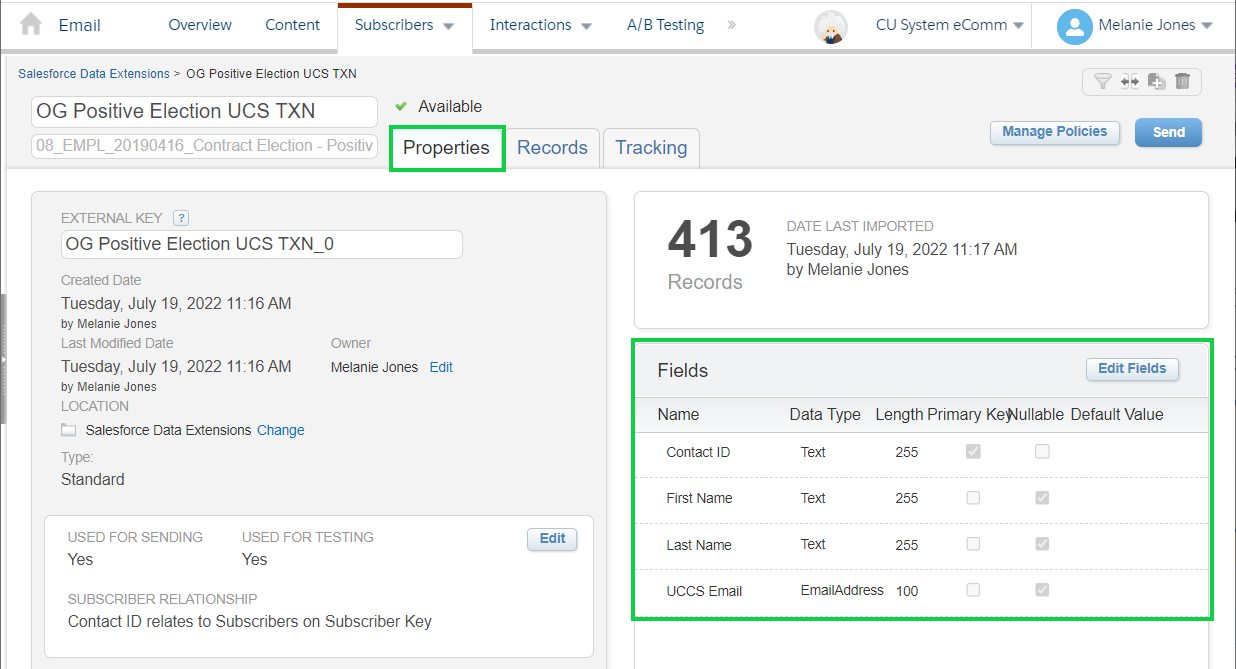
- The default tab Properties shows the Data Extension configuration and the count of individuals (413 in this example)
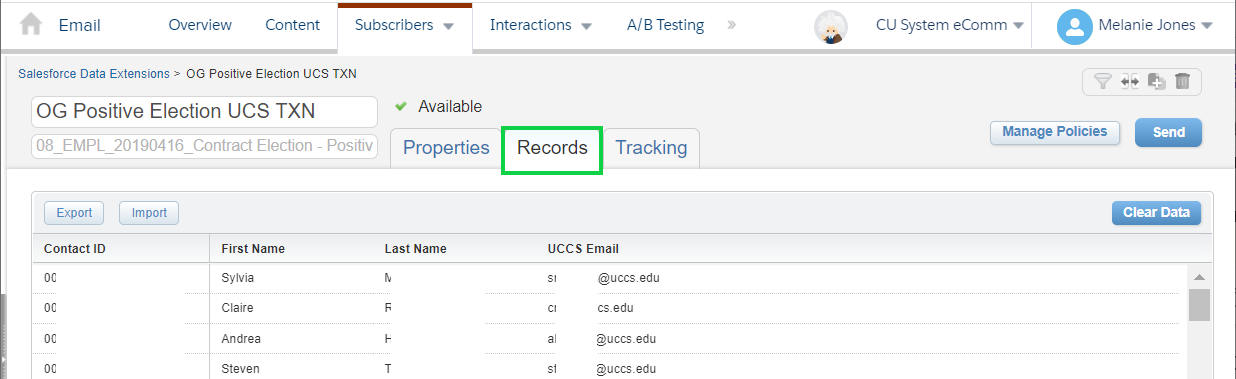
- The second tab labeled Records will show the data that populated in the Data Extension (or the audience) after being started
Delete Data Extension
Data Extension must be deleted in two different places. Failure to do so will result in confusion, including the Data Extension still being visable when sending (although unusable, resulting in a failed send).
Data Extensions accidently created with 35+ characters While you will get an error if you accidentally (corrected spelling)create a Data Extension with more than 35 characters, the reality is that Data Extension will be visable when sending (although unusable). Only the second method of deletion (outlined below) is needed to delete this Data Extension.
First
- Hover Interations, then select Import in the dowdown
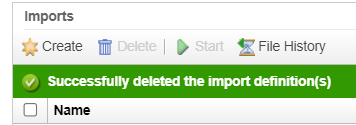
- Check the box next to the Data Extension and click the Delete button
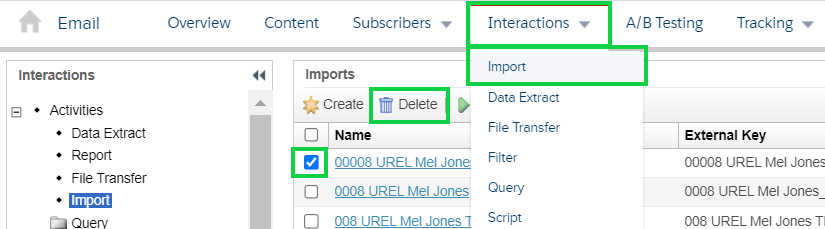
- Select the blue OK button in the pop-up to confirm
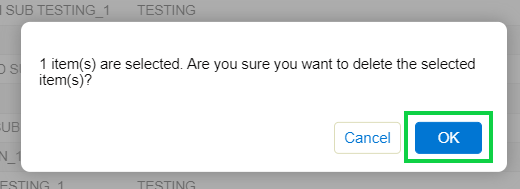
- A green Successfully deleted the import definition(s) message will appear
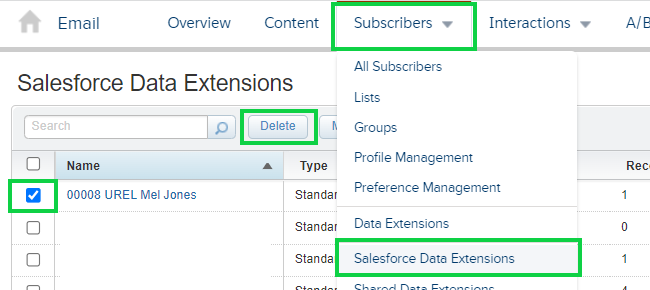
Second
- Hover Subscribers, select Salesforce Data Extensions in the dropdown
- Check the box next to the Data Extension and select Delete
TEST YOURSELF eComm specialists and other audience creators - regardless of their previous experience - are highly encouraged to complete an extensive quiz to ensure a deep understanding of Data Extensions annually. Please set aside 30-60 min. to complete the quiz of 35+ questions, many being open-ended. Do not miss the opportunity to review correct responses after submitting your answers to see how they match up for self-correction.
Related Content