


Import File to Data Extension
NOTE This task requires assistance from your eComm Specialist.
Learn how to create a Data Extension as you typically would, then Import over the data from a file. Just remember, you'll need the Contact 18 ID to Import successfully.
There are numerous use cases for importing data into a Data Extension, including but not limited to the following. Expand the '2 | Create File' section below for full details on these nuanced, common examples.
- Adding data that doesn't exist in Salesforce
- such as salutation for personalization (like Mr. & Mrs. Jones), although it could be any data
- a piece of information to drive dynamic content in an email
- adding unique URLs for each recipient (e.g., for tracking purposes or a unique survey link)
- Overwriting Existing Data
- Merge multiple Data Extensions (with different University emails) into a single Data Extension
- Incorrect Emails in Salesforce
Request a Walk-Through Importing a file over a Data Extension is simple in theory but more difficult when put into practice the first time. Some small intricacies will vary, depending on your use case. Feel free to arrange 30 min. with Melanie Jones to walk through it together by submitting a help ticket.
1 | Create Data Extension
The goal is to create a Data Extension as usual (based on a Report, which may or may not be based on a Campaign). Access the Marketing Cloud Business Unit from which the message will be sent and configure the Data Extension.
There is no need to 'Start' the Data Extension once created.
- Contact ID
- Primary Email (or any Email field)
- Other personalization fields (like First Name)
- Contact 18 ID
Create a Data Extension
Your Data Extension should be configured like the following:
- Contact ID=Key
- Primary Email Field=Email Address
- Include any fields used for personalization or dynamic content
- DO NOT INCLUDE the Contact 18 ID in the Data Extension
- Set to Overwrite
- Click Save at the top
- There is no need to Start the Data Extension, since you will import a file into it in step 3.
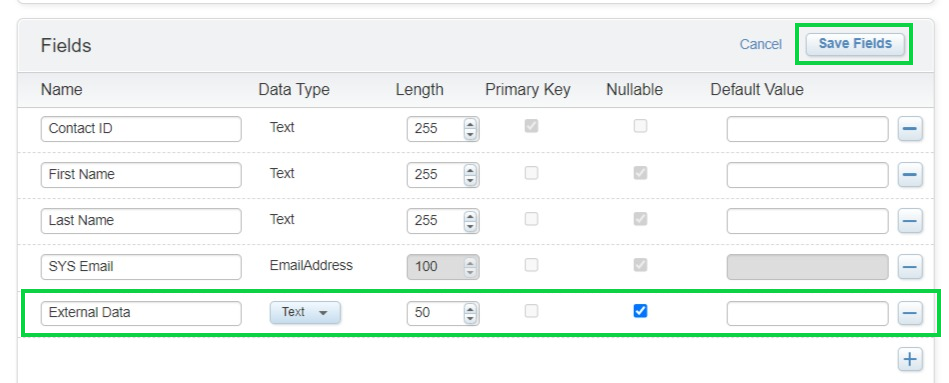
Add Column to Data Extension
With the basic Data Extension created, you need to add another column to house the data that you wish to upload. To manually add a new column to a Data Extension:
- Navigate to Subscribers >> Salesforce Data Extension
- Open the Data Extension you created
- Add a field by working in the Fields box in the bottom right
- Click the Edit Fields button
- Click the Plus icon
- Name the new field as you wish (ie External Data below)
- If the value is text, keep the data type as text (most common)
- Ensure the length number is larger than the number of characters in the field being uploaded
- Check Nullable if this value can be blank
- Provide a Default Value if you wish
- Click Save Fields in the top-right
Data Type = Currency The currency field is necessary when adding numbers with a comma (s) (e.g. 1,234.56). Add the currency sign ($) to the body content rather than in the Data Extension field. If you use Data Type = Text, a number with a comma will be rejected.
2 | Create File
There are many ways to prepare to upload a file to a Data Extension.
- Prepare a spreadsheet with columns including:
- 18-digit contact ID
- Email
- These values can vary in the domain
- Other personalization fields
- External data to add
- Save as a CSV or TXT
XLOOKUP Function
- Oftentimes, your file will need to be created by merging a Salesforce Report (with the 18-digit contact ID, email address, first name & last name) with an external file including custom information. The XLOOKUP function plays an important role in merging two sheets into a single sheet to be imported.
- Excel
- Google Sheets
See three use cases below for importing a file:
Some users wish to have external information included in their Data Extension. This could be a custom salutation for personalization (like Mr. & Mrs. Jones), a piece of information to drive dynamic content in an email, or adding unique URLs for each recipient.
- Create a Report with the required columns and export:
- 18 Digit Contact ID
- University Email
- field used to merge files (step 2 below)
- other personalization fields
- Use XLOOKUP function to merge an external file with the exported Salesforce Report
- Save as a file with columns labeled
Adding External Information for AMPscript
- While uploading external details to a Data Extension to create custom emails with AMPscript is a valid use-case, it is not supported by eComm. Users with AMPscript experience are welcome to explore this functionality, noting eComm will not be able to provide resources or support.
Some of the campuses recently noticed many employees/students have an incorrect/missing email in their university email field. This issue stems from the source system (Campus Solutions or HRMS) and takes time to remedy. As an immediate workaround, you can Import over the Subscribers in Marketing Cloud that have incorrect/missing emails.
- Create a Report with the respective University Email Field
- Required Columns include: 18-digit Contact ID, University Email, and other personalization fields
- Export Report
- Manually input new email addresses in place of the incorrect ones
- Save as a file with columns labeled
Merge multiple Data Extensions (with different University emails) into a single Data Extension.
Employee Services is a good example of using this Import feature. Typically, when they email across the campuses, they send to four different Data Extensions to target four different university emails. We can essentially merge those into one Data Extension so they can leverage A/B Testing and Journey Builder (which don’t support including multiple data extensions).
- Download and open the file
- Look for past 401(a) reports in SF
- Save As a new report
- Rename the report with the date and add the description
- Open old campaign
- Clone campaign
- Rename the campaign with the date
- Share the campaign with the Employee Services Public Group
- Update campaign name in SF report filter
- Excel file
- Add Campaign column > copy and paste campaign ID
- Add Status column = Sent
- Copy and paste all columns
- Apsona
- Campaign Members > Tools > Import
- Copy and paste from Excel file
- Add=no checking > Tab > Next
- Map Employee ID
- Map Campaign ID
- Map Status
- Download any rejections. Sometimes Employee ID is wrong.
- Go to the Salesforce report and campaign, and make sure the total number matches
- Export a report for each campus using the filters
- Save as a file (CSV or TXT)
- Make sure there aren’t blank email addresses. If there are, look them up in SF and add the email address if they have a campus address.
- Copy from the campus email column and paste it into the email column (keep it all in one Excel file)
- Do this process for each campus (1, 5, 2 & 3 & 6, 4). Usually, there won’t be anyone for the System, but be sure to check.
- Copy and paste all columns to the first exported file, and make sure to copy and paste the campus emails into the email column.
- Go to Marketing Cloud to create the data extension
- Open Employee Services BU
- Email > Interactions > Import > Create
[image]
- Put DO NOT RUN in DE description
- Salesforce Objects & Reports > Search Report
- Campaign Name, Contact ID, First Name, Last Name, Email
- Contact ID is Key
- Update Email type to Email Address
- Save & Start
- Go to DE in Salesforce Data Extensions > DE > Records Tab > Import > Select excel file
[image]
[image]
- Double-check check import and make sure there aren’t personal email addresses
- Move DE to Shared Items > Employee Services folder
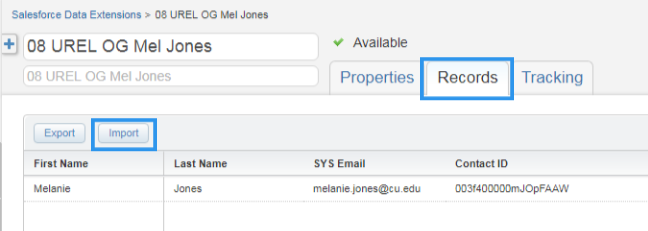
3 | Import File to Data Extension
- Navigate to Content Builder
- Hover Subscriptions, then drill into Salesforce Data Extensions
- Select your Data Extension name to open details
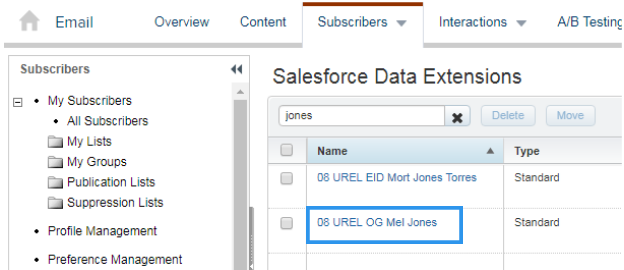
- Select tab two titled Records
- Click Import in the top left
- File: Find your saved file
- Delimiter: Comma or Tab (depending on the file type)
- Date Format: Leave as Default - English
- Import Type: IT DEPENDS
- Overwrite (most common) | Removes existing records and overwrites with file data
- Add & Update | Add new records and update existing, will not remove existing
- Add Only | Add new records, do not update or remove existing records
- Update Only | Update existing records, do not add new or remove existing records
- Import Options: Leave as Default - do not check/uncheck anything
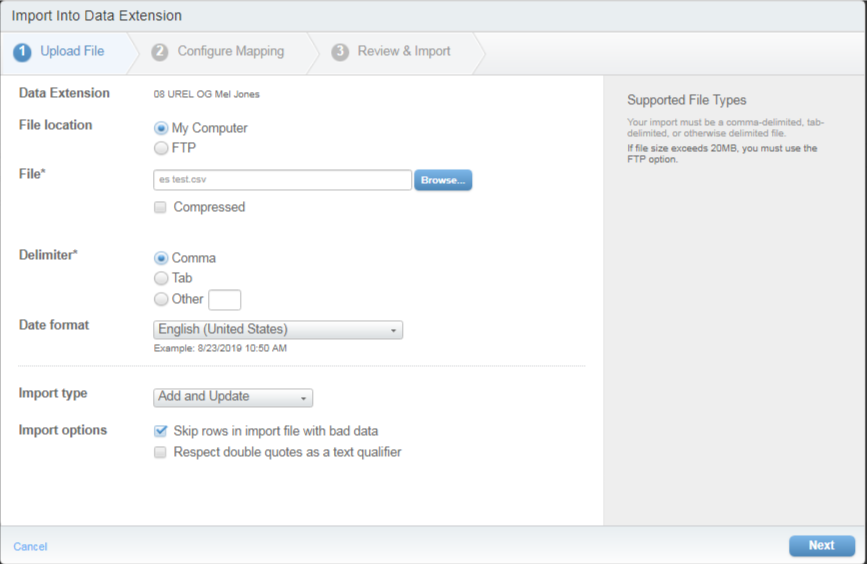
- Select Next in the bottom right
STEP 1 | Create Data Extension The Import Type you chose here (Step 3A | Import file Type) depends on your desired outcome. This will also impact if you Start your Data Extension in Step 1 or not.
Select Map Manually:
- Contact 18 ID=Contact ID
- Email=Email
- Other fields=other fields
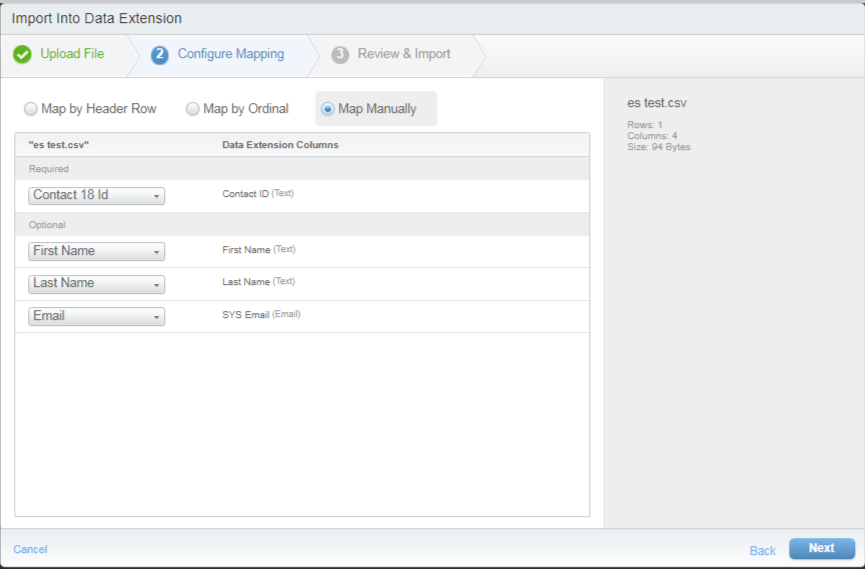
- Select Next in the bottom right
- Review your Import details
- Select Import in the bottom right
- You’ll receive an email notice once complete. Confirm it is successful.
- Failed Imports often read a case-sensitive issue. Confirm you are importing a file with Contact 18 ID rather than just the Contact ID (15-digit).
WARNING
Do NOT restart your Data Extension after completing the import. The data you just imported will be overwritten.
4 | Add Personalization to Email & Test
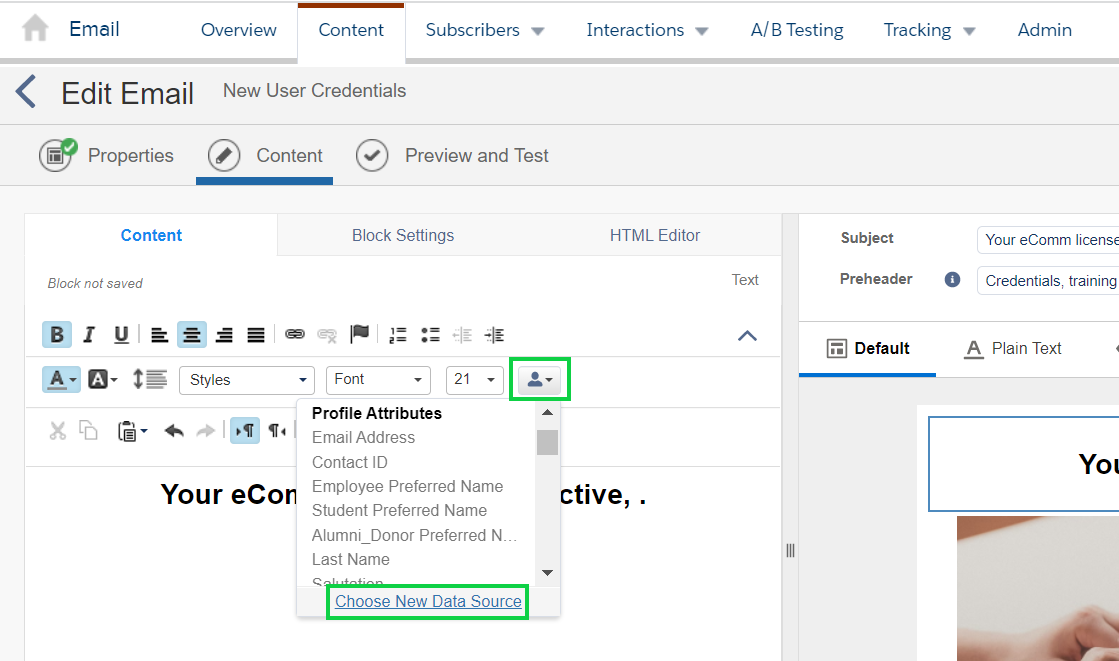
- To add personalization, click into the content block of the email
- Select the Personalization icon and click Choose New Data Source in the dropdown
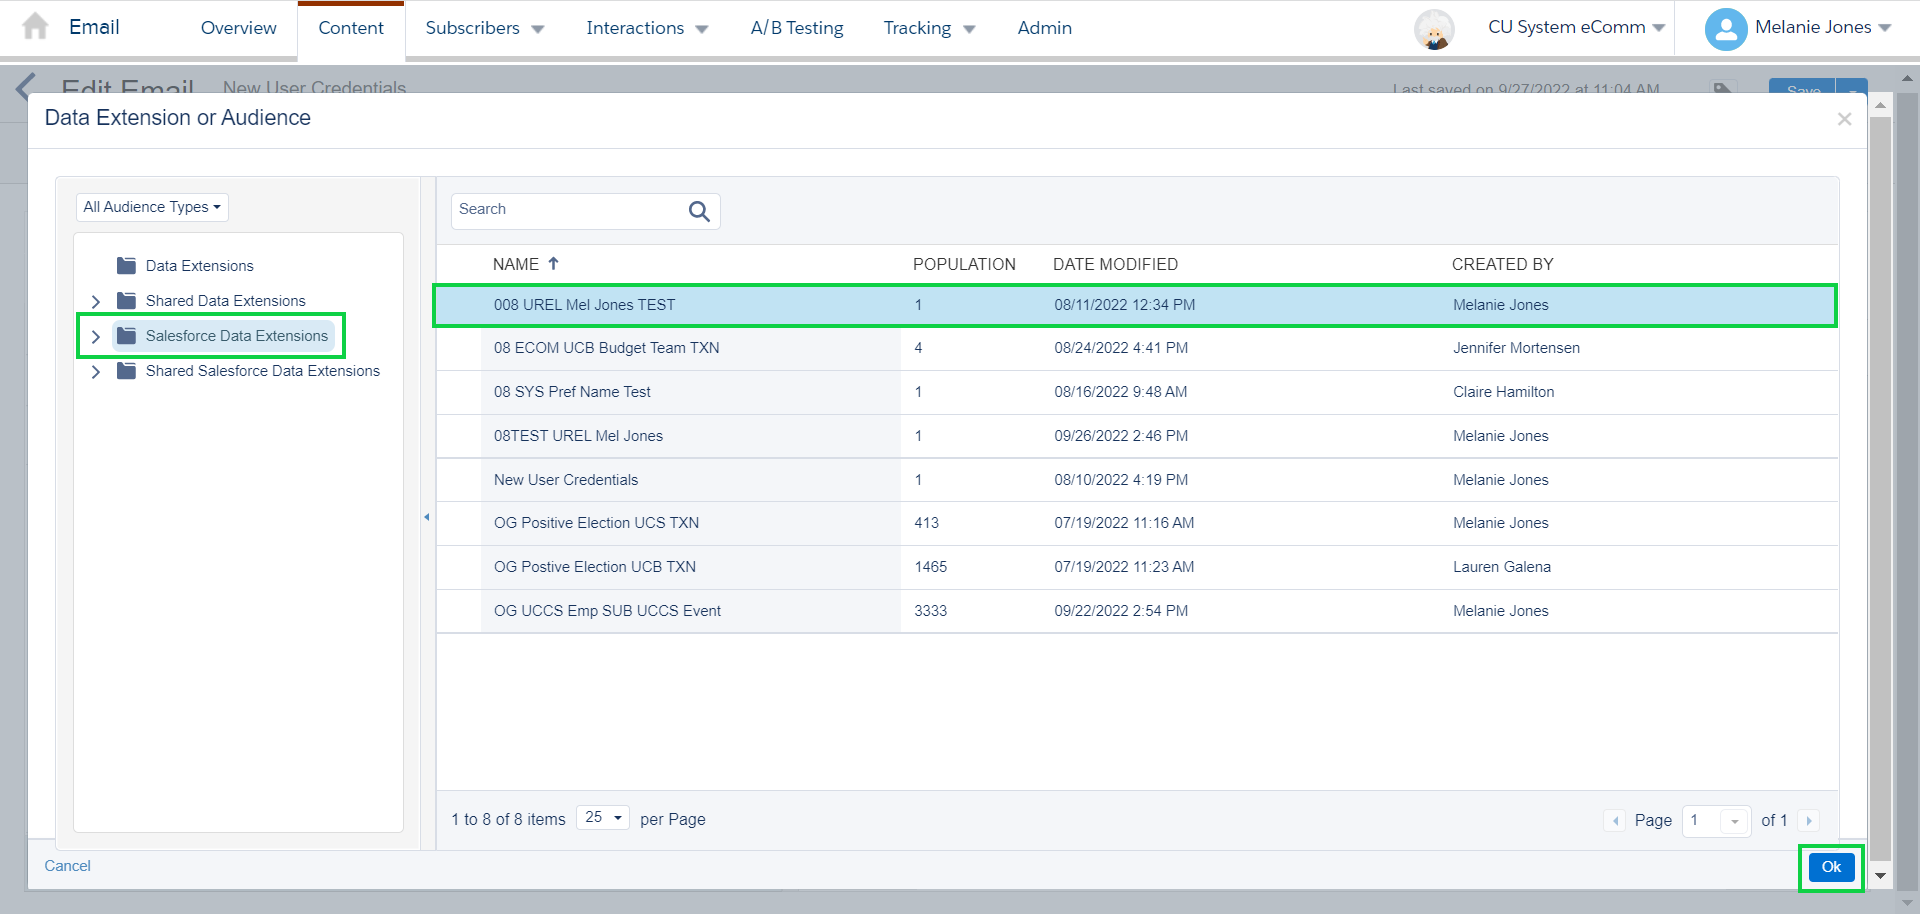
- Choose your data source by opening the Salesforce Data Extensions folder
- Select your Data Extension and click the blue OK button in the bottom right
- Now, when you select the Personalization icon, the Data Extension selected should be listed with available fields
- Select the attribute you wish to add
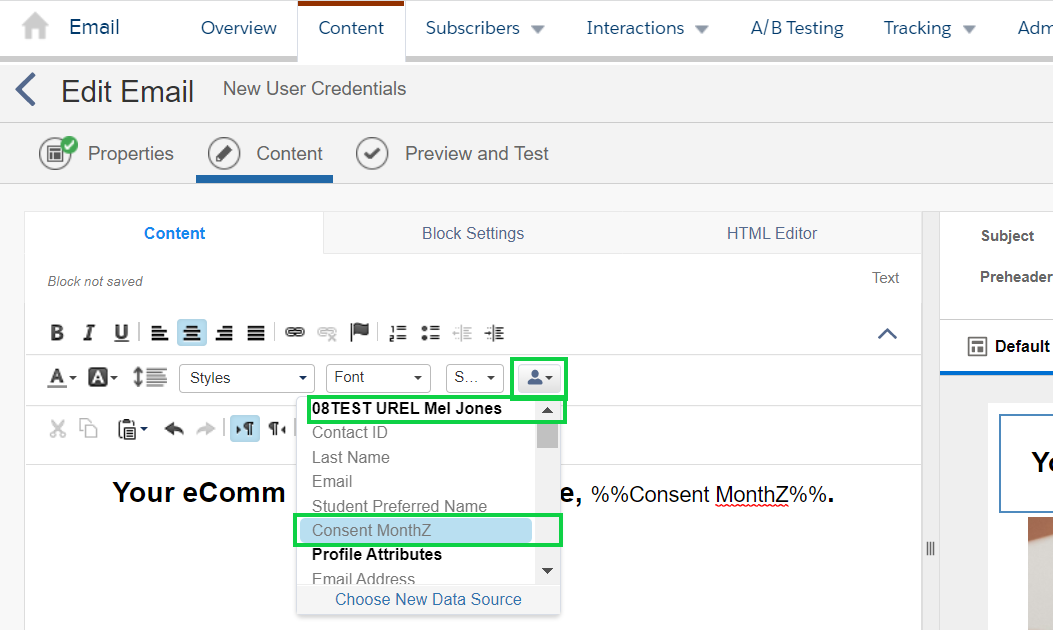
Don't forget to test your personalization.