Understanding Email Journeys
Email journeys deliver personalized and engaging communications to constituents using automation through the Journey Builder tool in Marketing Cloud. Journeys can be as complicated as a series of emails sent over a year with various decision splits to as simple as a single email sent once a year.
Focusing on the individual constituent experience — by sending emails to an audience based on defined triggers — allows you to deliver relevant and timely information encouraging engagement. For example, rather than manually sending an email to all alumni with birthdays in October on October 1, with Journey Builder, you can send a birthday email on the person’s actual birthday (as long as their birthday is on their contact record).
Benefits of Email Journeys
- Increase engagement (open rates and click-through rates)
- Save time and increase efficiency
- Reach the right audience, at the right time, with the right message
- A/B test with Path Optimizer
- Use Einstein's Send Time Optimization to deliver emails at the time constituents are more likely to open their messages
Examples of Email Journeys
- Alumni birthday email sent on a person's birthday
- New hire information and resources over the first 90 days
- Alumni volunteer opportunity information over 3 months for people who sign up to receive alumni news
- A welcome email when a constituent subscribes or opts-in to receive specific communications
High-level Considerations When Brainstorming an Email Journey
- What is the business need, and how will a journey support the need?
- What is the goal of the journey and the related KPIs (metrics of success)?
- Who is the target audience? What data will be used in the Journey?
- Journey Builder audiences that do not use data in Salesforce are not recommended for Journey Builder. Instead, an Audience Creator specialist can create a Data Extension with external data and send it via an alternative method (not Journey Builder).
- Is the content for each email decided or created already and will not change before journey launch? Journey email content needs to be complete before a journey can launch.
How to Get Started
Role Definitions & Resources
- Customer | Those requesting a Journey will be referred to as customers below and are often Marketing Cloud users.
- Journey Planning Worksheet Template (request access to copy)
- Email Journey Map Template (request access to copy)
- MEC / eComm Specialist / Super User | All three names will be referred to in the following instructions as 'MEC'. Those in these roles may also be the customer.
- Journey Builder Basics | 30 min.
- Quick Start: Create and Send a Message in Journey Builder | 20 min.
- Journey Builder Campaigns | 40 min.
- System | Refers to the system team who will collaborate with the customer on the Journey.
1 | Complete Worksheet (Customer)
- Complete the Journey Planning Worksheet and the Email Journey Map (request access to both to copy). Ask your MEC for support if useful.
- These documents will help with brainstorming the process, but don’t worry about completing them in full before asking your MEC to review them and submit a ticket on your behalf.
2 | Review Request, Create Audience & Request Consult (MEC)
- Review the Request
- Ensure a majority of the request sheet has been populated and you think it's a good candidate for a Journey.
- Journey Builder audiences that do not use data in Salesforce are not recommended for Journey Builder. Instead, an Audience Creator specialist can create a Data Extension with external data and send it via an alternative method (not Journey Builder).
- Create Audience (add details to worksheet)
- Create a folder in the Shared Data Extension folder matching the BU name and move the DE to this folder.
- Request a consultation by submitting a help ticket (selecting Marketing Cloud, and then Journey Builder from the dropdown menu). Requests will be addressed in the order they are received.
- Include your Journey Planning Worksheet and Email Journey Map Template !!!! on the audience created in your ticket submission.
3 | Consult (System, Customer, MEC)
System
- After the MEC submits the ticket, the System team will set up a meeting with the MEC and customer(s) to talk about the email journey idea and outline next steps.
- The System team will provide direction on populating additional details on the worksheet (rows in blue).
- The System team will enable Journey Builder access to customers.???
- The System team will configure Synchronized Data Extensions in the Business Unit (if not already).???
Customer
- After the MEC submits the ticket, the System team will set up a meeting with the MEC and customer(s) to talk about the email journey idea and outline next steps.
- The System team will provide direction on populating final details on the worksheet (details below).
- The customer decides if they want to move forward after the consultation.
Populate Additional Worksheet Details: Define Roles
- Who will create the Journey?
- System, MEC, Customer
- Who will launch the Journey (step 7)?
- System, MEC, or Customer
- Who will view analytics (step 8)?
- MEC or Customer
MEC
- After the MEC submits the ticket, the System team will set up a meeting with the MEC and customer(s) to talk about the email journey idea and outline next steps.
4 | Create Materials (Customer)
After deciding to move forward:
- The Journey Planning Worksheet and Email Journey Map should be populated in their entirety (if not already).
- The customer prepares all required materials.
- All content should be placed in a single folder (with content only for the Journey).
- The email names should start numerically to indicate the order of the emails and alphabetically to clarify different paths (eg: 1, 2, 3A, 4A, 3B).
Populate Additional Worksheet Details
- Provide the location (folder name) of the assets.
Resources
5 | Official Request (MEC, System, Customer)
MEC
- The MEC should review the Journey Planning Worksheet & Email Journey Map to confirm they are populated in their entirety and include them in the official request.
- Verify the assets are in the folder indicated and labeled correctly. Confirm the Data Extension is in the Shared folder indicated.
- Make an official Journey Builder request by submitting a help ticket (selecting Marketing Cloud, and then Journey Builder from the dropdown menu).
System
- The request will be prioritized among other eComm work, and a feasible timeline will be determined.
- The customer & MEC will be notified of the timeline via email, including when eComm can start and finish the build.
- If the timeline doesn't work for the customer: Journey Request canceled, and the MEC may support the request via other send options.
- If the timeline works for the customer: eComm builds the Journey and reviews it with the customer within 4 weeks of starting work.
Customer
- After receiving the official request, the system team will:
- send an email to the Customer & MEC of the timeline, including when eComm can start and finish the build.
- send a meeting invite to the customer and MEC to review the Journey and approve it (step 6).
6 | Journey Review & Approval (System, Customer, MEC)
System
- The system team will review the Journey with the customer and MEC.
Customer & MEC
- Attend a meeting (invite sent by system, including the MEC) to review the Journey and approve it (step 5).
- The customer has 2 weeks to make minor, final edits. Major edits will result in going back to step 3.
Populate Additional Worksheet Details
- Launch Date/Time
7 | Journey Launch! (System)
- The system office will launch the Journey on the agreed-upon date/time.
- If the eComm specialist or customer wishes to launch it themselves, they can (defined in step 3).??
8 | Analytics (MEC, Customer)
The MEC or Customer (defined in step 3) can view analytics after 48 hours of launch. There are numerous places to view this data, based on what you are interested in.
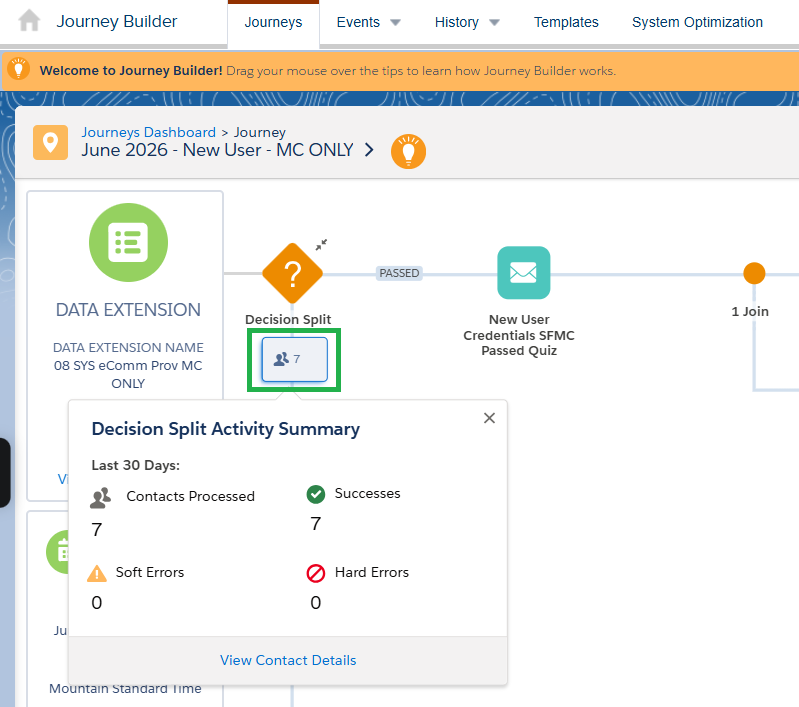
Journey Builder
- Journey Builder >> Select Journey >> Scroll to relevant step and click person icon to see details (how many received, any errors)
Tracking
- Email Studio >> select Tracking in the navigation >> select Sends in the dropdown
- Expand My Tracking, Journey Builder Sends, the Journey Name, then the relevant Version with the (+) symbol to the left of the folder name
Intelligence Reports
- Analytics Builder >> Intelligence Reports >> Journey Performance by Email >> Filter by Journey(s)
Triggered Send or Individual Email Result (IER)s in Salesforce
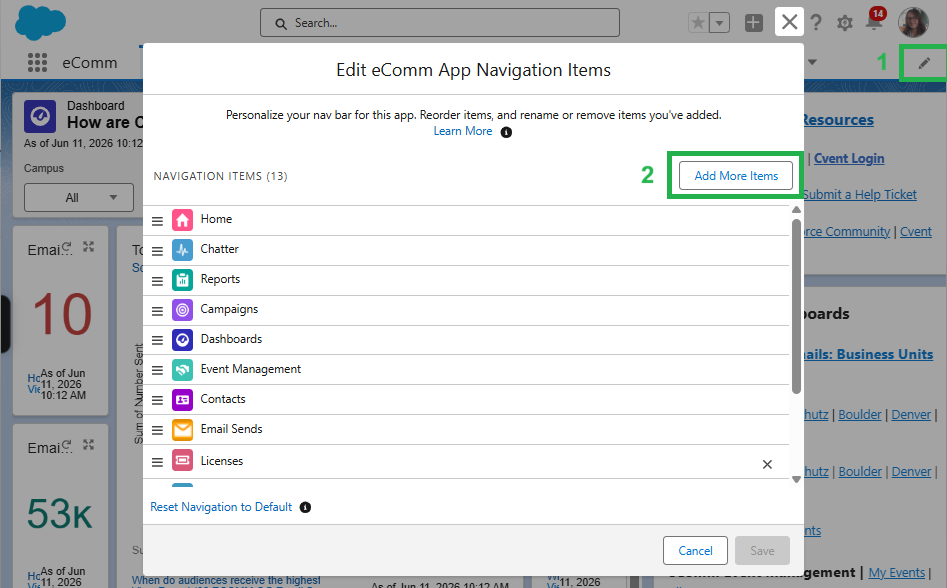
- Learn more about creating a Salesforce Report (if you have access) by starting with a template (found in the Salesforce Reporting wiki >> scroll to Templates section >> Engagement tab >> expand Email Performance & Email Engagement to find relevant templates for Journey Builder.
- Triggered Send tab: To get this tab added to your navigation in Salesforce, you'll need to customize it. Select the pencil icon in the far right of the navigation >> in the pop-up, select the Add More Items button >> on the left select All >> then search for Triggered Sends >> click Add 1 Nav Items button >> Save