Personalizing your Email with Preferred Name
Although CU communicators engage with over 1.5 million contacts through Salesforce and Marketing Cloud, each contact represents an important member of the CU family. Contacts have their own interests, relationships with CU, and email preferences. Let your constituents know that they are important and recognized by using first name or salutation personalization tags in your email.
When to Use First Name Personalization
Most communicators agree that email personalization leads to higher engagement rates among constituents. But what happens when first name personalization goes awry and we end up alienating the exact audience with whom we want to engage?
Despite our best efforts, incorrect email personalization can break relationships rather than build them. This wiki will help you understand how and when to personalize communication in Marketing Cloud so that you can achieve your marketing goals.
KEY TAKEAWAY Only use first name personalization in communications to students. Communications to other audiences (faculty, staff, alumni, etc.) should NOT include first name personalization based on our current data model.
Why can first name personalization be problematic?
Personalizing email communication with first name is one of the most common ways in which communicators customize their messages. While the goal of personalizing with first name is a good one, it can quickly become problematic and unintentionally hurtful given eComm's current data model.
While the first name field in Salesforce may look correct in many cases, it is only populated from one of eComm's source systems, Campus Solutions, a student-focused database. Constituents who have a different first name in a different source system may face a situation in which their first name isn't correct in communications.
eComm's data model pulls data from three source systems at CU:
- Campus Solutions (CS): CU Students
- Human Capital Managament (HCM): CU Employees
- Advance: CU Alumni, Donors, and Friends
The first names in these source systems sometimes vary, such as in this example:
A former student with the first name Bobby (in Campus Solutions) later becomes a CU employee and prefers to be called Robert (in HCM) in a professional setting. Since eComm's current data model only populates first name from Campus Solutions, emails personalized with first name will read as "Dear Bobby" rather than as "Dear Robert."
The use of an incorrect first name is particularly hurtful when it involves the use of a deadname that was updated in one source system but ultimately not passed down to the first name field in Salesforce.
How can we fix this problem?
The eComm team is working with source system leaders in University Information Services (UIS) to determine the best way to correct this issue to ensure that preferred names populate in Salesforce correctly based on a number of factors (such as student vs. employee vs. alumni or the most recent date on which a preferred name was provided in one of CU's source systems). We recognize the urgency of this issue and are working to resolve it as quickly as possible. We will provide updates to eComm users as they become available.
If you have questions in the interim time, please contact Jennifer Mortensen.
Marketing Cloud Personalization
Commonly referred to as data tags, Marketing Cloud allows you to personalize your communication for your constituents. If you wish to add personalization for data that already exists in Salesforce, it's less involved than adding data outside of Salesforce to a Data Extension (such as a unique Qualtrics link or formal salutation). In this example, we'll focus on the simpler and most popular option - adding first name to your communication.
REQUIRED The data you want to include as personalization must exist as a column in your Salesforce Report (first name in this example). If you send to a Data Extension, the Data Extension must have been configured to include the First Name column as well. Be sure to check that each of your constituents has the personalization you are using (First Name) and don't forget to test.
Using a Profile Attribute
1. To add a profile attribute, log into Marketing Cloud, navigate to email studio, and open the email to which you want to add the attribute.
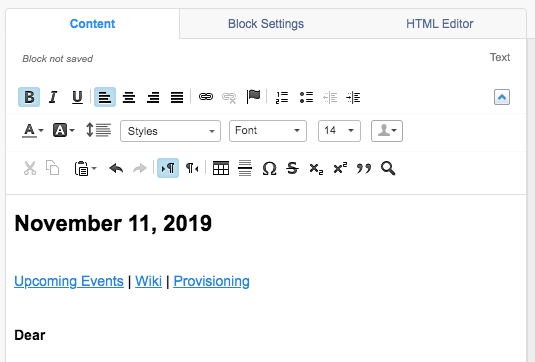
2. Open the content block to which you want to add the attribute. Then, click where you want the attribute to appear. In the screen shot below, we are using "Dear" followed by a space then the recipient's first name as an example.

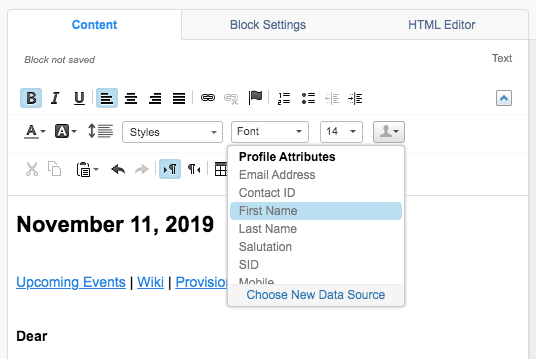
3. Locate the person / silhouette icon from the menu items above your content. Click the drop down arrow next to it to view your options. In our example we've selected first name. Click done when you are finished.

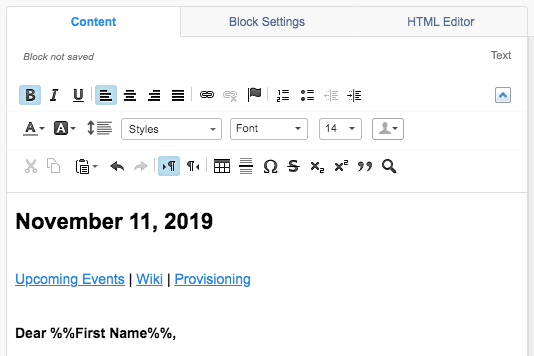
4. Marketing Cloud will add the first name profile attribute to your content in the format %%First Name%%. Be sure to include any needed punctuation after the attribute.

5. Test and Preview the personalization to confirm it merges as desired.
RECOMMENDATION We recommend users always 1) add an attribute to the email with Marketing Cloud's dropdown menu rather than typing it and 2) test.
Subject Lines and Preheaders
You can also use profile attributes in your subject lines and preheaders.
1. Click in the body of the subject line or preheader to open menu options. Place your cursor where you want to add the attribute.
2. Locate the person / silhouette icon from the menu items above your content. Click the drop down arrow next to it to select a profile attribute to add. Click done when you are finished.

3. The profile attribute populates in the subject line with the format %%First Name%%. Be sure to add any needed punctuation after the attribute. Click done when you are finished.

4. Preview and test the personalization to confirm it merges as desired.
Related Content
- How can I test or preview the personalized information?
- How can I add other personalized information to my Marketing Cloud email, such as address?
- How can I add personalized information that is not in Salesforce to my Marketing Cloud email?
- What if I want to add personalized data where the data tag doesn't already exist in Marketing Cloud?


