


eComm Event Management
eComm Event Management is a Salesforce solution for managing simple, free events. These types of events have a limited amount of customization and features, which makes launching an event quick and easy.
Have feedback or suggestions? Let us know.
Registrant Experience
See for yourself what the registrant experience is like, including the emails they will receive.
Event Registration & Emails
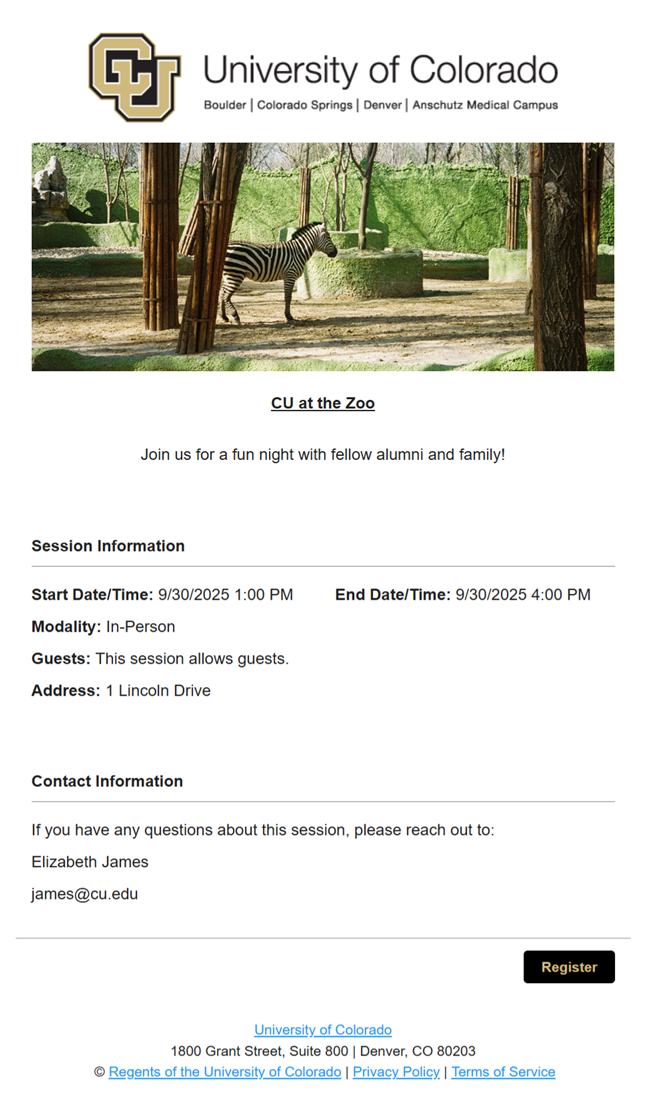
Event Registration Website
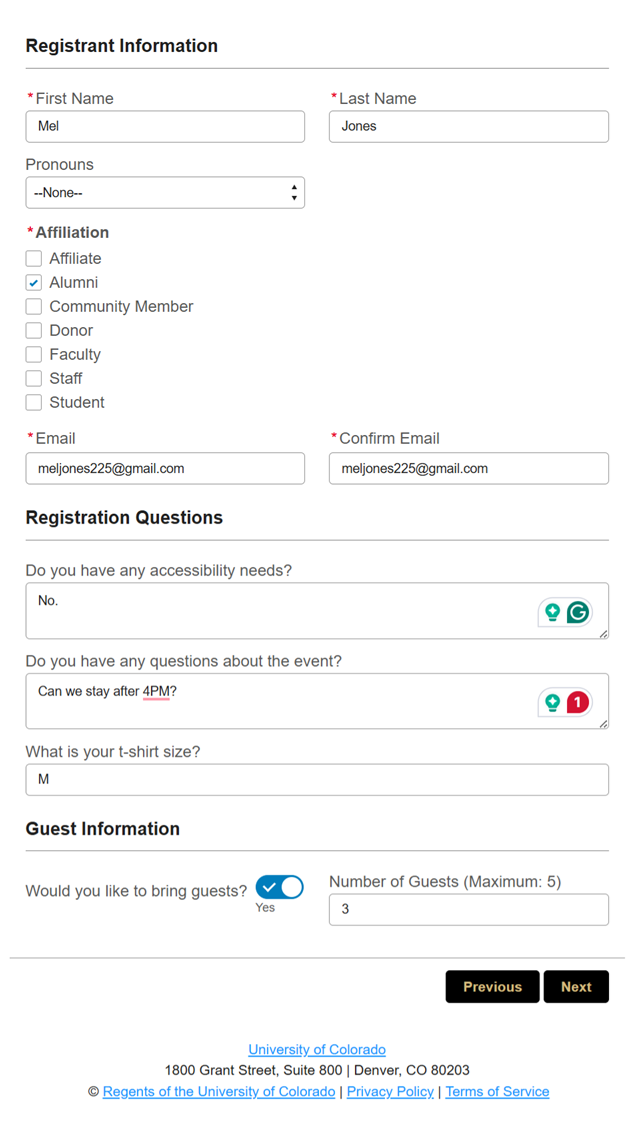
Registrant Information
Confirmation Page

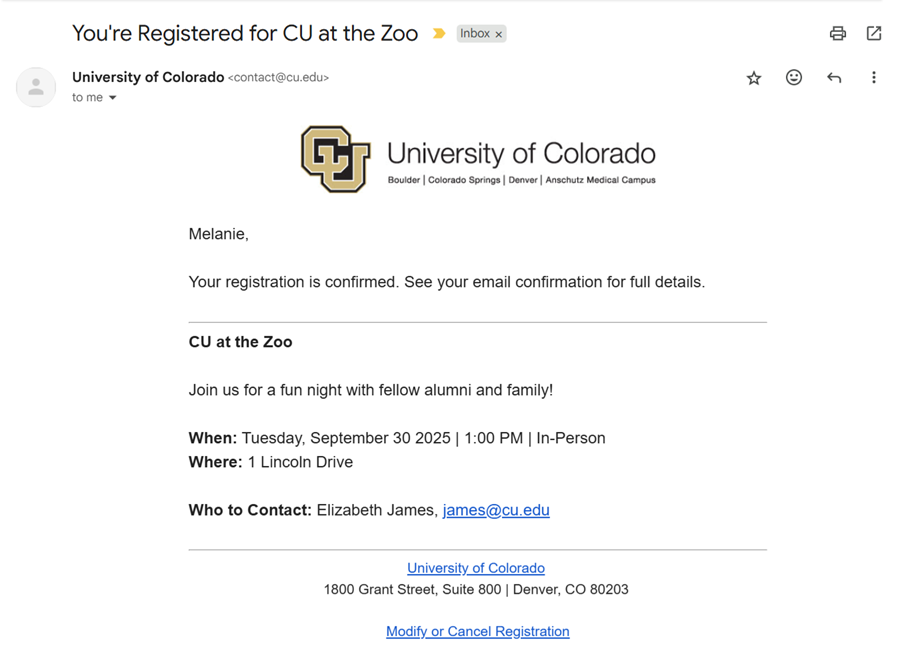
Registration Confirmation
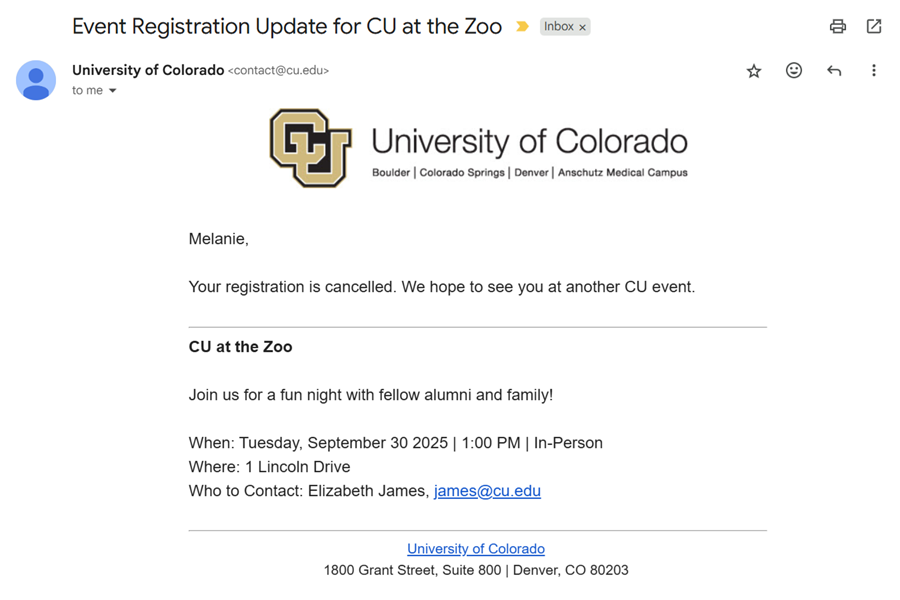
Cancellation
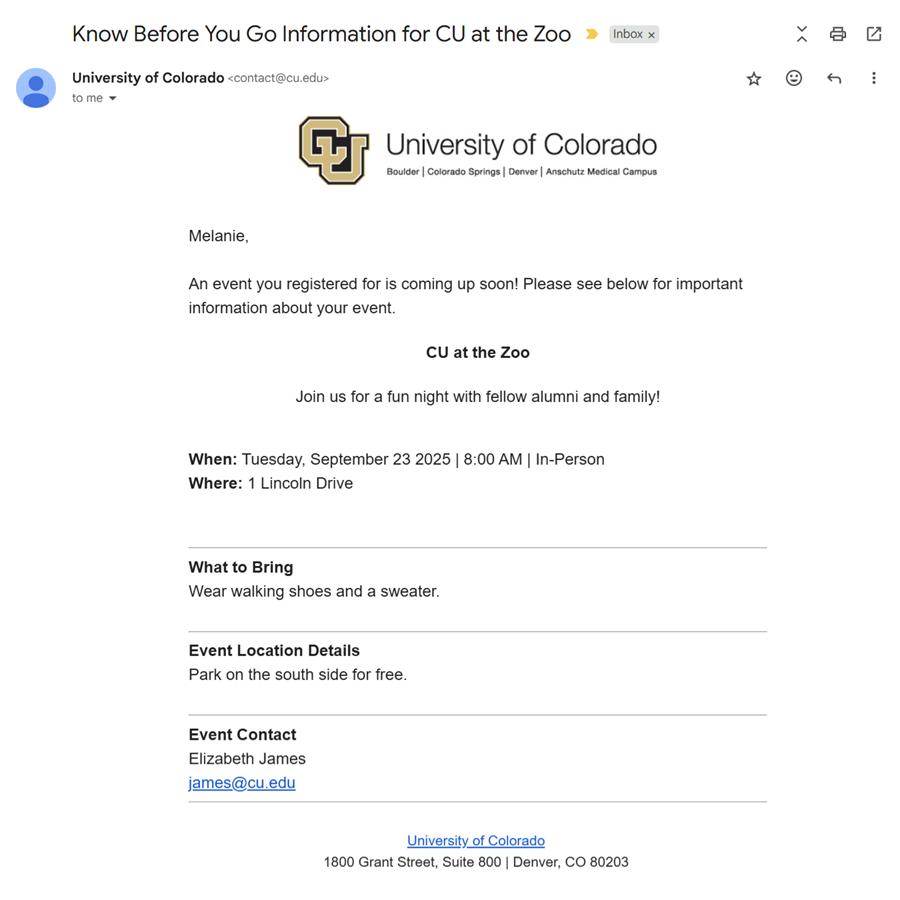
Know Before You Go (KBYG)
Note that KBYG is only sent if the event manager has enabled this email 6+ days before the session start date. This email is sent automatically 5 days before the session starts.
Event Creation
The eComm Event Management solution is intended for simple, free events - but there are still many components to configure.
Avoid Using the 'Previous' button While going through the wizard, you will see a 'Previous' button - but we ask you not to use it. Instead, use the 'Next' button to complete the path until you get back to the eComm Event Management homepage.
Login & Add 'Event Management'
Log in to Salesforce
- Navigate to the eComm login page
- Select Login to Salesforce & eComm Event Management (left)
- Select your campus and input your single sign-on (SSO) University credentials
- Select Event Management found in the top navigation (the navigation order and options may vary for each individual)

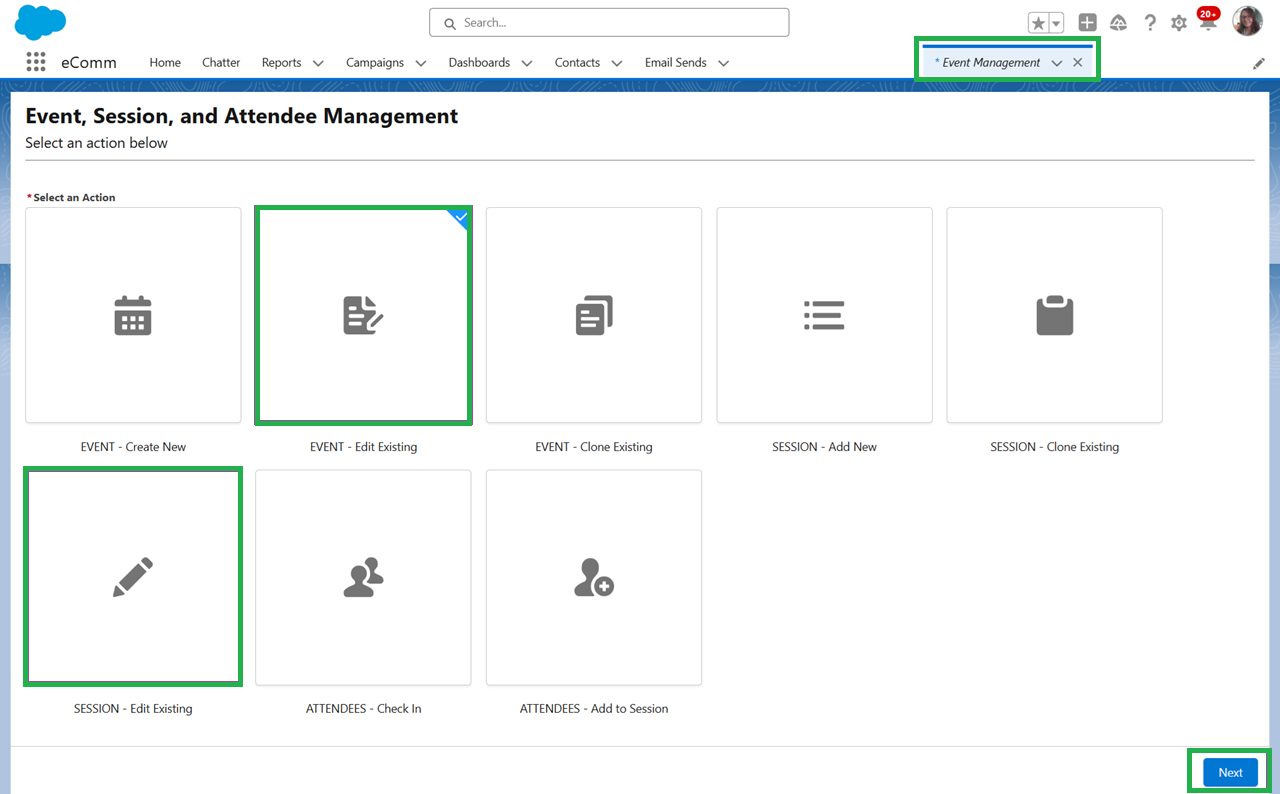
Create Event & Session(s)
Event Management
- Select Event Management in the top navigation (see login instructions above)

Create Event
- Select the first EVENT - Create Event icon
- Click the blue Next button in the bottom right
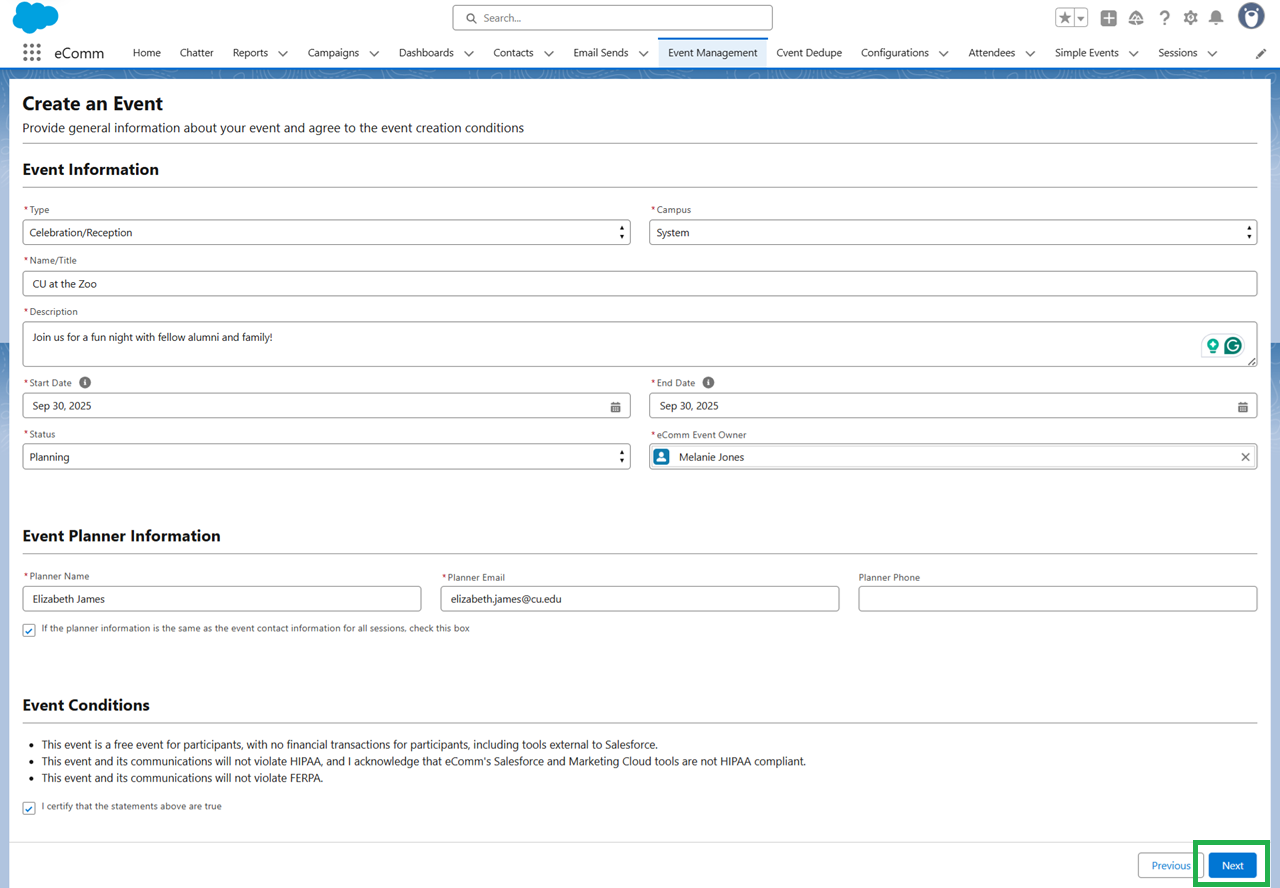
- Populate details for the event. Then, click the blue "Next" button in the bottom right.
- Campus | Indicate the Campus you are employed at (not where your event is hosted). This also determines which campus logo and footer will display on registration pages and the from information used in emails.
- Description | There is a 1000-character limit at this time. The event description appears on the event registration site and in all of the automatically sent emails to attendees.
- Status (active, planning, cancelled, closed, inactive) | Only events in the active or planning stage show up on the list to edit an existing event.
- eComm Event Owner | Search for your name (this is the person in Salesforce creating the event, which is different from the Event Planner, found in the section below). This allows you to manage this event in the future.
If the planner information is the same as the event contact information for all sessions, check this box | Note: every event will have at least one session (defined on a later page)
- Details will be displayed in your event registration and emails for constituents to view.
Image, Registration Confirmation & Cancellation Messages
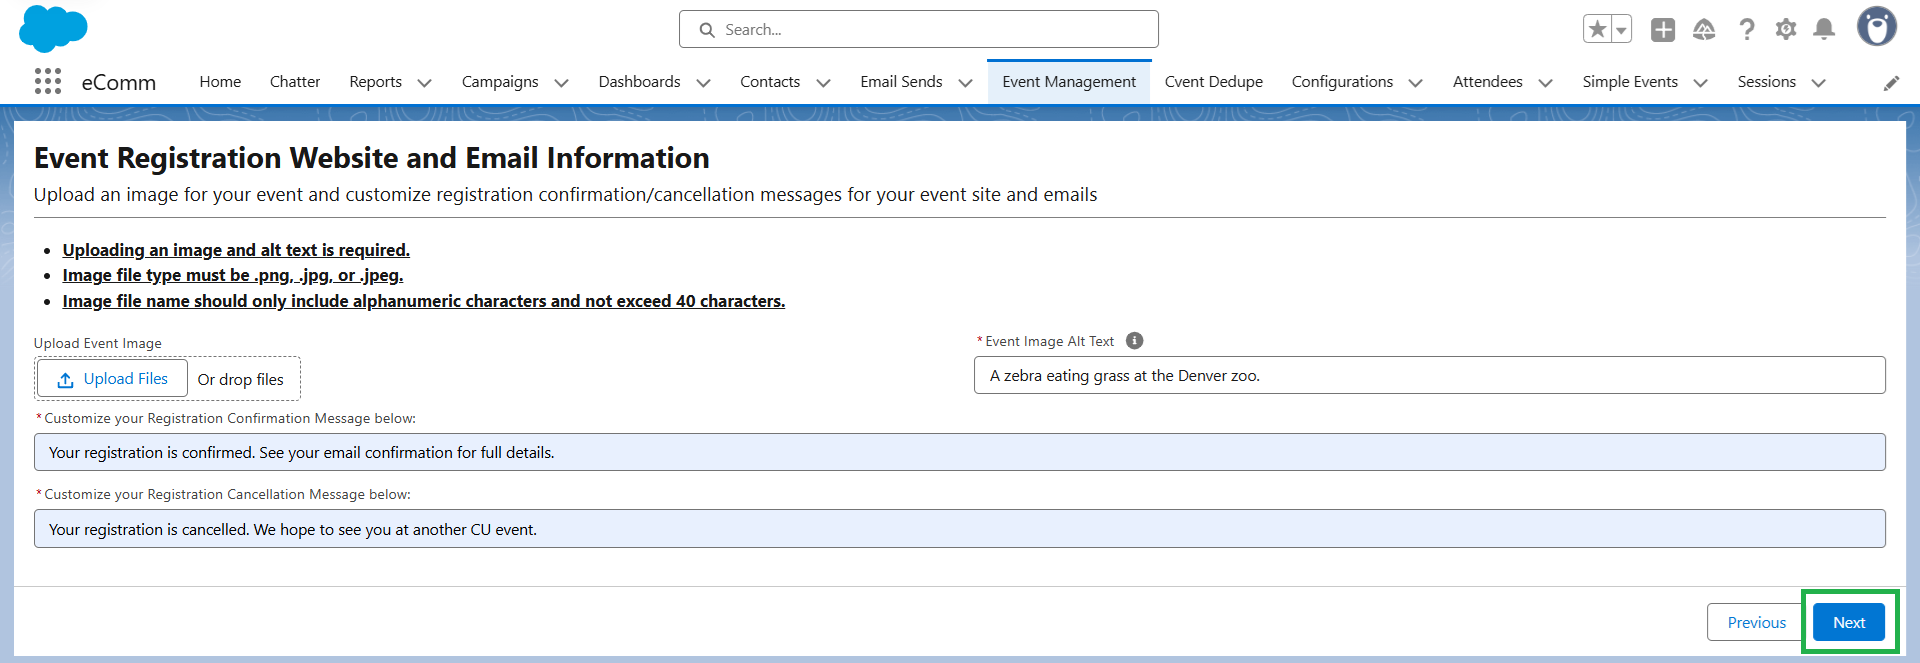
- Upload an image that will be displayed under your campus logo on the registration page.
- Note: When you upload an image, a pop-up appears to select Done. Once the pop-up is gone, there is no indication that the image has been uploaded (although it has).
- Event Image Alt Text is an accessibility best practice and required.
Image Notes
- Check the image name BEFORE you upload! The image name is limited to 40 characters, and you should only use letters and numbers in the name. If the name is too long or contains special characters, you may see an error. Rename the image and upload it again.
- Uploaded images should be between 400-1000 pixels wide. Uploading oversized images can impact how the registration pages display. View your registration URL and upload a different image if necessary.
- Confirmation & Cancellation Messages
- Provide text that will display for the registrant after they register, modify, or cancel. These fields have a 300-character limit.
- The confirmation and cancellation messages populate in the event emails to the attendees.
- You can add URLs in these messages, but know that if your event is virtual, in the next step, you will add the virtual URL in a specific field which will populate in the confirmation email automatically. Therefore, you do not have to put a virtual event URL in the confirmation message unless you'd like to.
- Tip: If you have other events or a website with additional ways attendees can get involved, consider adding that to the cancellation message. Example: Sorry to see you go! See our calendar here for more events: <insert website url>
- For events with multiple sessions, remember that confirmation and cancellation messages go to attendees regardless of which session your attendee registers for. In the email, the attendees receive the confirmation/cancellation message at the top of the email, and the event details, such as date, time, location, etc., are below that (see the registrant experience for an example).
- Select the blue Next button in the bottom right.
Create a Session
- Every event needs at least 1 session.
- Event date vs Session date
- Why enter the date more than once? This is because some events could span a few days, and within that, you can have multiple sessions.
- Note: At this time, sessions can only be one day (they cannot span multiple dates).
- Attendees are emailed session information, specifically for what they registered for.
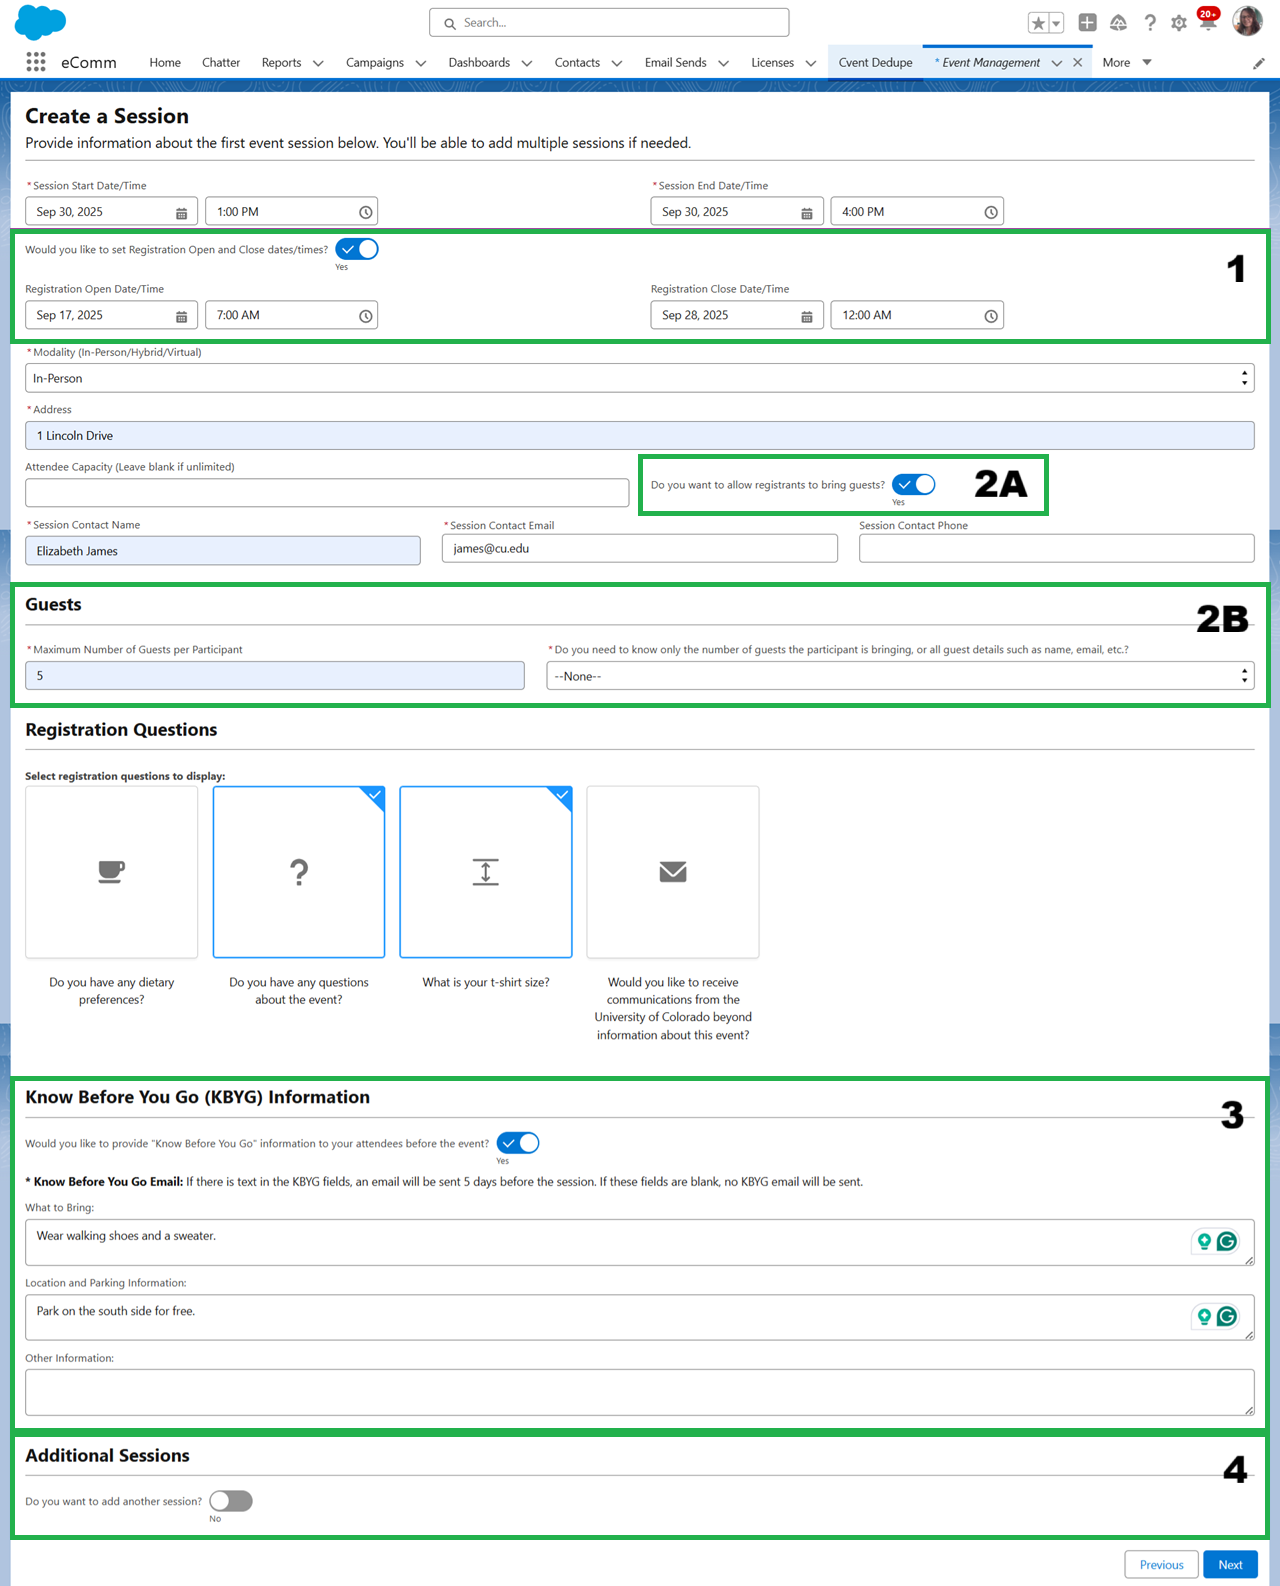
- Populate details for a session.
- Hybrid Event Tip | If you want to limit capacity for a hybrid event where in-person and virtual sessions have different limits, a best practice is to set up two different sessions - one in-person and one virtual for the same day/time with different capacities set for each. Otherwise, if you choose hybrid for modality, and set a capacity, it will apply the capacity to the total from the in-person and virtual sessions.
- Virtual Events| If you choose virtual for the modality, you will need to enter the URL in the virtual URL field. Note that the URL will auto-populate in the confirmation email in the "event location" area for every event email to attendees. You do not need to separately add the URL to the confirmation message unless you want to.
- Session Contact
- The session contact can be different from the event owner. The session contact information is shown on the event registration site and in all emails sent to attendees.
- Know Before You Go Email
- Event Managers can enable or disable the email. If there is text in the KBYG fields, it will send an email 5 days before the session start date.
- If you want to edit the KBYG email information, you will need to update this area 6 days or more before the session start date.
- Note that each box within the KBYG section is used within the email template and has a character limit of 255 (see the Registrant Experience section for an example) to build a seamless email to the attendee. If you add more than 255 characters in any of the KBYG sections, you may see an "unhandled exception" error, and your session will not save.
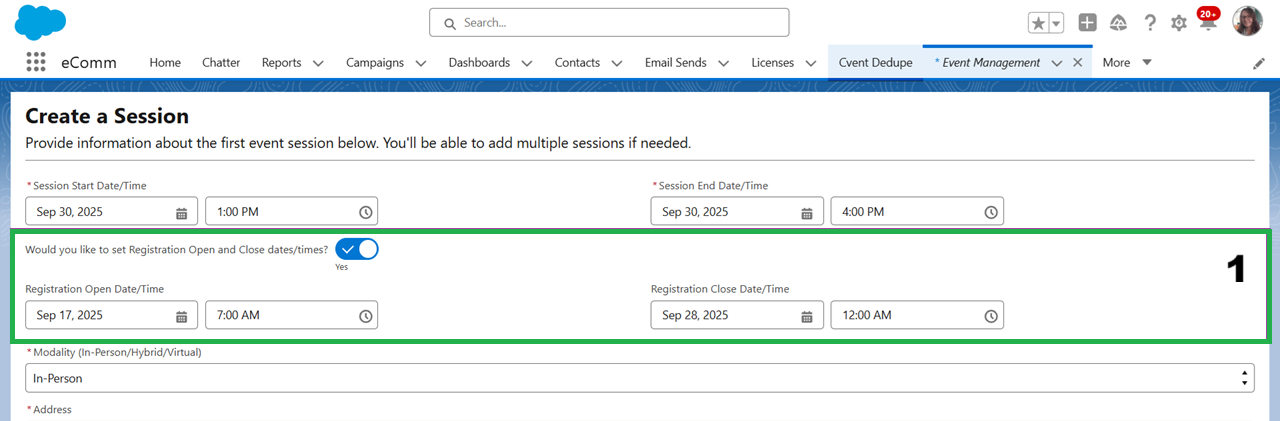
- Many additional options can be enabled for a more robust event, including:
- 1 | Would you like to set Registration Open and Close dates/times?
- 2 | Do you want to allow registrants to bring guests?
- If you enable all guest details, the attendee will need to enter name, email, etc for the guest, although email is not required for guests. If an email is entered for a guest, they will be matched to an existing contact or created as a standard contact in eComm's Salesforce. If no email is entered, the guest will appear on your registered list but will not be created as a contact in Salesforce.
- If you enable only the number of guests, when attendees register, they will be prompted to enter the number of guests. It will tell them what the guest limit is.
- If an attendee registers with guests and later cancels their registration, it will cancel their guests as well.
- 3 | Would you like to receive communications from the University of Colorado beyond information about this event?
- This should only be used if you intend to manually track or add folks to a subscription list or otherwise manually use this data. There are no automations for this question at this time.
- 4 | Additional Sessions
- Event Registration URL
- The event registration URL is populated in a dashboard you can access after you complete the "Create a Session" step. The confirmation message at the end of this step has a link to the dashboard.
- Your event has been created!
- Select Next to go back to the Event Management homepage.

Edit Event & Session(s)
- You can edit existing events or sessions by navigating to Event Management in the top navigation.
- Select the action you wish to take, then click the blue Next button in the bottom right.
Accessibility
- Every event has an open-text question asking the participants if they have any accessibility needs. This cannot be removed from the event.
- Event managers are expected to monitor responses to this question via one of the event dashboards and communicate with participants as needed.
- Event managers can add general statements about accessibility in the event description, event emails (event confirmation and KBYG), or send additional emails through Marketing Cloud.
- If you need to reach out to a particular registrant, do so via an Outlook message. See the Dashboard & Reports section below for details.
- Learn more about accessibility.
Testing
- Use the real event URL to complete a test registration exactly as true registrants will. You can also cancel your registration from the confirmation email.
- You will not be able to preview the 'Know Before You Go' message.
Troubleshooting
Delete a Session
Users cannot currently delete a session. We recommend you 'EDIT - Existing Session' and change the session date to one that's already passed. Sessions with a date that has already passed will not display on the registration site.
Delete an Event
Users cannot delete an event. You can 'EDIT - Existing Event' and change the status to 'Canceled'.
Error During Event Creation
- Avoid using the 'Previous' button and instead use the 'Next' button to go through all the steps (even if you make no changes), until getting back to the Event Management homepage.
- We are working to remove the 'Previous' button as an option.
- Be mindful of adhering to character limits. Some of these include:
- Description | There is a 1000-character limit.
- Registration Confirmation & Cancellation Messages | These fields have a 300-character limit.
- Know Before You Go Message (What to Bring, Location and Parking Information, Other Information) | These fields have a 255-character limit.
Event Closed / Not Open
If you view your registration site, but can't actually register, it's likely due to how the event is configured:
- Confirm the event you made has at least one associated session. The wizard should have walked you through these steps when you created the event, but they can also be added after if it was missed. From the eComm Event Management homepage:
- Confirm an event has a session by selecting 'SESSION - Edit Existing'. Choose the event, and confirm there is at least one session listed. If there is not, from the eComm Event Management homepage, select 'SESSION - Add New', and associate it with the existing event.
- Confirm that at least one session associated with the event has registration open and close dates/times that align with when you are viewing the registration site. You can view these by selecting 'SESSION - Edit Existing' from the eComm Event Management homepage.
Missing Event Image
- From the eComm Event Management Homepage, select 'EVENT - Edit Existing' to upload an image again. Make sure you are adhering to the following requirements:
- The image name is limited to 40 characters, and you should only use letters and numbers in the name. If the name is too long or contains special characters, you may see an error. Rename the image and upload it again.
- Uploaded images should be between 400-1000 pixels wide. Uploading oversized images can impact how the registration pages display. View your registration URL and upload a different image if necessary.
Emails
There are numerous emails that will be sent to the registrant throughout the event lifecycle.
From Email Address
- The "From" email is set to your campus name as the sender name and cannot be customized further.
- Each event has your event contact information listed on the registration site and in every email body, so registrants can reach out that way. If they hit "reply" on the email, it goes to an inbox managed by folks - including eComm Specialists - at each campus. Those messages will be forwarded along to the event planner.
Automatic Registrant Emails | Confirm, Modify, Cancel & KBYG
Attendees are emailed session information, specifically for what they registered for. This includes relevant information such as event description, date, time, location (including virtual event URL), etc. Email templates are not customizable, although the text that goes in the body of the email is customizable, such as the confirmation or cancellation message. The event owner fills out these details when creating the event. See the Registrant Experience for examples of these emails.
Registration Confirmation & Cancellation | Required
- Emails confirming registration or cancellation are automatically sent at the time the action is taken.
- These fields have a 300-character limit.
- The confirmation and cancellation messages populate in the event emails to the attendees.
- You can add URLs in these messages, but know that if your event is virtual, you will add the virtual URL in a specific field, which will populate in the confirmation email automatically. Therefore, you do not have to put a virtual event URL in the confirmation message unless you'd like to.
- Tip: If you have other events or a website with additional ways attendees can get involved, consider adding that to the cancellation message. Example: Sorry to see you go! See our calendar here for more events: <insert website url>
- For events with multiple sessions, remember that confirmation and cancellation messages go to attendees regardless of which session your attendee registers for. In the email, the attendees receive the confirmation/cancellation message at the top of the email, and the event details, such as date, time, location, etc., are below that (see the registrant experience for an example).
Know Before You Go (KBYG) | Optional
- The event manager can enable or disable the KBYG email. If there is any text in the KBYG field sections, the email is enabled.
- The KBYG email is sent 5 days before the session starts. Additional KBYG messages would need to be sent via Marketing Cloud.
- If you want to edit the KBYG email information, you will need to update this area 6 days or more before the session start date.
- Note that each box within the KBYG section is used within the email template and has a character limit of 255 (see the Registrant Experience section for an example) to build a seamless email to the attendee. If you add more than 255 characters in any of the KBYG sections, you may see an "unhandled exception" error, and your session will not save.
Include Files (like 'Add to Calendar')
It's not uncommon to want to link to additional files, especially an 'Add to Calendar' link. Follow these instructions for different options to save a file, upload it for public use, and where to include it within eComm Event Management.
Invitations & Other Communications
Invitations
- Invitations can be sent by email via Marketing Cloud, included in social media, or promoted in other ways. If sending invites through Marketing Cloud, work with your eComm specialist on an audience list. See Event URL details below.
Other Communications
- Additional communications (or even the 'Know Before You Go') can be sent via Marketing Cloud. A report creator will need to edit a report template for the particular event or session and make a Data Extension.
- If the Report is sent to it (rather than a Data Extension), the email will be delivered to the contact's preferred email, which might be different from what the contact actually registered with.
- Navigate below to the Dashboards & Reports area >> expand the Dashboard for 'My Events' OR Dashboard for Overall Analysis sections >> then the Custom Reports tab for details.
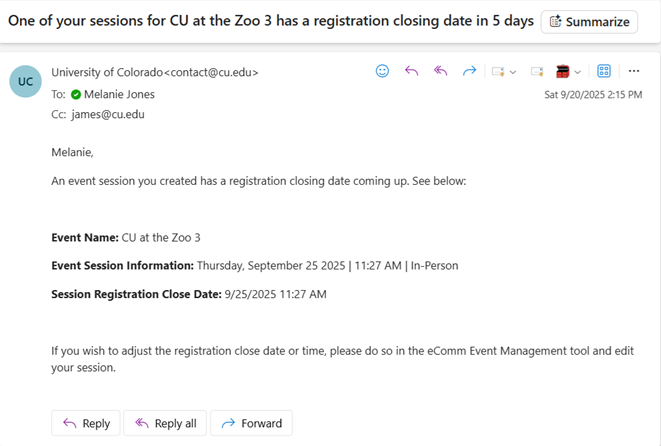
Automatic Event Owner/Creator Emails | Close
- If a session close date/time is set (1st screenshot below), the owner and event creator will get an email reminder that registration is closing in 5 days (2nd screenshot below). You can change the close date/time if desired.
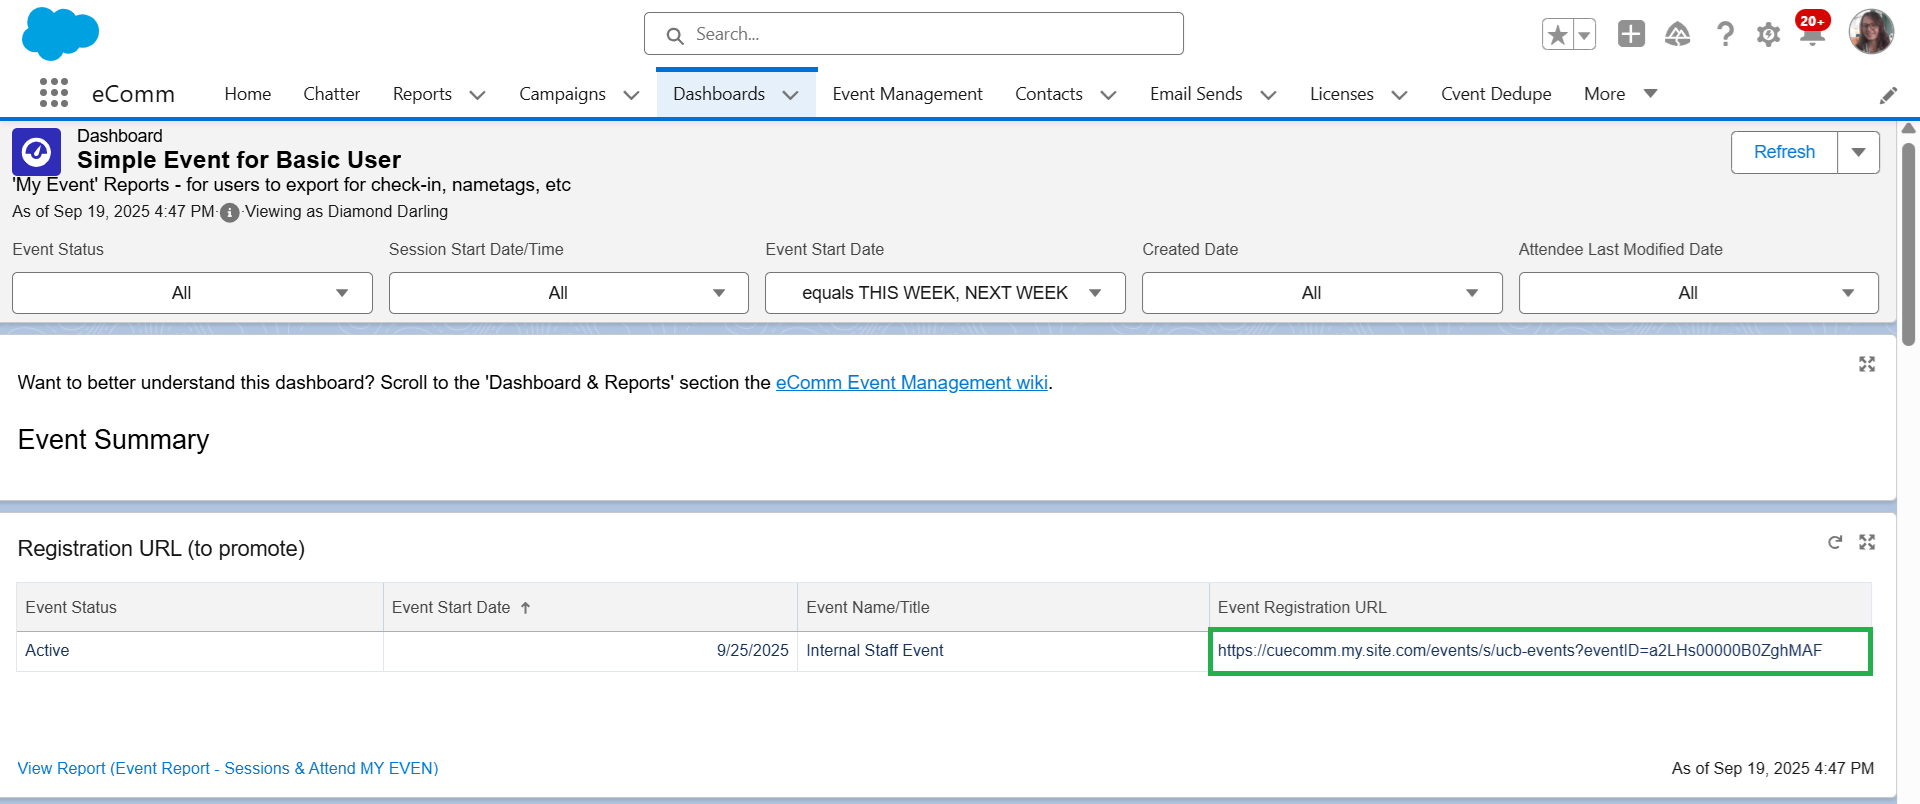
Event URL
The event URL can be found within a Salesforce Dashboard intended for users.
- Navigate to the Dashboard.
- Events that only you own will display.
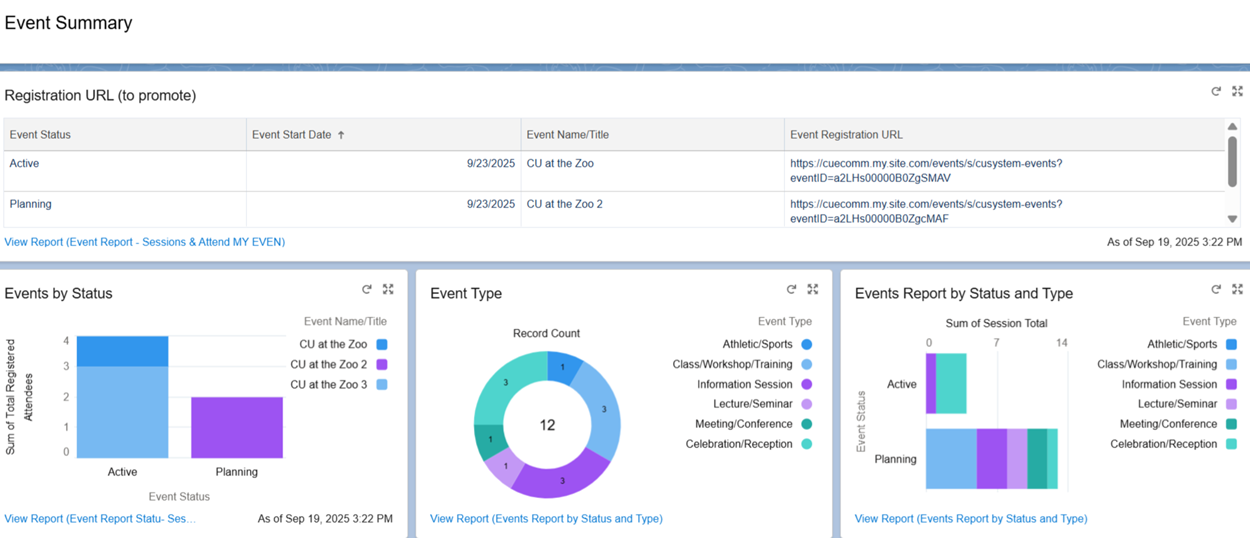
- The first component lists your events in order of Start Date, with a column for the event URL, which can be copied.
Registrant Management
From helping folks get registered to tracking their attendance, there are many ways to manage registrants.
Register Attendees
Attendees can be registered by going to the event registration site (find the URL via the event management dashboard) or by manually adding them to the event in Salesforce. To add attendees to an event:
- Navigate to Event Management >> select Attendees - Add to Session >> click the blue Next button
- Select the event and session, then input registrant details.
- Note: At this time, when you manually add attendees to a session in Salesforce, they will not receive a confirmation email. They do receive a confirmation email when registered for the event via the event registration site.

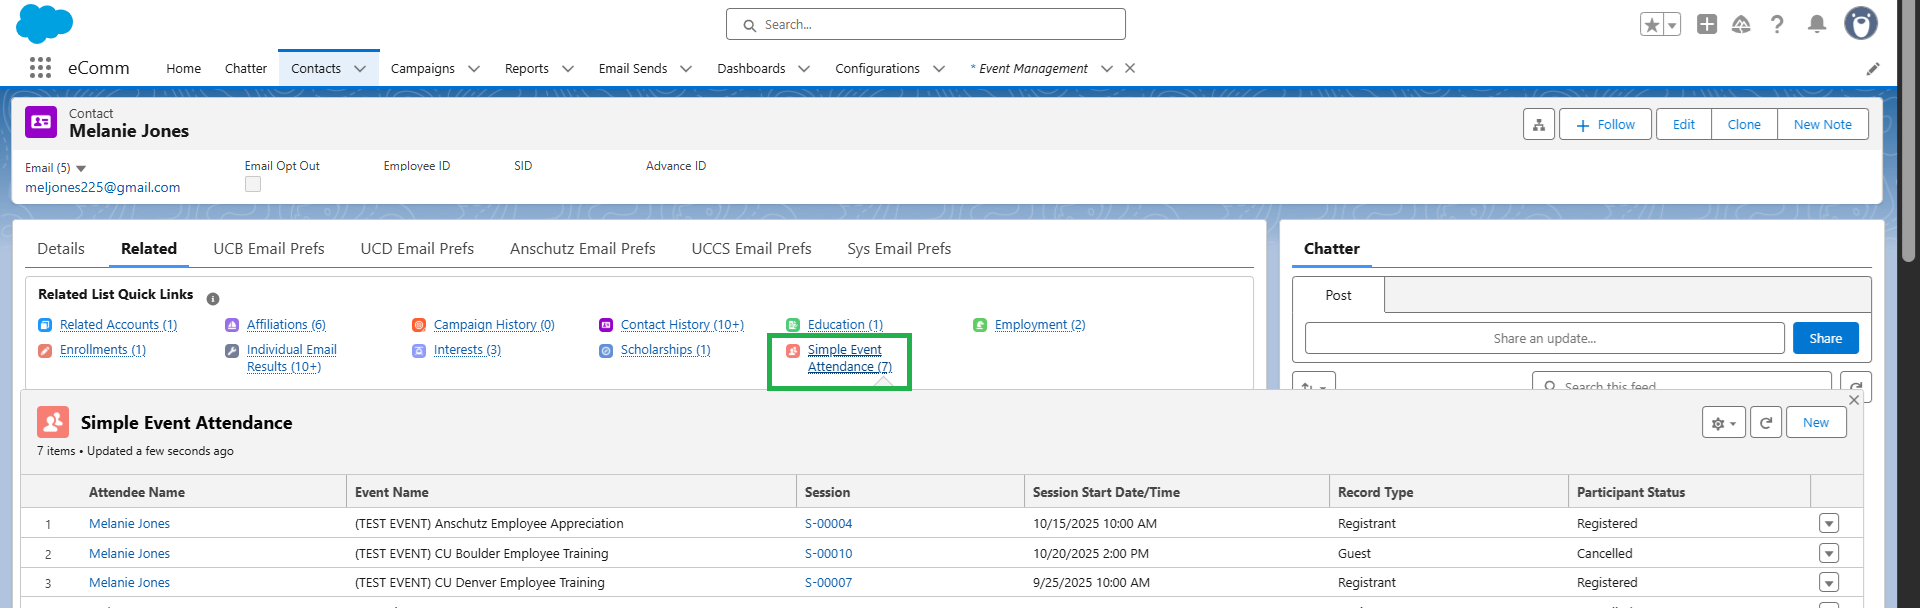
View Contact Engagement
- Contact record > Related tab > Simple Event Attendance
Check In Attendees
Within Event Management, select
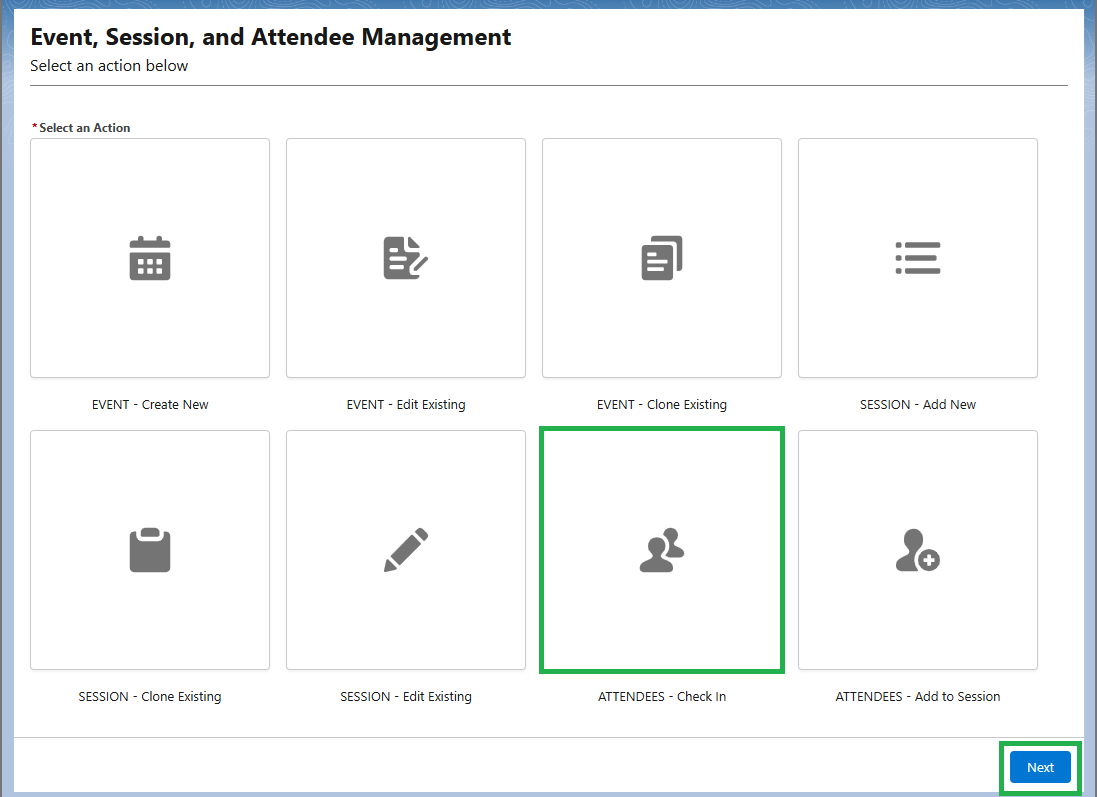
- Select the event and session that you want to check attendees in for.
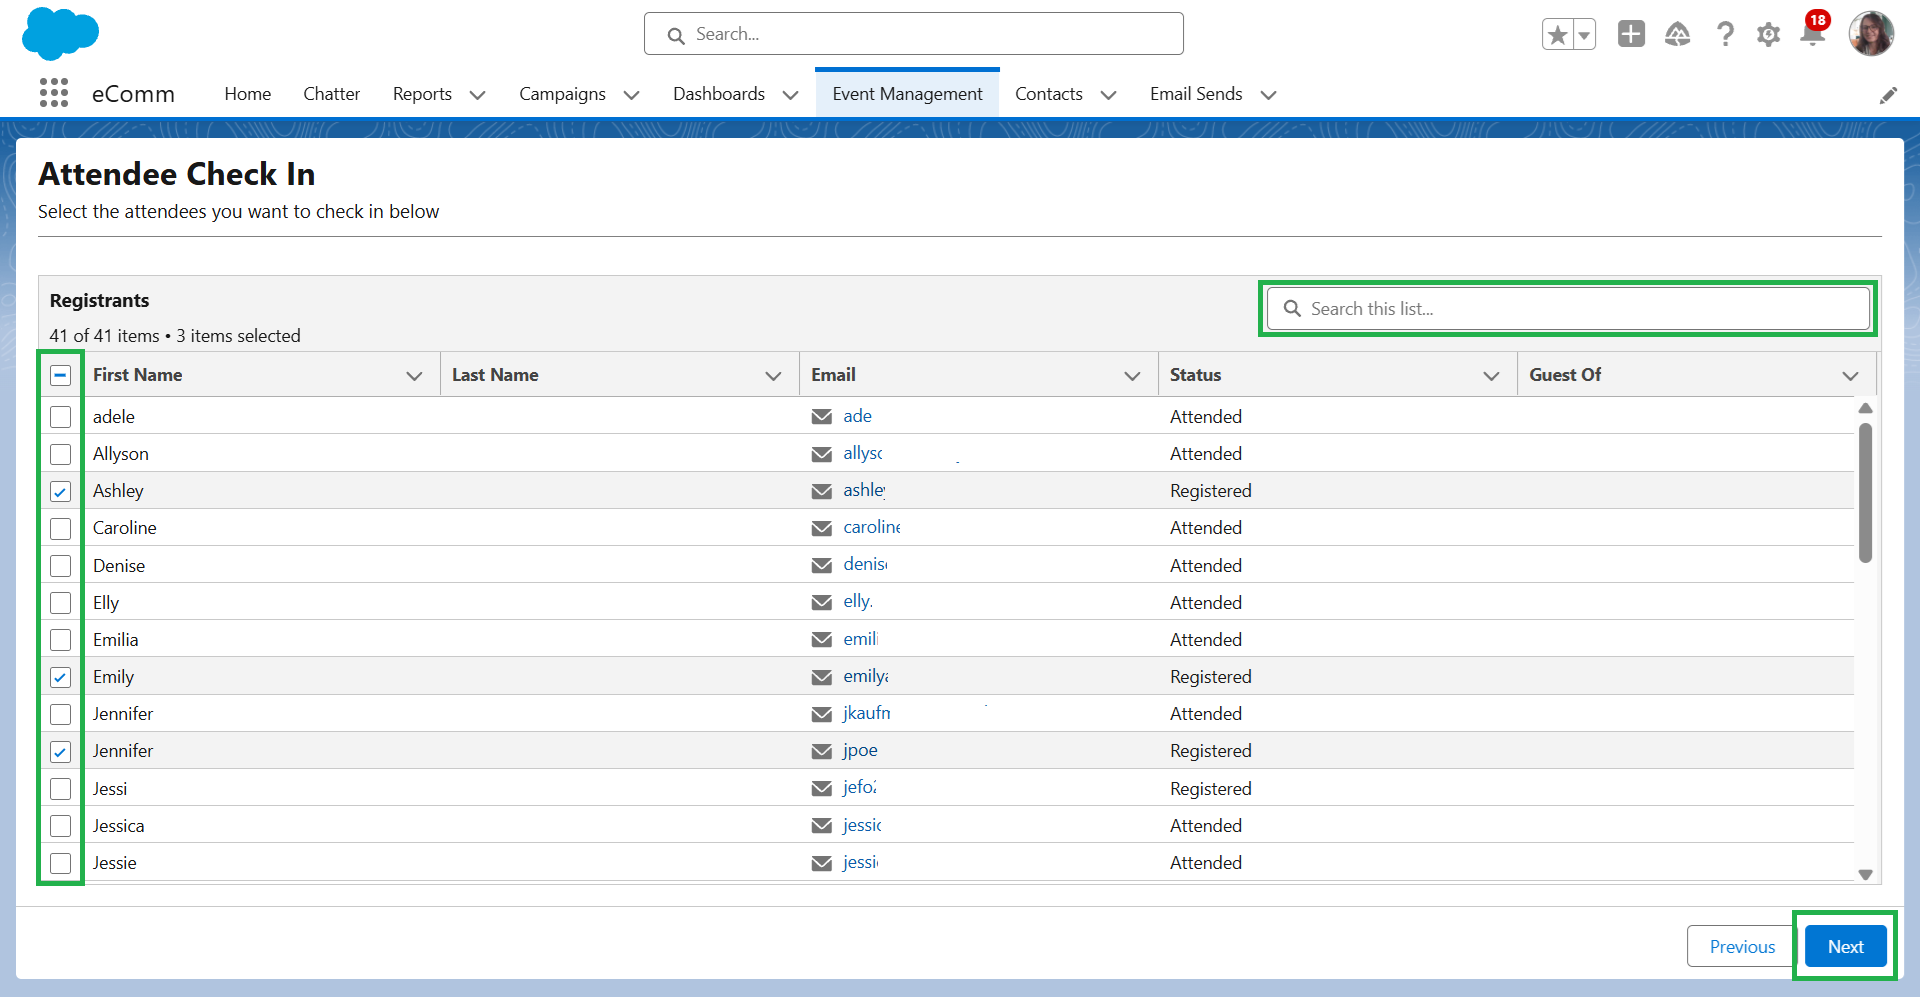
- Check the boxes next to the names of attendees.
- You can search in the top-right and see each attendee's status.
- Select the blue Next button.
- Those with participation tracked will have a status of Attended, and those who have not will have a status of Registered.
- You can exit this area and come back to check in more attendees.
Understand Attendee Data
Matching on Email Address
- The name and information the attendee enters when registering is viewable on the event reports (see Dashboard & Reports below) as they entered it. However, if their email matches an existing Contact, the name on the contact record does not update. For example:
- An Attendee who already exists in eComm with the name Jim Jimster and the email address of jim@email.com
- If Jim's wife registers for an event with the name Sally Jimster and the email address jim@email.com:
- These details are reflected in the event reports.
- A new Standard Contact for Sally will not be created.
- The event registration will be added to Jim's contact record (since it matches on email alone, similar to Cvent).
- Attendees are matched to existing contacts on email only. If it exists, it adds the event information to that contact record. If they don't exist, it creates a Standard Contact (like Cvent).
- Guests
- If guests are enabled for the event, they are matched to an existing contact or created as a Standard Contact IF:
- The event requires guest details, and not only the number of guests
- The guest's email address was entered (email is an optional field for guests)
- Guests will appear on a registration list if all guest details are enabled for the event, and at least their name is entered when registering. Their Record Type is Guest, which is viewable on the contact record and in Dashboards/Reports. When viewing Dashboards/Event Reports, there are columns related to the attendee record type and who the person is a guest of, if you would like that information.
Registrant Status
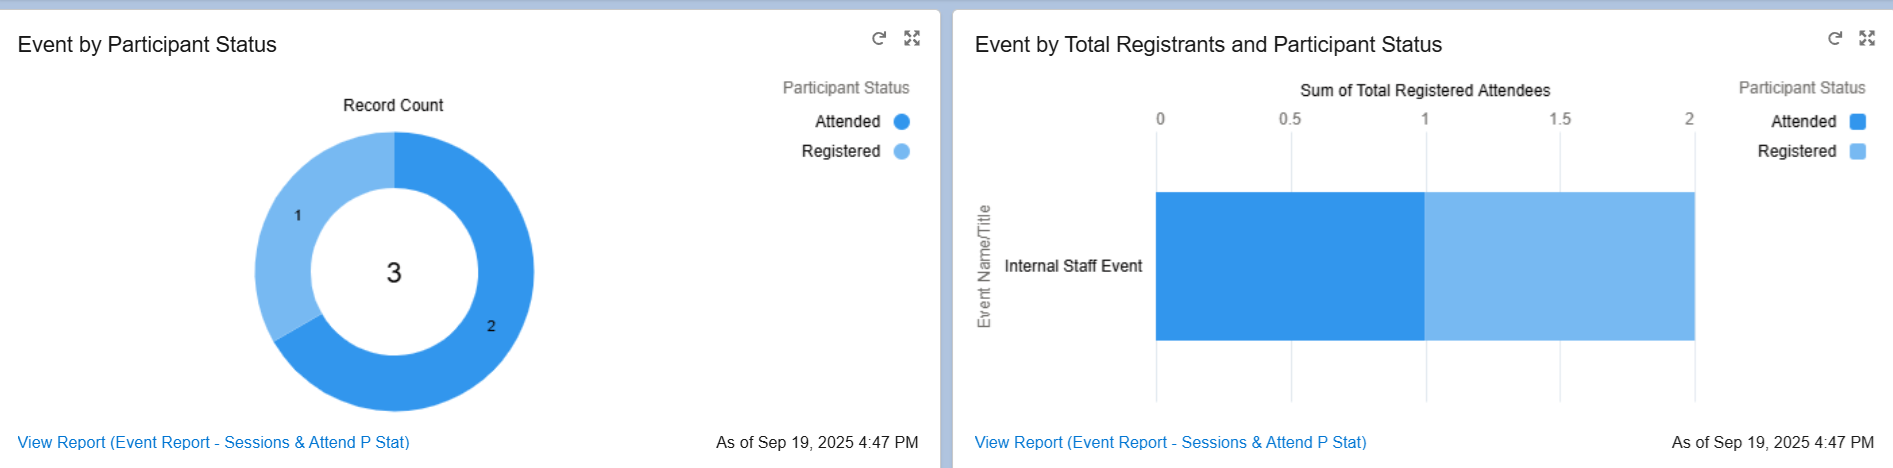
- Once you have checked an attendee in, the participant status field updates to Attended. This can be viewed via an Attendee Report (see 'Dashboard & Reports' below >> expand 'Dashboard Components / Uses' section >> click the 'Participation/Attendence' tab) or if you go to the Contact record > Related > Simple Event Attendance
- If the attendees are not checked in and the event passes, their status remains as Registered.
Dashboard & Reports
A Dashboard is available for event owners to manage aspects of their events, from event creation through closure and beyond.
How-To Use Dashboard & Reports
Refresh
- Select the Refresh button in the top right to ensure you are seeing the most recent data.
- You will see a date/time in the top left, under the Dashboard title, for when it was last refreshed.

Filters
- Apply Dashboard filters if desired. It's usually best to apply only one filter at a time.

Open
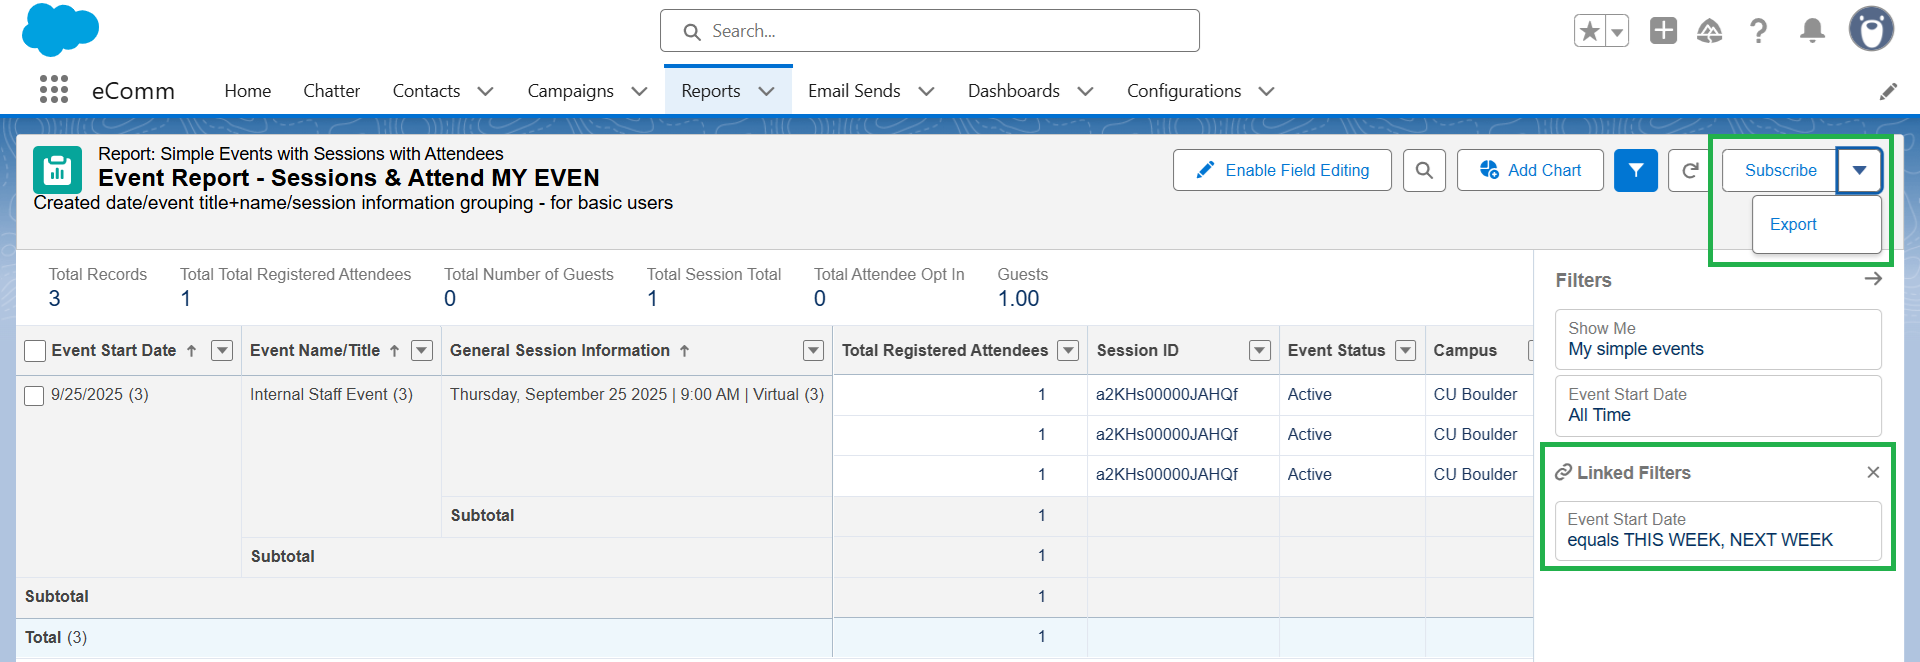
- Dashboard components are all based on a Report. Open/Run a Report by clicking on the link in the bottom right of each component.

Export
- Then, in the top right, select the down arrow next to Subscribe. Click Export in the dropdown.
Subscribe
- You can Subscribe yourself (and other Salesforce users) to Reports to be notified via email.
- Note: Non-Salesforce users cannot be subscribed.
- Dashboard Filters and Report Conditions can be set to only be notified of recent activity.
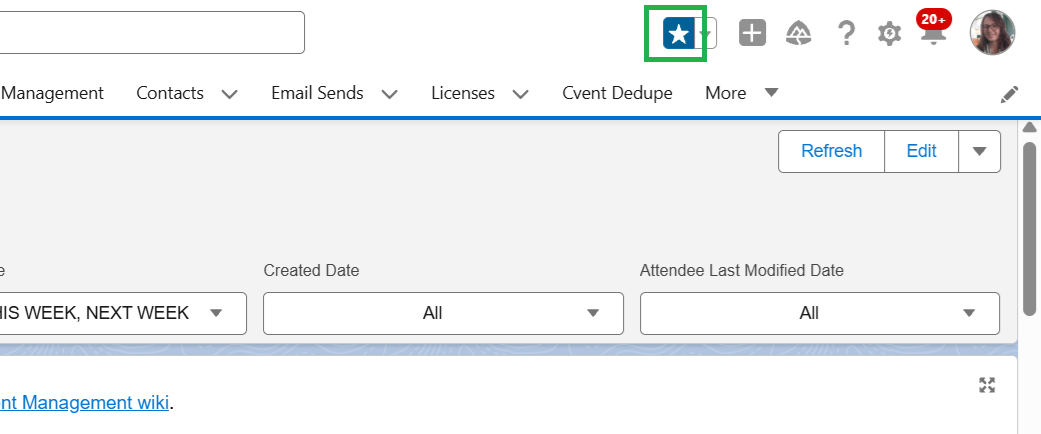
Favorite a Dashboard (or Report, Contact, etc.), to make them easy to access.
- Once the Dashboard is open, select the star icon in the top-right
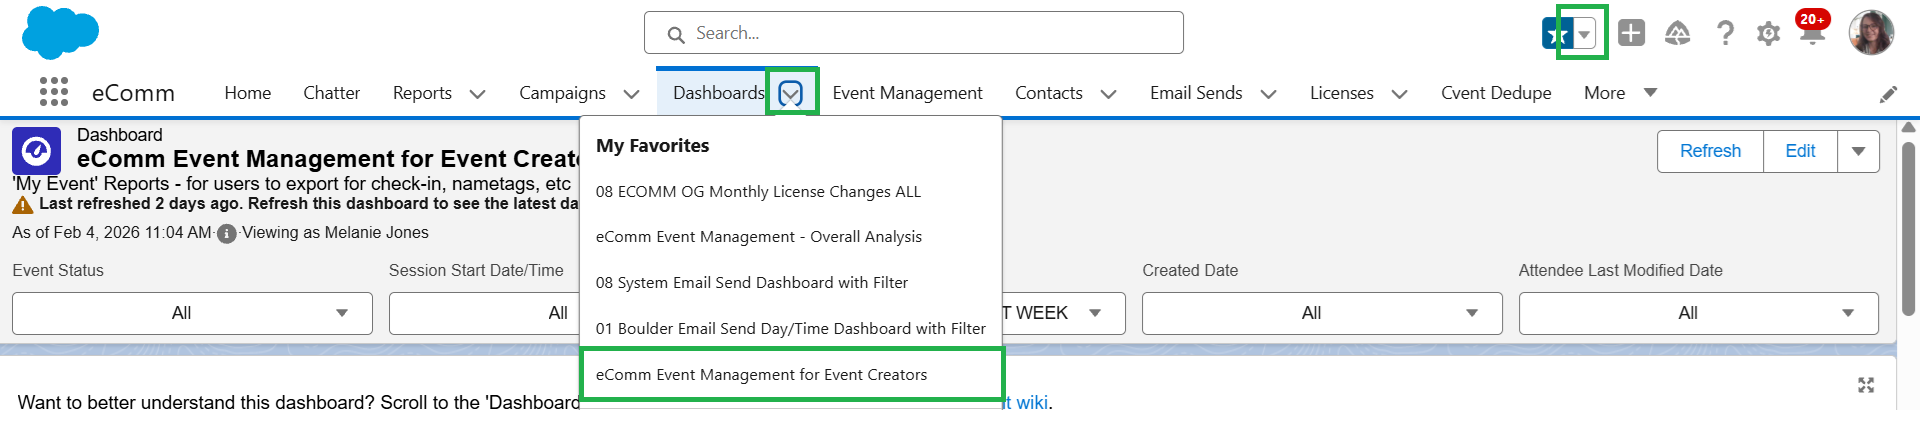
- To access your favorites, either:
- Select the down arrow to the right of Dahabords in the navigation
- Select the down arrow to the right of the star icon in the top-right
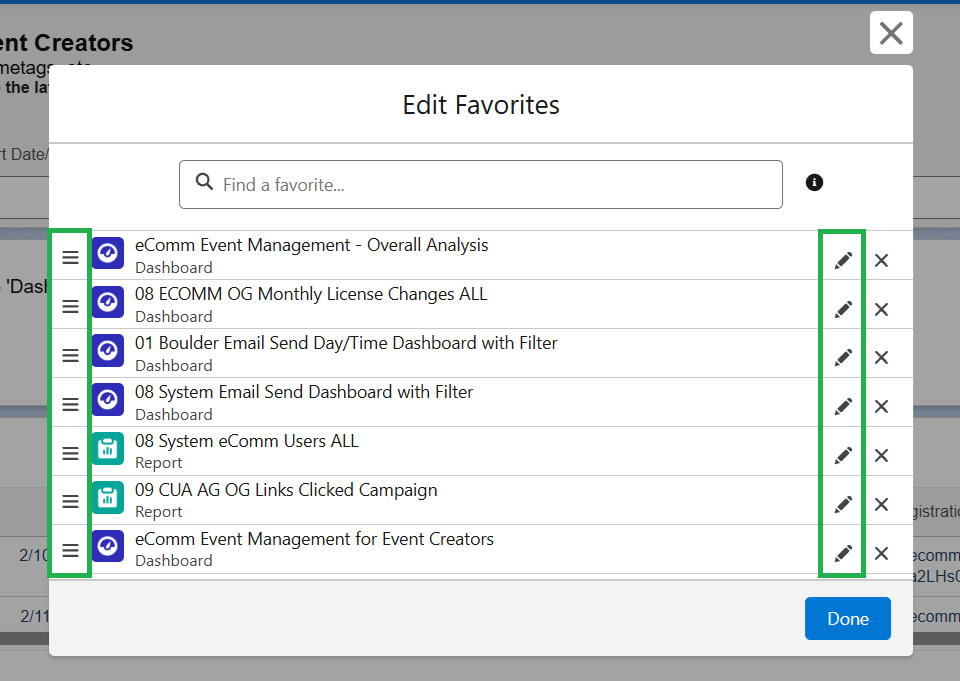
- To edit your favorites, select the down arrow to the right of the star
- Select Edit Favorites in the dropdown
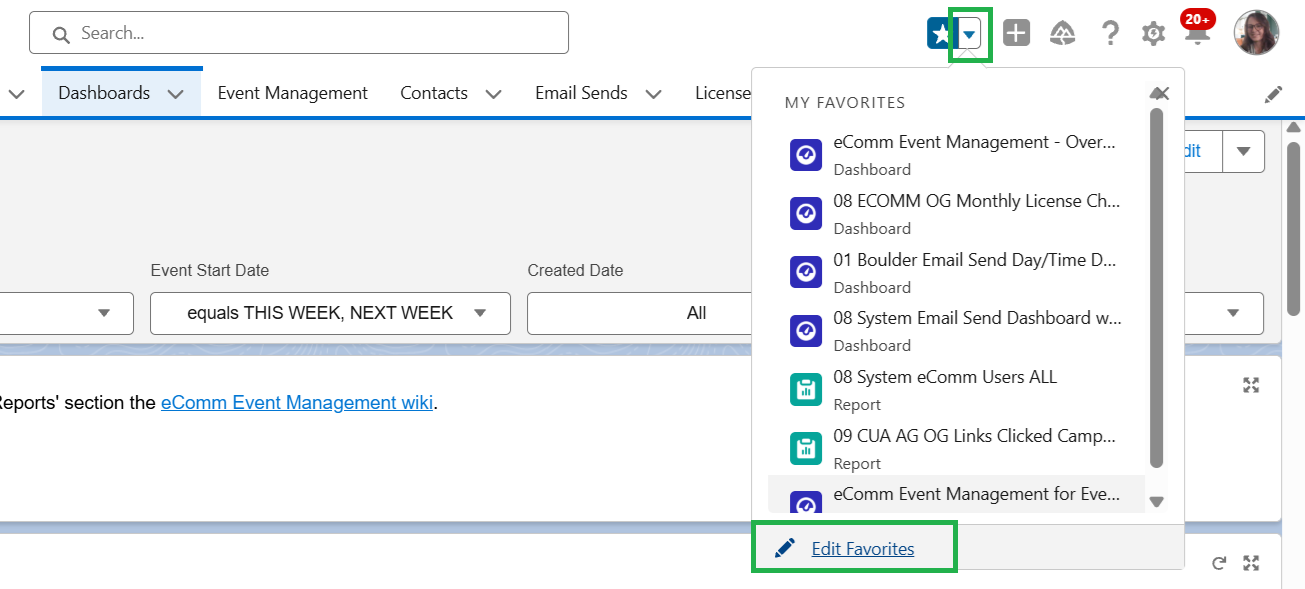
- You can reorder favorites by using the menu on the left to drag-drop
- You can edit the name of favorites with the pencil icon found on the right
- Select the blue Done button to save changes
Dashboard For 'My Events'
Scroll through the 'My Events' Dashboard to view and utilise various components according to your specific use case.
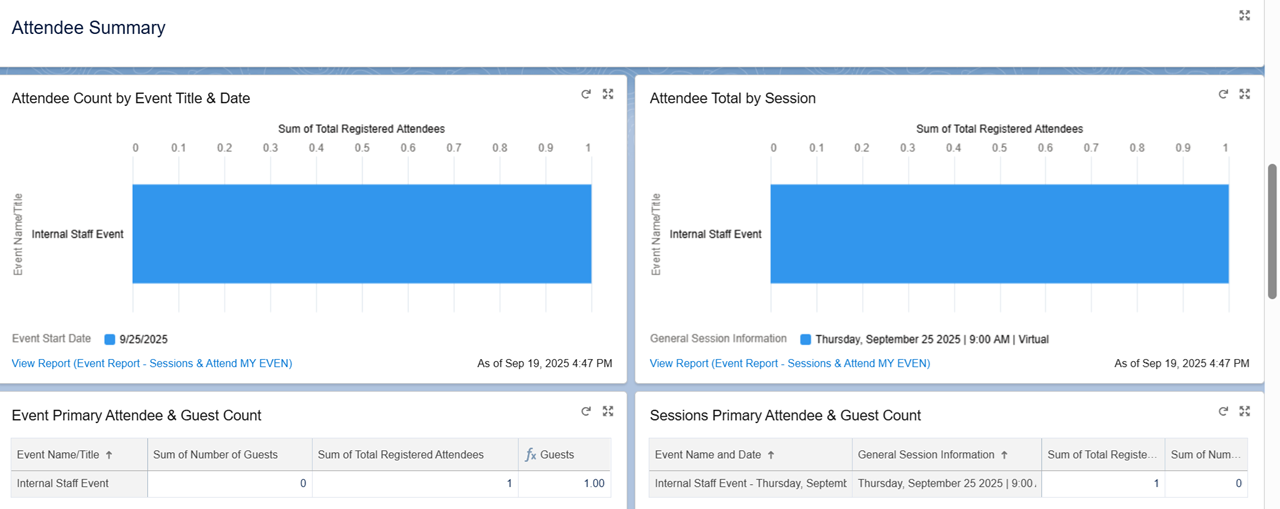
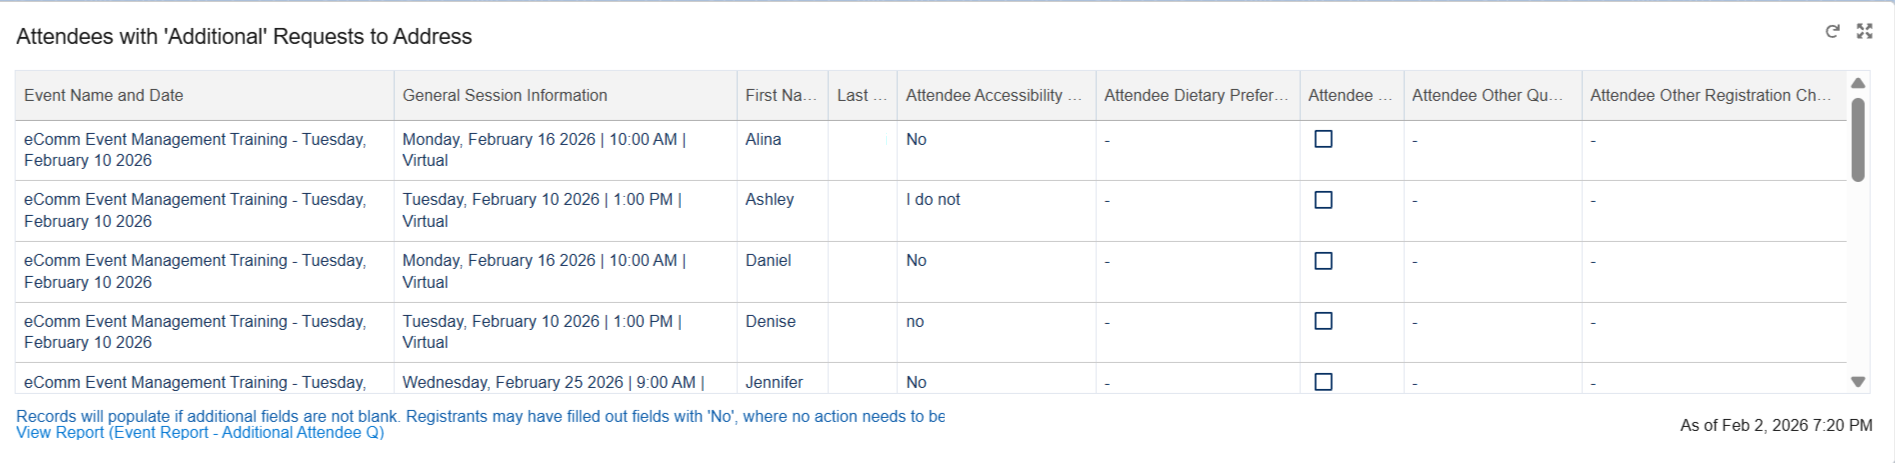
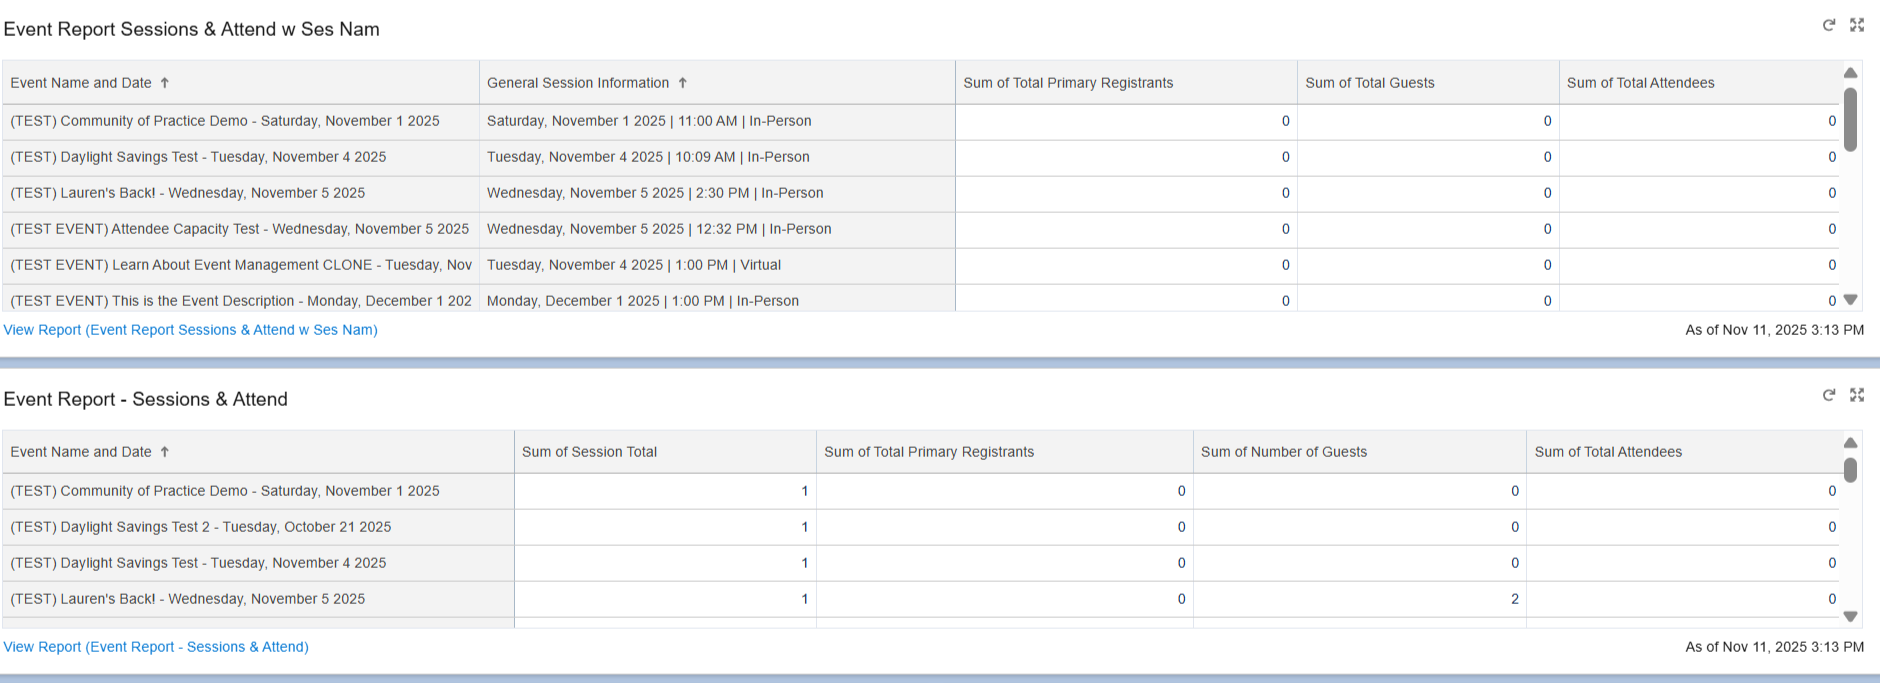
Use the table of attendees for all registrant details, so you can:
- See who's coming or if they have special requests.
- Export and print it to use for check-in or print nametags.

The following use-cases require updating a Report template. Only report creators can do this, so you may need to ask your eComm specialist. These use-cases include:
- finding a registrant's campus affiliation, which is common when printing nametags
- emailing registrants via Marketing Cloud a 'Know Before You Go', an event follow-up with photos, or promoting a future event
- changing event ownership, if the original owner left, and a new employee is managing the event

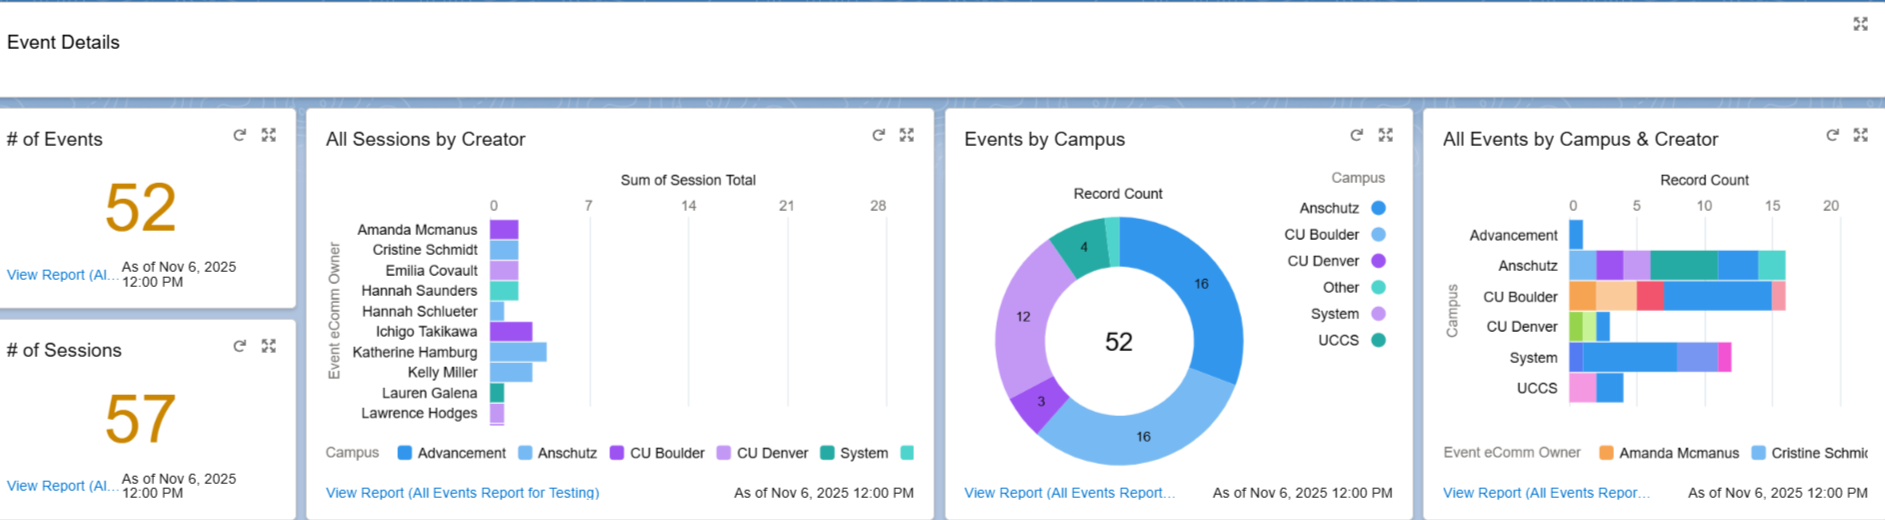
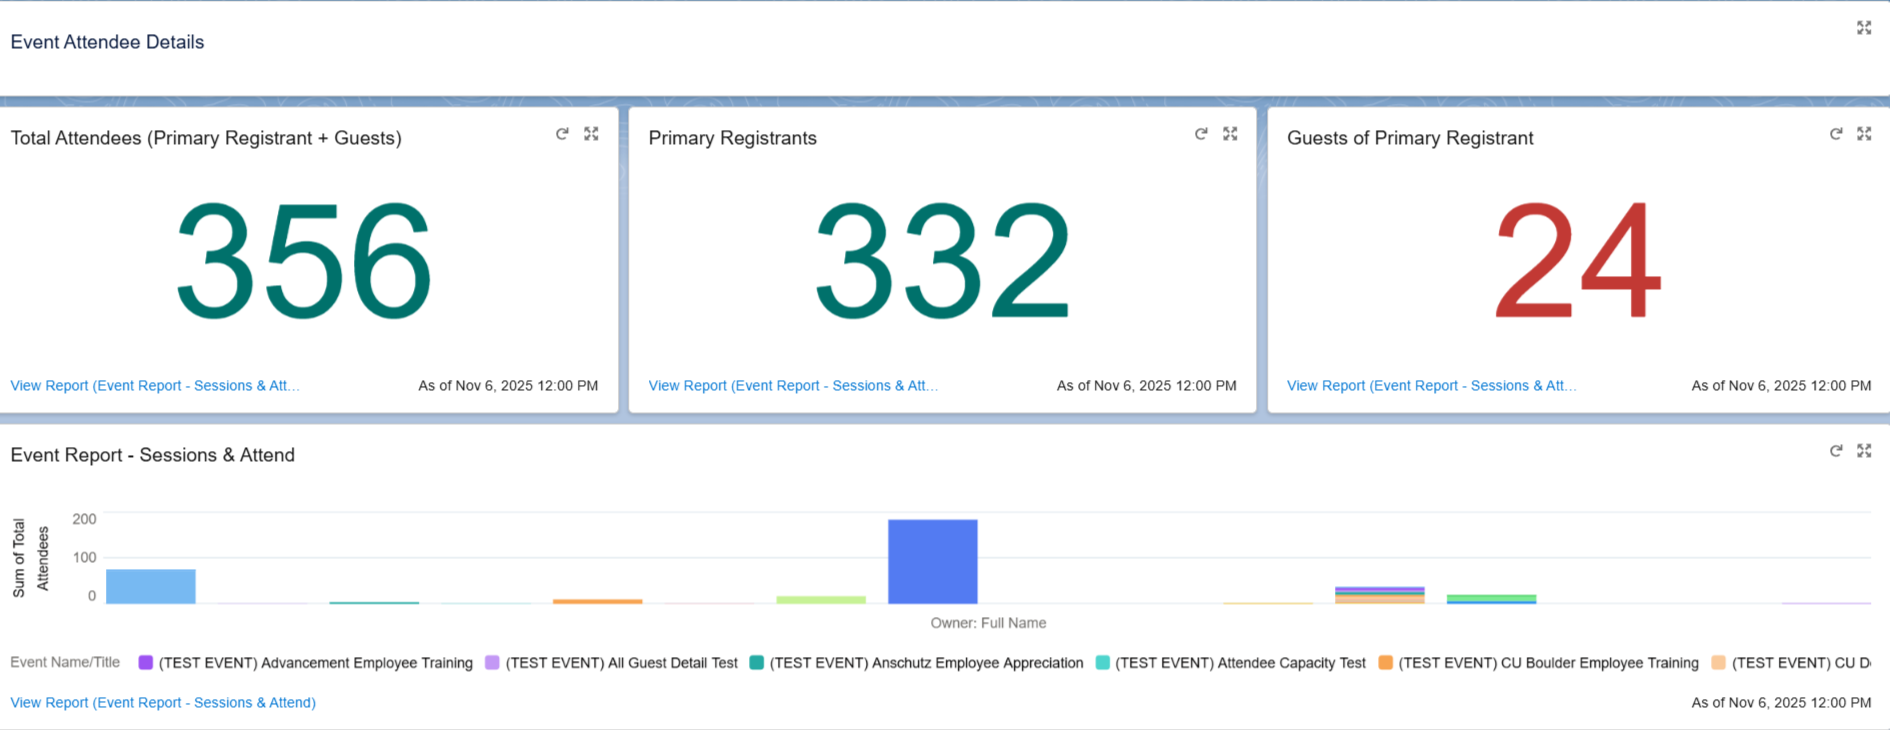
Dashboard For Overall Analysis
Scroll through the Overall Analysis Dashboard to get a pulse on events that are occurring across CU.
The following use-cases require updating a Report template. Only report creators can do this, so you may need to ask your eComm specialist. These use-cases include:
- finding a registrant's campus affiliation, which is common when printing nametags
- emailing registrants via Marketing Cloud a 'Know Before You Go', an event follow-up with photos, or promoting a future event
- changing event ownership, if the original owner left, and a new employee is managing the event
Have feedback or suggestions? Let us know.