Scheduling Data Extension Imports in Automation Studio
Many eComm users who send to data extensions might find themselves sending to the same audience on a regular basis, which generally means going through the time-consuming process of manually importing the data extensions to which you'll be sending. For example, the weekly CU Connections sent from the Office of the President is sent to nine data extensions every week. In this case (or even for less extreme examples), searching through your list of data extensions and checking boxes to manually import them takes time. The solution? Marketing Cloud's Automation Studio.
Running Data Extensions automatically might also be a good backup solution for a user not 'Start'ing Data Extensions as they should, resulting in CAN-SPAM violations.
What is Automation Studio?
Automation Studio is one of the tools available in Marketing Cloud, just like its companion tool, Email Studio. Automation studio allows you to automate processes and email sends that you complete on a regular basis to save time and let technology do the manual work for you.
How do I find Automation Studio?
If you're already a Marketing Cloud user, you're probably used to navigating to Email Studio on an almost daily basis. Automation Studio can be accessed in the same way. When you login to Marketing Cloud and land on the homepage, you'll see the familiar Email Studio icon on the left and a new icon called Journey Builder just to the right of center.

Hover over the Journey Builder icon, and then select Automation Studio.

How do I schedule a data extension to run automatically?
1. When Automation Studio opens, click the New Automation button in the upper right corner of the screen.
2. The next screen will ask you to identify a starting source for your automation from two options: Schedule or File Drop.


3. Click on the green Schedule option and drag it into the open circle.

4. Next, locate the Import File icon in the Activities menu. Drag and drop it to the activity canvas.


5. To choose the data extension you want to schedule, click the Choose button in the Import File box.

6. In the Choose Import File Activity window, click on the data extension you want to schedule. You can also search for it using the search tool in the upper left corner. Once you've made a selection, ensure that you see the highlighted message, "Overwrite Data Action Selected." This will ensure that your data extension is set to overwrite so it is always populating with the most current data. When you are finished selecting your data extension, click Done.
More than one date extension? You'll only be able to select one data extension at a time. If you are hoping to schedule more than one data extension as part of a group, repeat steps 4-6 until you are finished.

7. To schedule your data extension to automatically import, click on Configure under the Schedule Starting Source.

8. Enter the parameters for your import schedule in the Define Schedule window. Click Done when you are finished.

9. Next, save your automation by clicking Save in the upper right corner. You can save in the "My Automations" folder, or you can (when you're ready) create a folder hierarchy to keep your automations organized.

10. Once your automation is saved, you'll notice that the schedule tab has an activity of Paused. Change the activity to Active to activate your automation. A confirmation window will appear to allow you to confirm that you want to activate the automation. Click Activate.


11. Click Save one more time to ensure that your active automation is saved.
How often should I schedule my automated Data Extension to run?
Based on the sends using these Data Extensions, determine your automatic or manual run date. For example:
- If the email is delivered every Thursday at 6 AM
- Automatically scheduled to run 11 PM Wednesday
- If the email is delivered every Monday AND random/unknown frequently (numerous times each week)
- Automatically schedule for every day outside business hours
- If the email is delivered every Monday AND random/unknown infrequently (a few times each month)
- Automatically schedule for every Sunday, and start manually when needed
- If the email is delivered at random/unknown/inconsistent frequency
- Start automation manually when needed or determine that it may not be an efficient use of time to automate the data extension(s).
How will I know if my automation failed or ran successfully?
1. Click the Activity tab in your automation. You'll see a Notification Settings option on the left side of the screen. Enter your email address in one or both of the notification fields. Click Save when you are finished.

Activate again before closing Since you made a change to an existing automation, the automation activity will reset to Paused. Be sure to return to the Workflow tab to activate the automation and save again before exiting.
What will the Activity tab look like once my automation is running?
Once your automation has run at least one time, the Activity tab will begin to populate with a history of your automation's activity. An example is included below. You'll notice that the average run time of the automation is only 15 seconds - much faster than if you were importing the data extension manually.

Automate Data Extensions
Marketing Cloud senders are required to re-Start Data Extensions before each send to ensure the audience is up-to-date (and CAN-SPAM compliant). If an Automation is configured to run the Data Extensions automatically, manually re-starting the Data Extensions before each send becomes obsolete. eComm specialists can automate defined Data Extensions and help users understand the change of process.
Passcode: v@Jcv7X*
Common Use Cases
- Frequent sends to the same data extensions
- Numerous sends to the same data extensions
- Numerous Data Extensions in a single send (frequency irrelevant)
- User Failing to Re'Start Data Extensions and Violating CAN-SPAM (although makes access questionable)
- Cannot be used when:
- sending to Reports
- importing Data Extensions (for email personalization or dynamic content based on data not available in Salesforce).
Identify Good Candidates for Automation Studio
- Find a communication that goes to the same audience (Data Extensions) regularly. Define all the Data Extensions.
- Are these Data Extensions used in other sends? Define all sends and their frequency then see 3 below.
- Based on the sends using these Data Extensions, determine your automatic or manual run date. For example:
- If the email is delivered every Thursday at 6 AM
- Automatically scheduled to run 11 PM Wednesday
- If the email is delivered every Monday AND random/unknown frequently (numerous times each week)
- Automatically schedule for every day outside business hours
- If the email is delivered every Monday AND random/unknown infrequently (a few times each month)
- Automatically schedule for every Sunday, and start manually when needed
- If the email is delivered at random/unknown/inconsistent frequency
- Start automation manually when needed or determine that it may not be an efficient use of time to automate the data extension(s).
- If the email is delivered every Thursday at 6 AM
- Do other senders use these Data Extensions?
- If no, proceed.
- If yes, communicate that they do not need to run these, but ONLY these Data Extensions. Email notifications will be disabled, therefore senders must confirm a recent successful 'run history' before sending.
- If a user gets confused and fails to run any data extensions, we will likely have a CAN-SPAM violation. Only go this route if you trust the user will understand the different cases and follow the correct protocol.
- If a user fails to re-run Data Extensions, you can automate all their Data Extensions to ensure CAN-SPAM is adhered to. However, it's worth considering if a user who cannot perform the basics should be licensed.
- Are those Data Extensions configured to notify? If so delete notification email.
- This email will get notified when Automation runs.
- Update description to include 'in Automation'.
- Create Automation (instruction above) with a notification email to MEC (if troubleshooting is needed). Manually run to ensure success.
Troubleshoot Failed Automation
An email notification can be sent every time the automation is skipped or run unsuccessfully. On occasion, an automation might fail due to one Data Extension failing which prevents the following Data Extensions in the automation from running. When an automation failure occurs, it's important to troubleshoot the failure and restart the automation until it is successful to ensure audience accuracy.
Troubleshooting
Unfortunately, sometimes automations fail at random points for no good reason. 99% of the time, simply running the automation once manually fixes the issue.
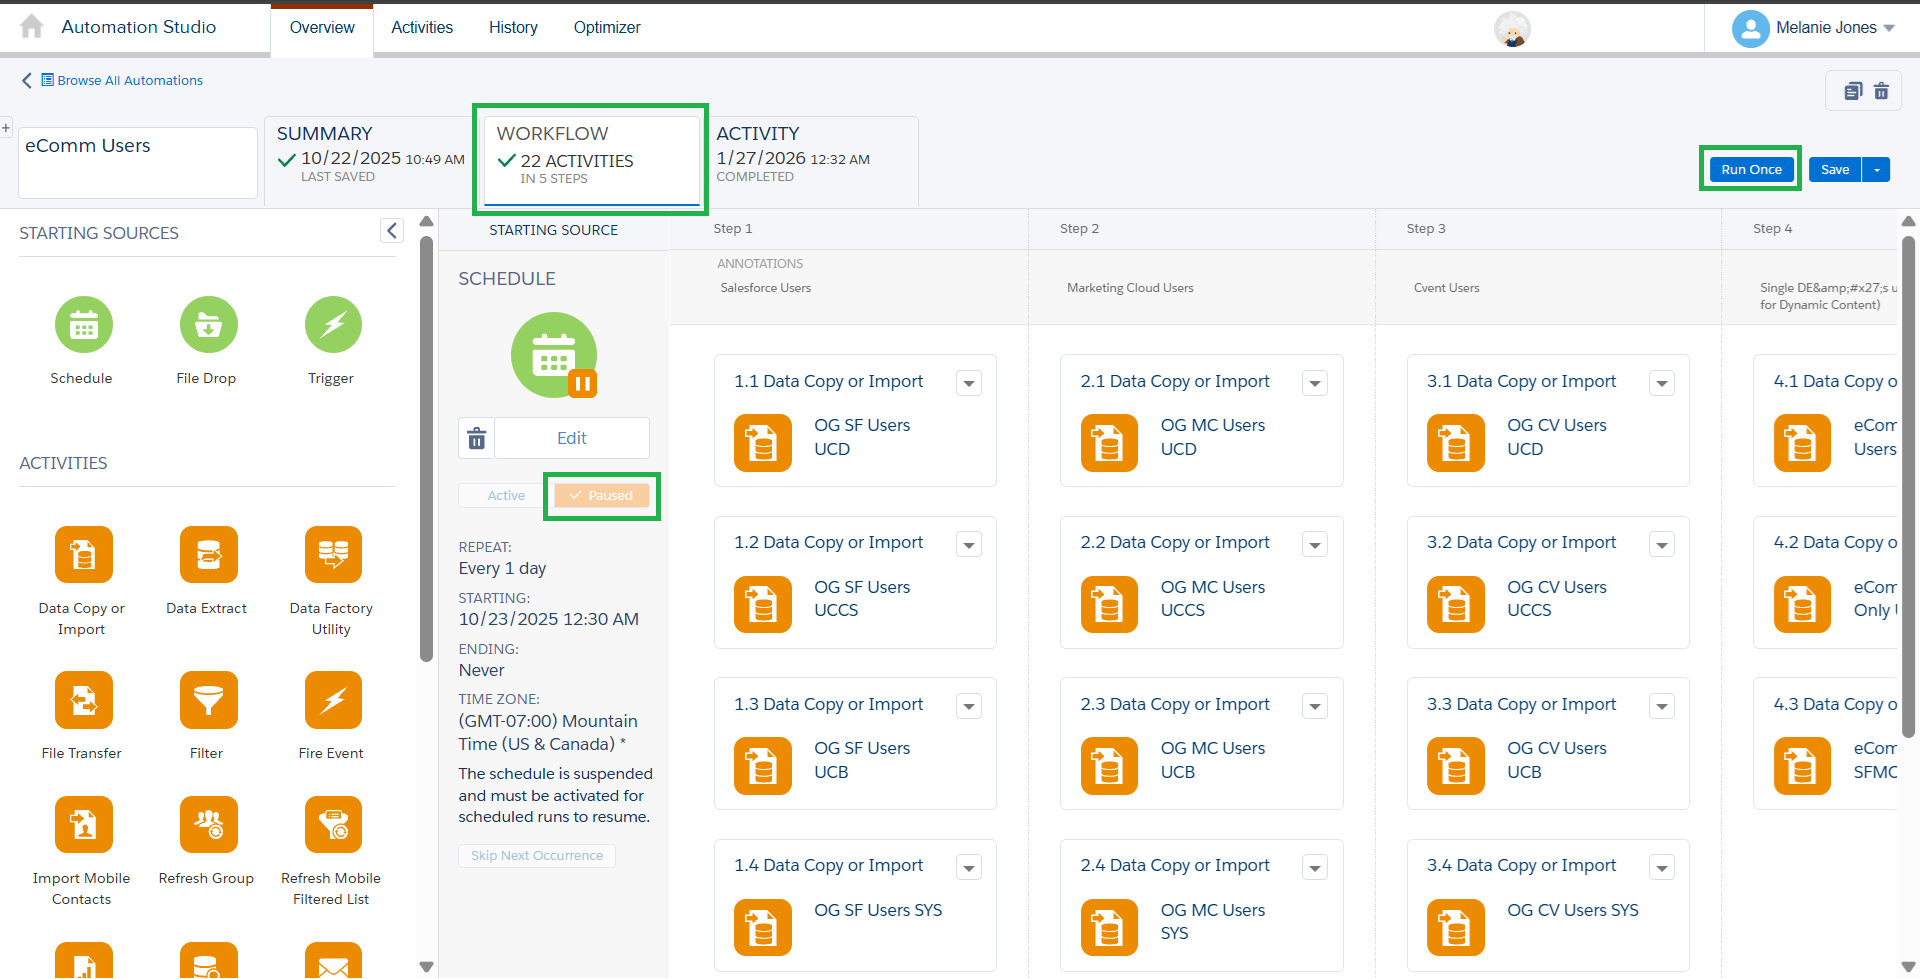
- Under the Workflow tab, Pause the schedule
- Select the blue Run Once button in the top right
- If it runs successfully, make sure to reactivate the schedule so it runs automatically again.
- If it does not run successfully, try to Start the Data Extensions under Import. This can help determine if one of the Data Extensions itself is not configured correctly. If you get an error:
- Check whether the Salesforce Report still exists and is saved to the correct folder.
- Check the Data Extension configuration under Subscribers >> Salesforce Data Extensions. Confirm the included columns are still present in the associated Report.