


Creating Sender Profiles, Delivery Profiles and Send Classifications
Learn how to create sender profiles, delivery profiles and send classifications in Marketing Cloud so that communications contain the correct from information, email footer and commercial vs. transactional distinction (CAN-SPAM Classification).
As of May 2024 | Updating Sender Profiles to Match SAP for Compliance Updating Sender Profiles to match SAP for compliance must occur for all Sender Profiles (previous and new) as to not impact email delivery.
Note
Only eComm Specialists can create and modify Sender Profiles, Delivery Profiles, and Send Classifications in Marketing Cloud. If you need this information added to your account, contact your eComm Specialist.IMPORTANT Overriding Delivery Profiles (rather than using Send Classifications) can have unintended CAN-SPAM implications - such as folks not receiving transactional emails when they should. Send Classifications must be created by the eComm specialist and used by the sender to ensure the CAN-SPAM classification is accurate.
Sender Profile | From Information
IMPORTANT If you are in a shared Business Unit. Follow the existing naming convention by preceding the Sender Profile Name with your unit's abbreviation in all caps.
A Sender Profile specifies the information that is displayed in the recipient's inbox and drives where a message will be sent if they click 'reply'. The sender profile is made up of three different items. In this example, we will use CU Connections, a weekly newsletter distributed to CU employees.
- Sender Profile | CU Connections <connections@cu.edu>
- From Name | CU Connections
- From Email | connections@com.cu.edu
- Reply Email | connections@cu.edu
- This could be the same or different than the 'from email'
1. To begin creating a new sender profile (or to modify an existing one), navigate to the appropriate Business Unit, enter Email Studio, and then click Admin - Sender Profiles.
2. Click New to create a new sender profile, or click the name of an existing profile to modify it.
3. Configure your sender profile as follows:
Properties
- Enter a sender profile name with the email address included to make distinguishing between similar names easier for your users (example: CU Connections (connections@cu.edu).
- Enter a sender profile description (example: Send from UCCS College of Business).

Sender Information
- Select "Use the specified information"
- Enter a From Name (example: CU Connections)
- Enter a From Email with the SAP Domain (see blue box below for varying details for each campus). This means you should use the desired From Email up until the @ symbol and after the @ symbol, use the SAP domain.
SAP Domains Are Determined by the Business Unit
The SAP Domain used is determined by the Business Unit sending. For example, if you're sending from an Anschutz Business Unit but the reply email is an @ucdenver email, use the Anschutz SAP. Failure to do so will prevent the From Email from being 'Verified'. See the next red box for details.
Advancement, System & Boulder SAP: com.cu.edu
Anschutz SAP: com.cuanschutz.edu
Denver SAP: com.ucdenver.edu
UCCS SAP: com.uccs.edu
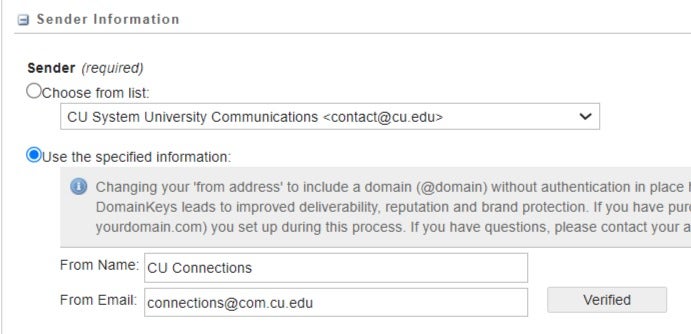
NOTE You'll notice in the screenshot above that next to the From Email text box, there is a button that reads Verified. This means the email address you entered is a sendable profile because it is already part of one of CU's verified sending domains: com.cu.edu, com.colorado.edu, com.ucdenver.edu, com.cuanschutz.edu, or com.uccs.edu. If you are creating a sender profile for a non-CU domain, read these instructions to verify your sender profile.
Custom Reply Mail Management Settings
- Select "Use custom settings below"
- Select "use specified information"
- Enter a Name (required) (Example: CU Connections)
- Enter an Address (required) (Example: connections@cu.edu)

4. Click Save.
Delivery Profile | Footer
Marketing Cloud delivery profiles specify if the communication is Commercial or Transactional. When creating a delivery profile it's essential to identify an IP address, header, and footer for compliance with CAN-SPAM.
To create a Delivery Profile, complete the following steps:
1. In Marketing Cloud, navigate to Email Studio >> Admin >> Delivery Profiles, and click Create.
2. Under Properties, type the name and description of your delivery profile. The external ID will populate automatically upon saving the profile.

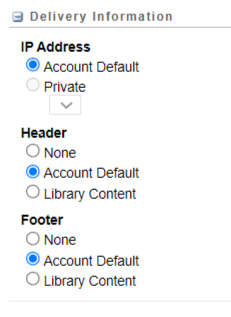
3. Under Delivery Information:
- Make the following selections if you are sending TRANSACTIONALLY:
- Set IP Address to Account Default
- Set Header to Account Default
- Set Footer to None

- Make the following selections if you are sending COMMERCIALLY:
- Set IP Address to Account Default
- Set Header to Account Default
- Set Footer to Account Default
4. Click Save.
Send Classification | Sender Information, Footer & CAN-SPAM Classification
IMPORTANT If you are in a shared Business Unit. Follow the existing naming convention by preceding the Send Classification Name with your unit's abbreviation in all caps.
A send classification is a CAN-SPAM classification plus the combination of a sender profile and a delivery profile.
To create a send classification in Marketing Cloud, complete the following steps:
1. In Marketing Cloud, navigate to Email Studio >> Admin >> Send Classifications, and click Create.
2. Under Properties, type a send classification name and a description. The external ID will automatically populate when you save the send classification.

3. Under About CAN-SPAM Classification, select either COMMERCIAL for emails that will use the CU FOOTER FOR ALL EMAILS or TRANSACTIONAL for those that will not offer an option to unsubscribe.

IMPORTANT Overriding Delivery Profiles can have unintended CAN-SPAM implications - such as folks not getting transactional emails when they should. Send Classifications must be created by the eComm specialist and used by the sender to ensure the CAN-SPAM classification is accurate.
4. Under Sender Information, select the sender profile and the delivery profile that should be automatically associated with this send classification.

5. Under Send Priority, select Normal.

6. Click Save.
Related Content
- Bulk Sender Compliance
- Sender Profiles, Delivery Profiles and Send Classifications (for Users)
- Updating Sender Profiles to Match SAP for Compliance (for eComm specialists)