


Wiki Creation & Help Ticket Best Practices
Get Started, Then Grow
Always Important
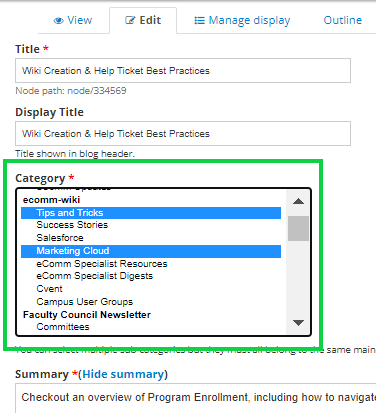
Categorize correctly
- New categories can be created when necessary but shouldn't exceed 10 or so.
Link Related Wikis Together
- Be sure to link to related wikis within the new wiki and add the new wiki to existing, related wikis. This should be done throughout the body of the wiki, plus the footer section.
- Consider wikis that are newly related, often due to updating/enhancing a wiki.
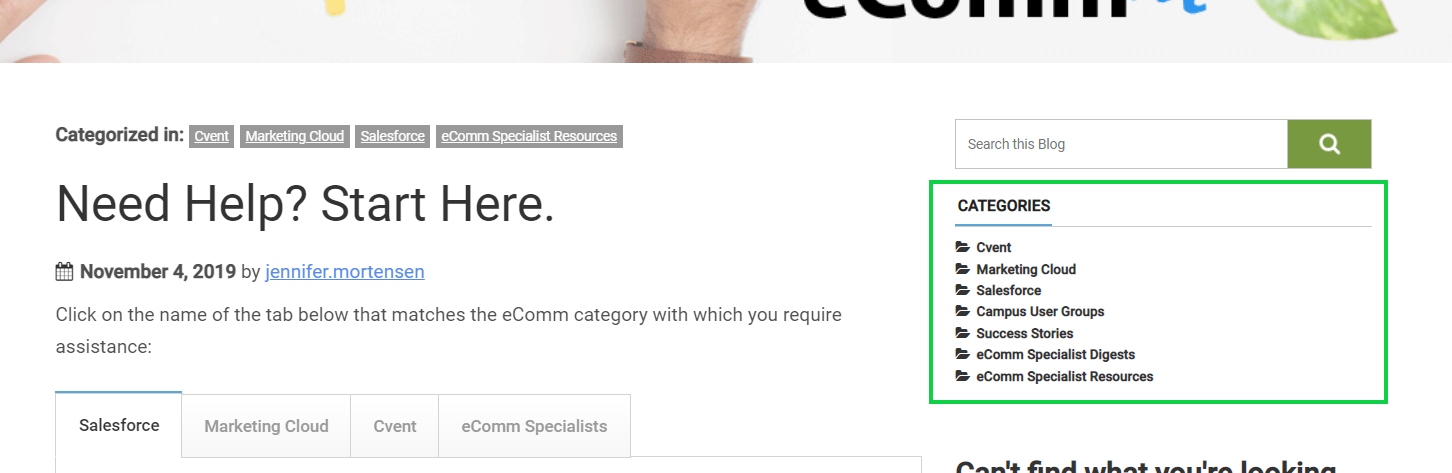
Index: Need Help? Start Here.
- Add to any relevant sections/accordions and add new ones when necessary
Include wikis in Help Ticket
- Present relevant wikis within the Help Ticket to mitigate ticket submissions altogether.
Phased Approach
Which Wiki To Start With?
- Start with the simplest of tasks (how to log in, meet the team, what we do, who we support, etc.).
- Identify the most frequent requests. Educating in these areas will bring the most value quickly.
- Make new user training on-demand - it will buy time to create advanced training materials or enhance existing ones. An unedited recording is a fine, short-term solution to start getting users trained without the time commitment of 1:1 training.
- Are any new items getting rolled out? Get these documented so you can share the wiki resource and build adoption. Host one live session (less than 30 min. preferred) and make the recording available.
- Save infrequent or the most complex requests for last.
Content Creation
- Unedited Recording
- If unedited recordings exist, make them available as a short-term solution.
- Written Instructions with Example
- Bold words that reflect the exact word in the application.
- Use a bullet point for each step.
- Type in your desired Template Name
- Select Template in the dropdown
- Click the blue Create button in the top right
- Screenshots
- Should be placed under the written instructions, with each step called out on the screenshot.
- Context
- Define the task and give a use case for completing the step. Add a sentence about the previous and next steps and link to wikis with more information.
- Diagrams
- Diagrams provide a great basis for common understanding across different groups and can minimize confusion. Request Access to Venngage, a tool for making infographics, icons, graphics, and more.
- Recording
- Host a session by finding the resource in the index, following along with the wiki, and then posting the recording to the same wiki. This helps increase the adoption of the wiki by truly showcasing how a user can access the same resources.
NOTE Refrain from 'fixing' processes while documenting. While it's tempting to better a process when the opportunity is presented, it hinders progress. Get the current state documented, then prioritize areas to optimize.
How-To: Format Wiki Body
Text Formatting (Bold & Italics)
Add bold or italics to the formatting of the text.
Bullets / Lists
Add numbered or unnumbered lists, particularly for step-by-step instructions.
Links
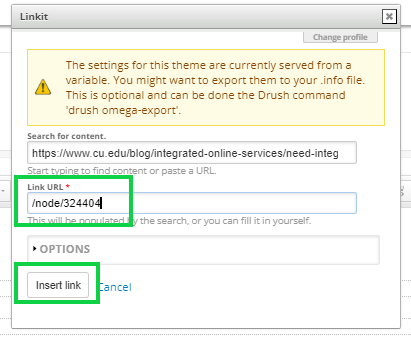
- Highlight the word(s) you wish to link, then select the link icon in the navigation.
- The Link info tab will open by default to include the URL
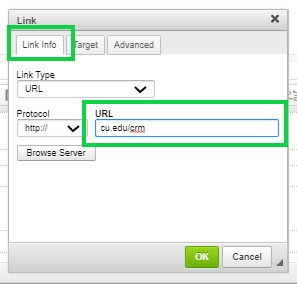
- Select the Target tab and choose New Window blank in the dropdown. Click the green OK button
- Highlight the word(s) you wish to link, then select the link icon with the plus sign in the navigation. It will read Link to Content when hovered.
- Paste the internal link (cu.edu). Once it finds the URL, click the green box
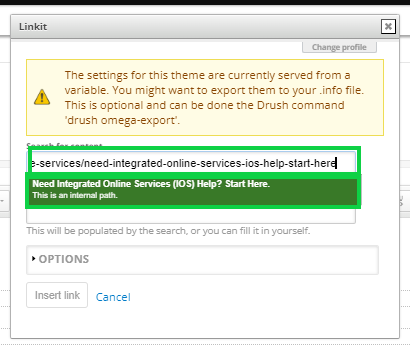
- This gets the Link URL field to populate with the node (a best practice when linking to internal pages)
- Select the Insert Link button
- Use the Internal Linking directions to set the Target = New Window Blank. This ensures the link opens in a new tab, rather than refreshing the existing page.
Images
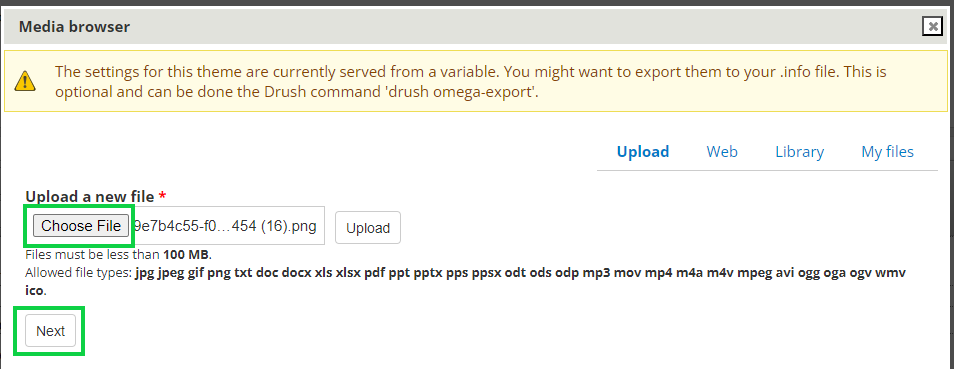
Click in the body of the post, where you want the image to be inserted. It's usually best to be on its line/paragraph.
- Choose File then click Next
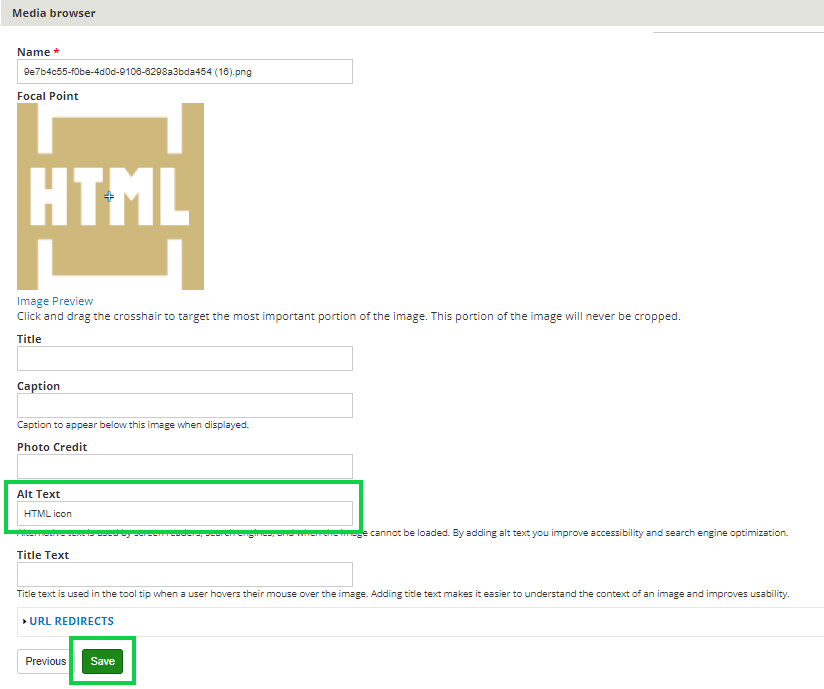
- Populate the Alt Text*
- Provide alternative (ALT) text that is contextually relevant, accurate, and concise. For example:
- lists the relevant data so that a bar graph can be understood
- to explain what an image contains and why it is being used, rather than details about how the image looks
- *DO NOT LEAVE BLANK. Although not a best practice, typing 'null' is better than leaving it blank.
- Provide alternative (ALT) text that is contextually relevant, accurate, and concise. For example:
- Click the green Save button
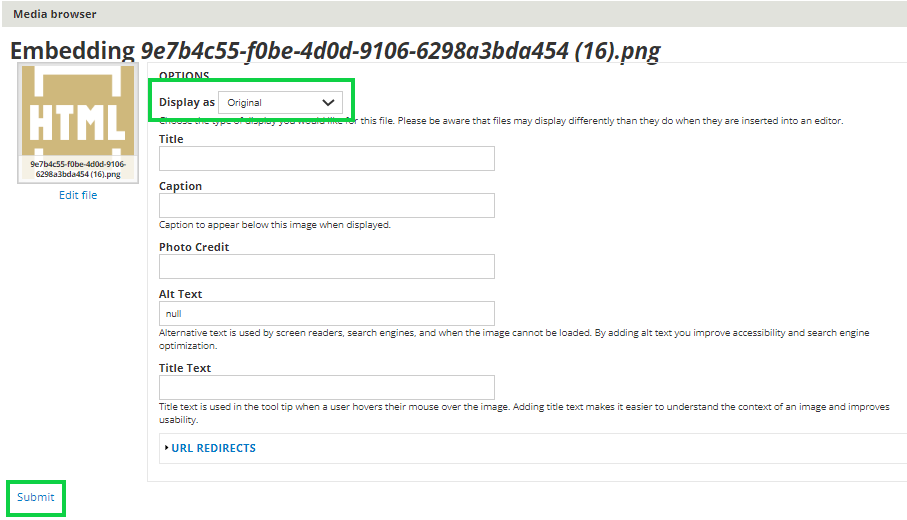
- Choose Display as: Original in the dropdown
- Click Submit
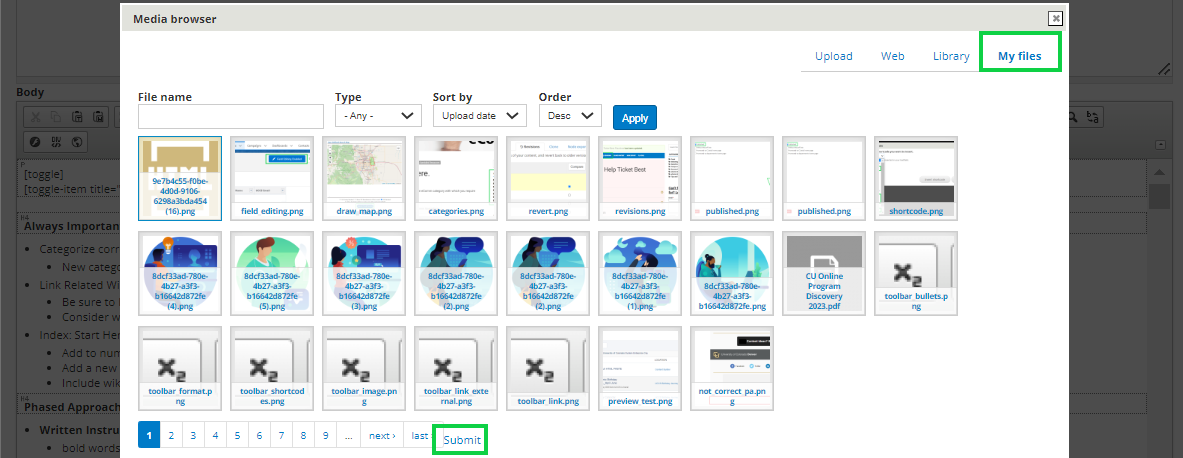
- Access previously uploaded images in the My Files or Library tabs
- Click the image, then select Submit
I typically leave the image as is. In cases where you need to re-size an image, click the image after it has been placed in the body, then select the Image Icon found to the left. Input the size in the pop-up.
Shortcodes
- Click in the body where you want to insert the shortcode
- Select the Shortcodes icon (black box with down arrow) in the top navigation
- A pop-up will appear (may need to scroll up on the entire page to find it)
- Choose the Shortcode you want to insert via the dropdown
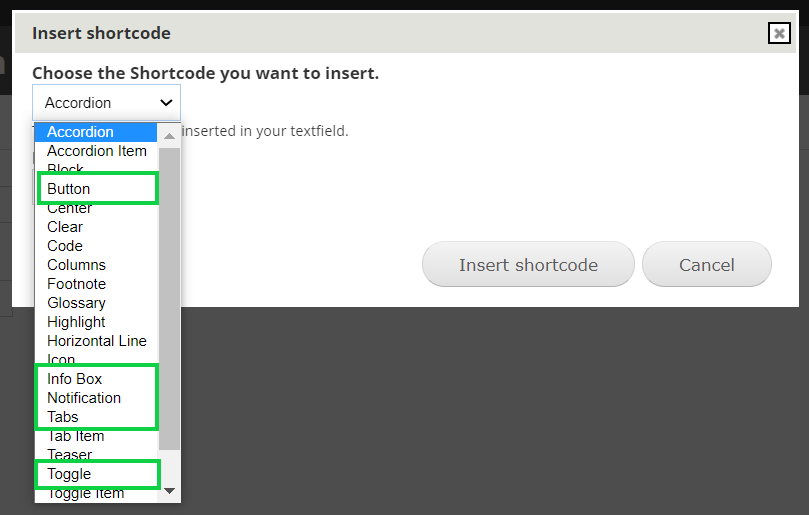
- Different fields will be presented based on what Shortcode you select.
- Fill out the details and select Insert shortcode.
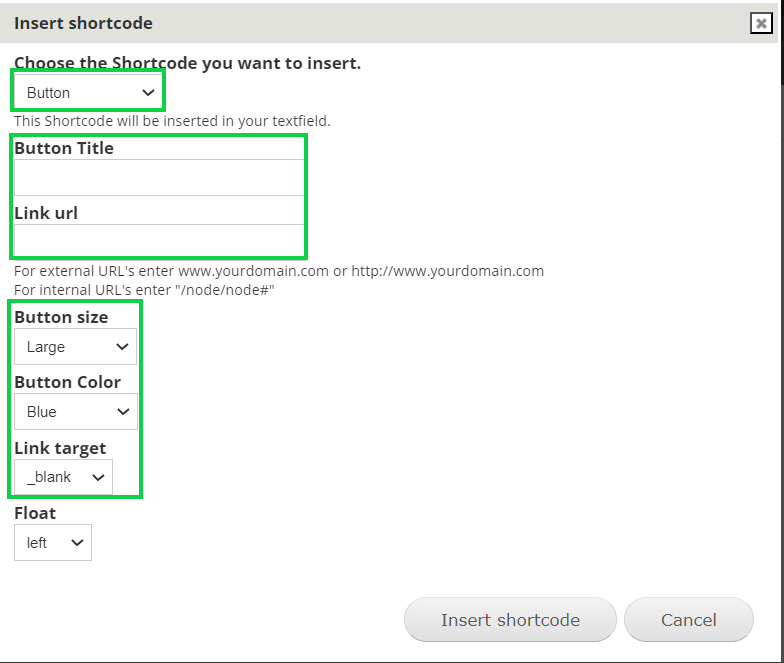
- In the example below, the Button was selected in the Shortcode dropdown.
- Populate details for:
- Button Title
- Button URL
- Button Size = Large
- Button Color = Blue
- Link Target = Blank
- Click the Insert Shortcode button
Look at the tabs below to see how the most commonly used shortcodes appear to the viewer, along with the inserted shortcode. While many other options exist, wiki creators following these standards will:
- Lessen the learning curve
- Create a consistent wiki appearance for a more seamless user experience
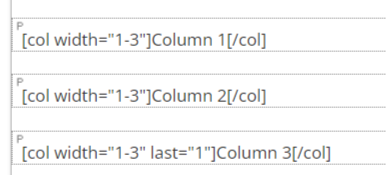
You'll notice the shortcodes use brackets [] surrounding the shortcode name to start and end (with an additional /). This is important because after inserting some shortcodes, you will need to type in the body between these brackets to format your email as desired.

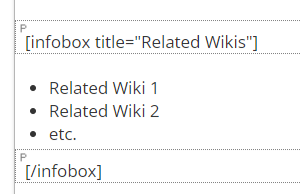
Related Wikis
- Related Wiki 1
- Related Wiki 2
- etc.
Important Callout warnings, important notes, or crucial pieces of information with red notification boxes.
Best Practices / Tips & Tricks / FAQs Add tips & tricks, best practices, frequently asked questions, or notes to blue notification boxes.

Toggle
Toggle Title Here
Toggle Title Here
Toggle Title Here

Notice above, that everything is in a single paragraph. Compare to the accordion example below.
Accordion
Accordion Title Here
Accordion Title Here
Accordion Title Here

Notice above, that each piece of the Accordion code is in a single paragraph. This extra spacing can help make creating the wiki easier and has no impact on the way it renders.
When in doubt, add space If you ever notice areas are overlapping others or formatting oddly, it's usually resolved with additional space.
How-To: Wiki Configuration & Tips
Categorize
New categories can be created when necessary but should total less than 7.
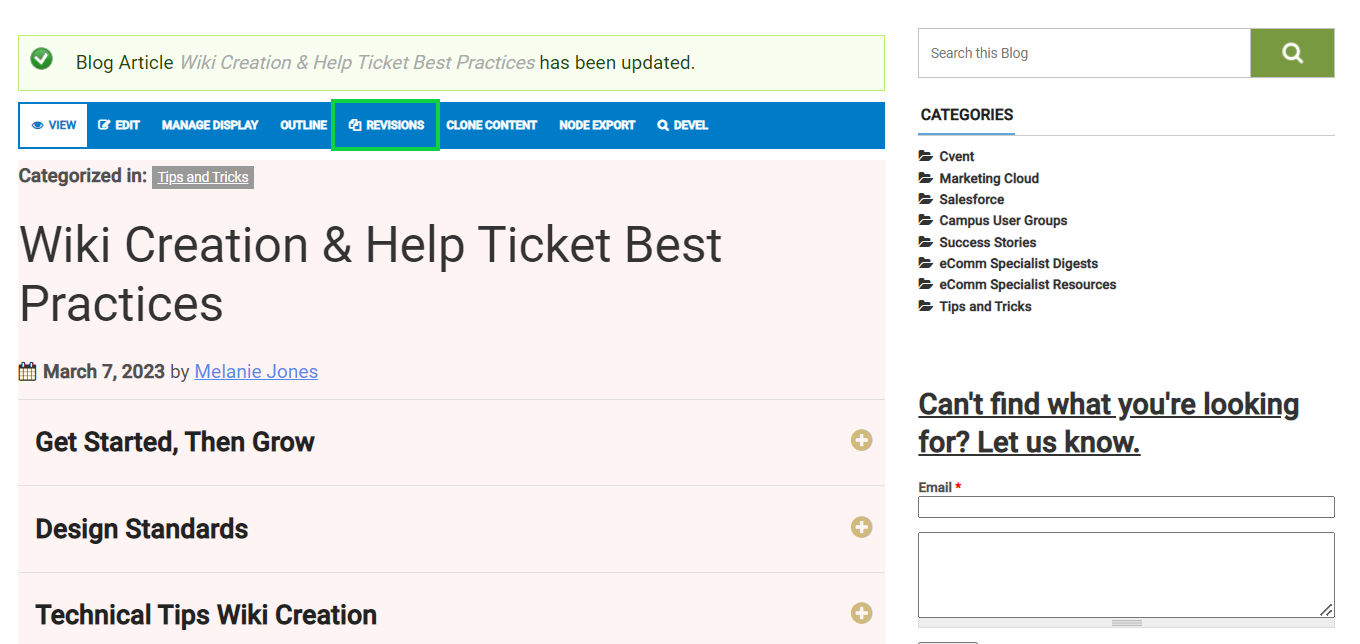
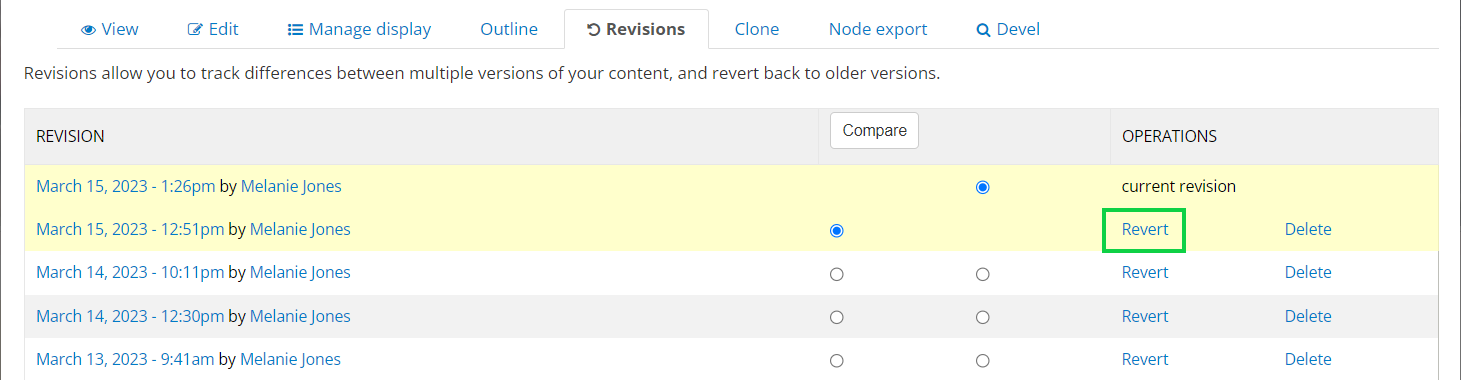
Revisions
- Ever 'break' a page? Revert to an earlier version.*
- *not available within forms.
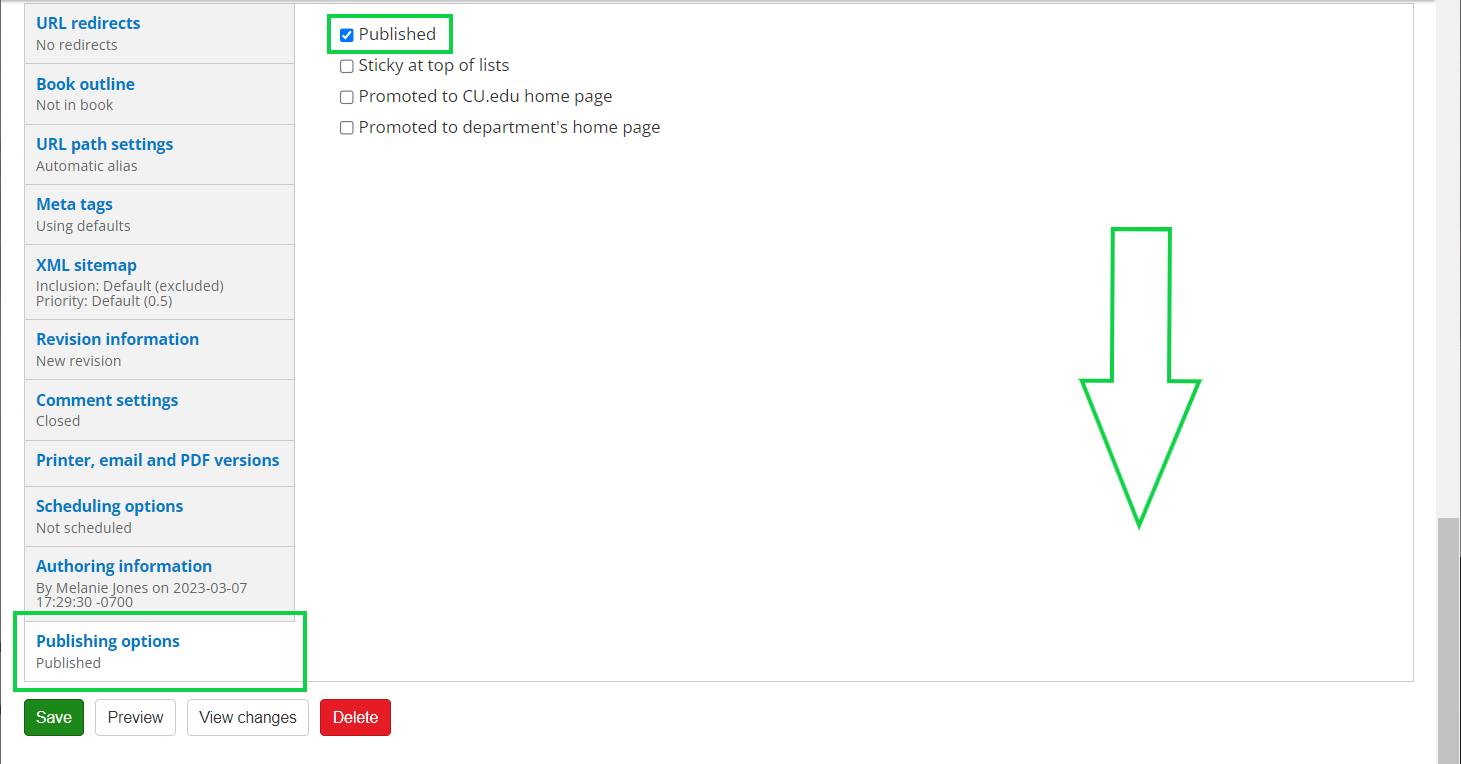
Published vs. Unpublished
- If other team members need to review wikis while they are unpublished, melanie.jones@cu.edu can get them access to do so.
- 'Preview' is not recommended. Save while unpublished to view instead.
Training & Enablement Approach
Approach to Wikis & Content
- Wikis are Dynamic
- Leverage User Acceptance Testing (UAT) to test resources and find gaps. Let users know to provide feedback if something is incorrect or unclear.
- Record once (including a review of the wiki) & publish
Approach to Change
- Communicate impacts only
- Present resources at every opportunity
- Help Ticket
- Wiki Index / Need Help? Start Here.
- Salesforce Chatter Groups
Approach to Help Ticket Adoption
Groups supported by UIS would benefit from a help ticket similar to eComm. The benefits are many but ultimately creates more timely and efficient responses::
- self-troubleshooting based on selection (fewer tickets created)
- notify one/many individuals based on the selection
- can create an Issue in Gitlab (or not)
- can have internal fields to track work (closed/owner/etc)
- can have conditional questions to get necessary information upfront for faster troubleshooting.
Folks are used to sending emails, so there will always be a learning curve. UIS employees need to be united in our approach. There are ways to encourage adoption:
- Tell all users to use the help ticket. and highlight all the benefits.
- When someone submits an email, complete the ticket and in the response mention "Can you please submit a ticket for things like this in the future".
- It's not uncommon to need to remind folks of the correct process. If you recently did the above, write back, "Would you mind submitting this as a help ticket at: LINK". They will be more inclined to do so right now with their issue unresolved. Usually the next time, folks remember to use the ticket rather than email.
- When someone continues to disregard the process, submitting issues on their behalf can help get the message across. I tell users "I can't do work without a ticket, so you can submit it or I can. But you doing it will get you a faster turnaround time."
- 100% of users will never adopt this 100% of the time - and that is okay. The value is the 80% who want to do things correctly and adopt scalable and efficient processes.
- Those who fail to follow processes will be worse off. Seize opportunities to highlight it. for them:
- I had a user email me at 9 PM because they were going on vacation and needed to send an email, but there was an error message in Marketing Cloud. We were unable to connect before they left and the communication didn't go out until they returned. The error message screenshot with a solution was available on our help ticket, so they could have self-resolved in real time and got the message out on time. I let them know, and that individual stopped emailing after that.
- Get emails for requests that are not for you? Make sure your team has a response to say, "I'm not the right person, would you mind submitting a help ticket so it does get to the right people? Thanks!".
- Teach others to fish, do not fish for them. If someone calls you to say "How do I do A/B testing', do walk them through it or just send the link. Show them where to find this resource (Help ticket >> Marketing Cloud >> A/B Testing). "Good question, would you mind sharing your screen. I shared our help ticket link with you. First let's bookmark it and then I'll show you where the A/B wiki is.".
Mantras
- Create a resource for every question, because it will come up again.
- Create a ticket for every question.
- Do not let perfection hinder progress.
- Explain it simply.
What to Avoid
- A 'one and done' approach. User enablement is about constant nurturing.
- A single training or meeting isn't enough. Scale by hosting it once and making the recording available. This allows everyone to get the same education on-demand and opens the door for meeting time to be refocused toward deeper conversations or questions.
- Inaccessible resources create an unnecessary barrier and make users dependent on non-scalable support. Do not send the resource directly to the user during training via email. Instead, show them how to access the resources for themselves for true empowerment.
- Not documenting due to fear of demand
- Instead, document and be transparent. If you will not provide a feature or know it takes 8 months to complete, say it. This is more likely to mitigate questions than create them. If it does create demand, there is an opportunity for adding it to the roadmap.
- Siloed / Fragmented/ No feedback loop
- Not adhering to processes (like helping a user when they did not follow the standard protocol of submitting a ticket)
- We are all an integral part of managing change, and being united in our communications and approach is the most efficient path for adoption. Fragmented approaches create a cycle of "one step forward, three steps back".