

Production Maintenance Complete for Monday, June 29
All enterprise and business applications are in service at this time.
Portal Status: Green


Outlook rules automatically act on incoming emails based on conditions you set — flagging messages for follow-up, moving them to specific folders or tagging them with a color category. Set up a rule once, and Outlook applies it to every matching message going forward.
Rules can be triggered by different criteria, including sender, subject line, recipients, importance and attachments. The subject line is often the most reliable trigger. For example, if you receive the Work/Life newsletter regularly, a rule can tag every message with that subject line with a specific color category, making those emails easy to spot in your inbox.
The steps below use color categorization as the rule action. Before following along, make sure you have a color category set up.
In classic Outlook
1. Right-click an email that matches the type you want to tag, then select Rules > Create Rule.
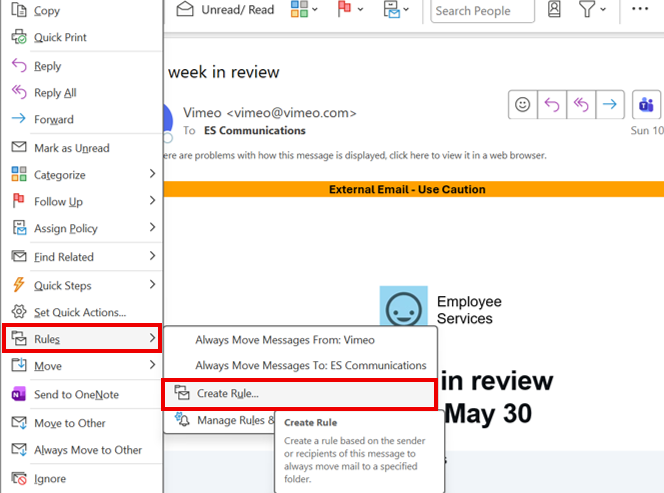
2. In the Create Rule dialog box, click Advanced Options to open the Rules Wizard.
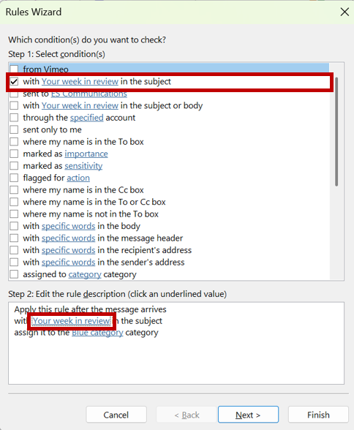
3. Under Step 1: Select condition(s), check with specific words in the subject.
4. Under Step 2: Edit the rule description, click the underlined specific words link.
5. Type the word or phrase you want Outlook to look for — for example, "Work/Life" — then click Add and OK.
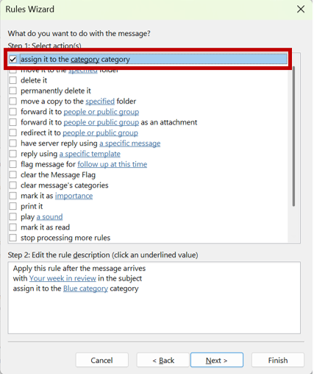
6. Click Next. On the actions screen, check assign it to the category category.
7. Click the underlined category link in the rule description, select your color category from the list and click OK.
8. Click Next twice to skip exceptions.
9. On the final screen, name your rule. To apply it to existing messages in your inbox, check Run this rule now on messages already in "Inbox".
10. Click Finish. Outlook applies the rule to all matching incoming messages going forward.
In new Outlook for Windows
1. Right-click a message in your inbox, hover over Rules and select Create rule.
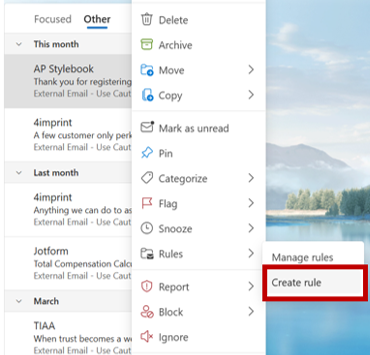
2. In the dialog that appears, click More options to open the full rule settings page.
3. Name your rule.
4. Under Add a condition, choose how Outlook should identify matching messages:
a. Select Subject includes and enter the word or phrase to match in the subject line.
b. Select From to trigger the rule based on a specific sender.
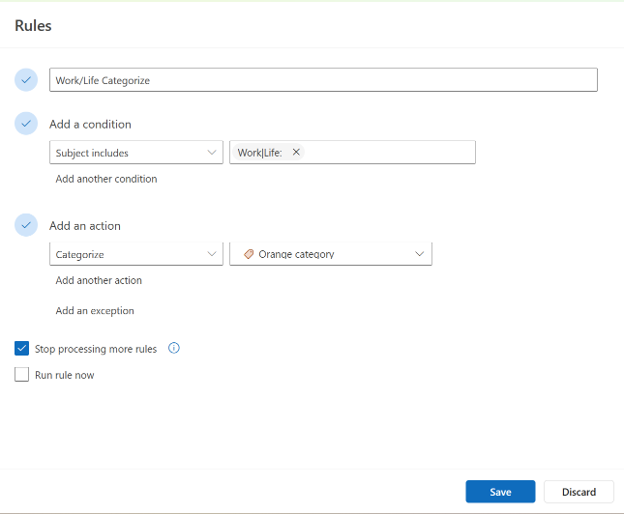
5. Under Add an action, select Categorize and choose your color category from the list.
6. Click Save. The rule applies to all incoming messages going forward.
TIP: To edit, disable or delete a rule in new Outlook, go to Settings > Mail > Rules.
Once your rule is running, find every tagged message by typing the following in the Outlook search bar:
category:"Category Name"
Replace "Category Name" with your category's label. Outlook returns the full list of matching messages.
Automatically applying a color category is one example of what rules can do. A few other common uses:
REMINDER: Email rules are helpful for organization, but you remain responsible for reviewing communications sent to your inbox. If you use rules to move messages into folders, be sure to check those folders regularly so you don't miss important information.

Add new comment