


The Journal Entry Spreadsheet Template is a tool to reduce the manual effort of creating journals. It’s best for multi-line journal entries (more than 10 lines), recurring journal entries, and copying data from other Excel spreadsheets.
Watch the Mini-Webinar
Read the Procedures
Downloading the FIN Journal Entry Spreadsheet Template
There are two steps to this process; setting up the spreadsheet template and, if you wish, configuring the spreadsheet template.
Setting up the Spreadsheet Template (Required)
- Click on the File Attachment link below to download the spreadsheet files.
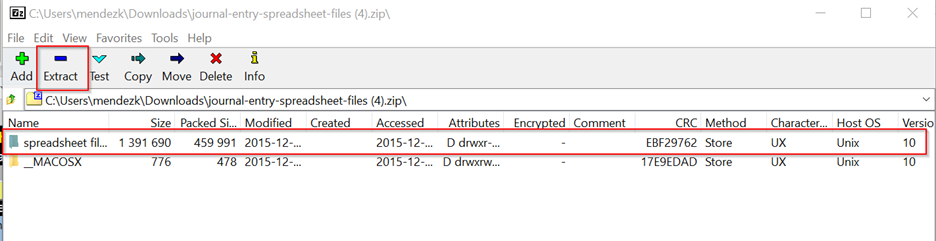
Journal Entry Spreadsheet Files - Click on the zip file to open it.
- Select the Spreadsheet files folder.
- The window may look different depending on your operating system (see below). Select the Spreadsheet Files folder, then click the Extract or Extract All button at the top of the window.

- You'll need to save these files to a folder not backed up by OneDrive or SharePoint (select a folder that does not display a cloud icon next to it). Typically, it is best to save these to a server folder.
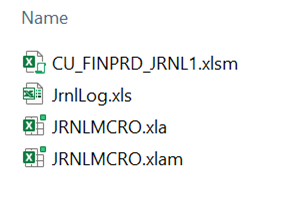
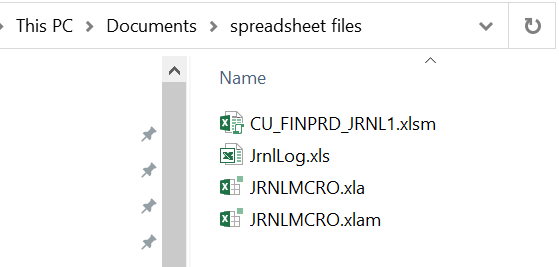
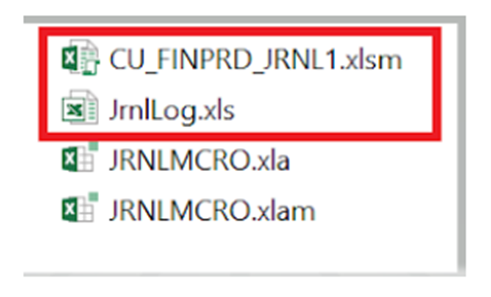
Important - You must save all 4 files (JRNLLOG, JRNLMCRO (2), and CU_FINPRD_JRNL1.xlsm) to the same folder.
- Delete the original zip file from your Downloads folder. You will not use this set of files for your spreadsheet journals.
- Now, open the journal entry spreadsheet template file from the new location. You may see some Security Warnings when you first open this file.
- If there is a Security Warning in a yellow bar at the top of the spreadsheet, click Enable Content.
- If a security warning window asks to enable macros, click Enable this content, then click OK.
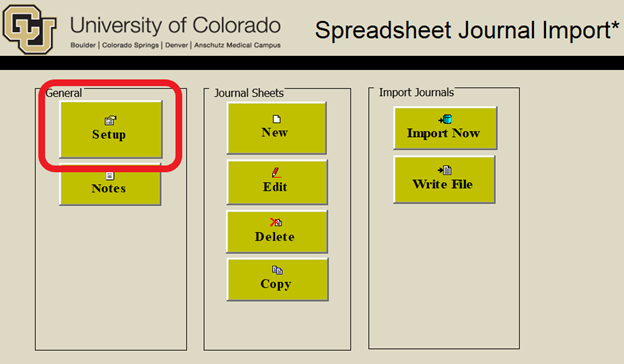
- On the Control worksheet, in the General column, select Setup.
If the Setup button does not respond when you click it, see the Troubleshooting Errors section at the bottom of this page.
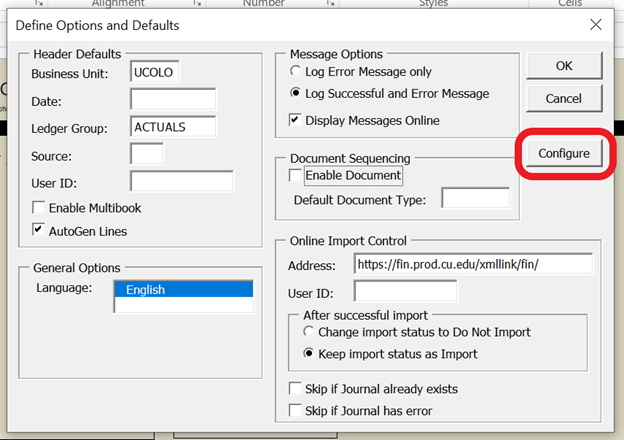
- In the Define Options and Defaults window:
- Enter your Journal Source Code
- Enter your PeopleSoft User ID
- Update the After successful import option to Change import status to Do Not Import.
- The other details, including the business unit, ledger group, and import address, will default, as shown below.
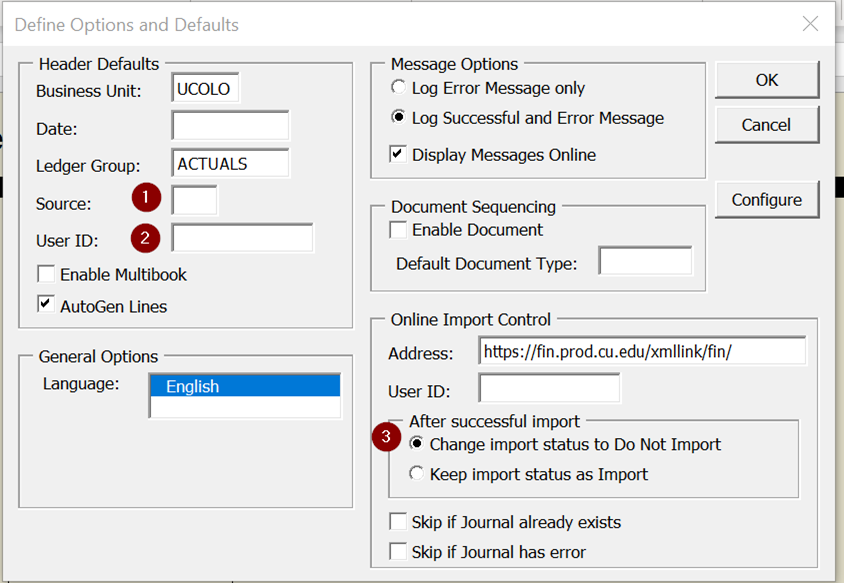
- Click OK to complete the setup process.
Configuring the Spreadsheet Template (Optional)
Configuring the spreadsheet template allows you to rearrange the columns on the spreadsheet template. Rearranging the spreadsheet columns will not impact the order of columns in the Finance System.
- On the Control worksheet, in the General column, select Setup.

- On the Define Options and Defaults window, click Configure.
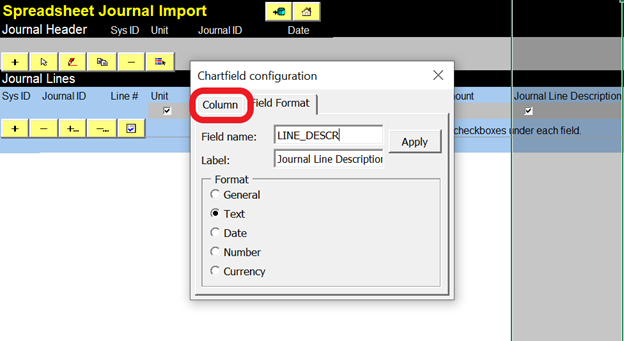
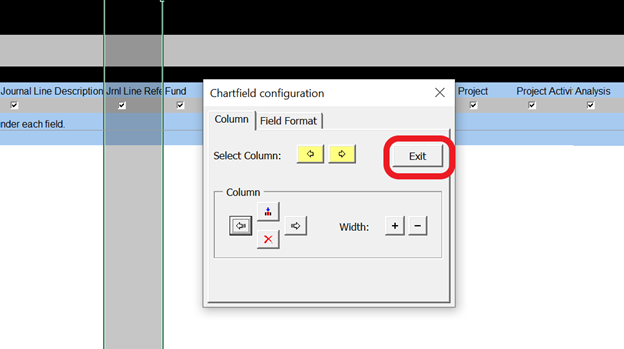
- The ChartField Configuration window appears. By default, it opens to the Field Format tab. Select the Column tab.
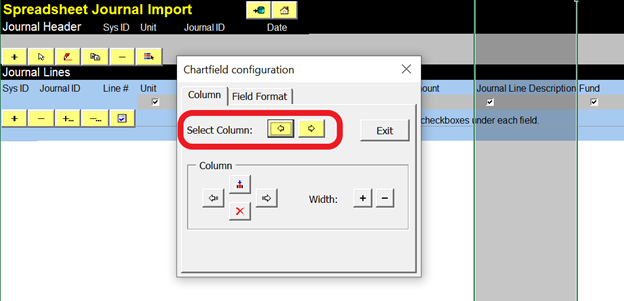
- Use the Column tab to reorder and delete columns so that you can enter your journal entry data in the order you prefer.
To reorder a column: Select the column you wish to reorder by using the yellow arrows next to Select Column to scroll through the columns on the journal entry template.
Note - Use the column configuration to rearrange your columns. You cannot rearrange columns directly on the spreadsheet using copy/paste functions. - Once you have selected the column you wish to reorder, use the arrows below Column to move the column to the location/order you prefer.
The red X will delete a column. We recommend moving the columns you do not need to the right side rather than deleting them.
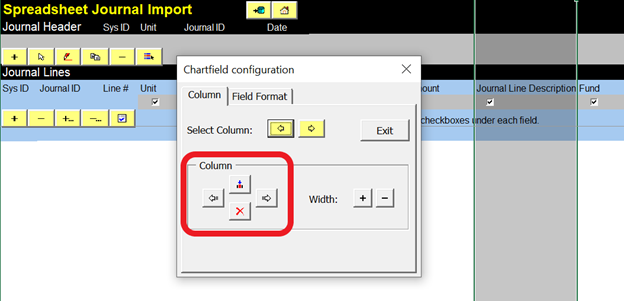
- After rearranging and deleting the columns to your preference, click Exit.
Creating Spreadsheet JEs
- Open the journal entry template spreadsheet.
Remember! When you set up your Journal Entry Spreadsheet, you downloaded, extracted, and saved all 4 files to a folder on a server folder. So be sure to open the template file from its new location. Opening it from the original zip file will cause an error.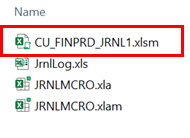
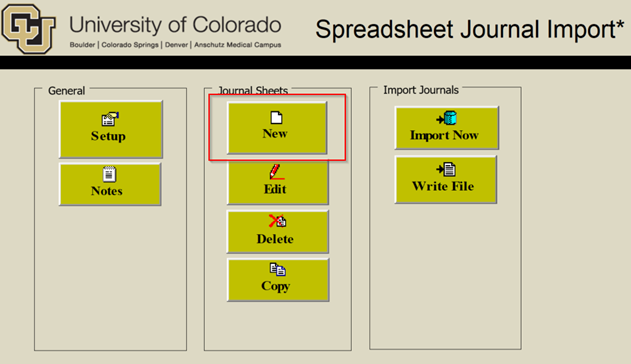
- It will open to the Spreadsheet Journal Import page. Click New in the Journal Sheets column to create a new Journal Entry.
- Enter your Journal Entry Name and click OK. This names the worksheet within the journal entry spreadsheet template; this is not your Journal ID.
Note: The name is limited to 29 characters and cannot contain special characters, including > *{ % & @ / : }. It can contain spaces. - In the Journal Header section, click the Plus Sign (+).

- The New Journal Header popup will appear.
- The Journal ID will default to NEXT. If you prefer to name your journal, you can update this field.
- Enter a Description. This description will feed to the Long Description field in FIN.
Note - For tips, see What Makes a Good Long Description. - The Journal Date will default to the current date. You can update this if necessary.
Note: You may need to make additional selections if entering a journal at year-end.
If you enter a journal for an Adjusting Period at the end of the year (period 996, 997, or 998), select the Adjusting Entry box. Then, enter the appropriate 996, 997, or 998.
If you enter an accrual entry, use the Reversal section to select Beginning of Next Period.
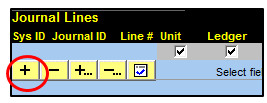
- Click the Plus sign (+) in the Journal Lines section to add a journal line.
Or use the Plus signs with the dots (+...) to add multiple lines at once. A popup box will prompt you to enter the number of lines you want to add.
- Complete the details for each journal entry line.
The Business Unit (UCOLO), Ledger, SpeedType, Account, and Amount are required.
For JEs containing project-related SpeedTypes, also complete the AN Type (required).

Here are a few tips -- You can only change information in the gray fields. You cannot change the blue areas.
- Make sure the Ledger matches what you selected on the Journal Header.
- As a best practice, we recommend you use SpeedTypes, rather than FOPPS to complete the lines.
- If you're pasting data into the JE Spreadsheet Template from another document, make sure to "Paste Special Values" (Ctrl + Alt + V).
To add another line, click the Plus sign (+) again. The information from the line above will copy to the new line. If you don't want the information to be copied, deselect the checked boxes above the columns you wish not to copy.
Copying a Journal Entry
Copying a journal is especially helpful when working with recurring JEs. There are two ways to copy journal entry spreadsheet data: copy a journal within an existing sheet or copy a journal to a new sheet.
Copying a Journal within a Sheet
- In the Journal Header section, click the Copy button.
- Select the JE you want to copy.
- Enter your Business Unit (UCOLO), Journal ID (NEXT or a custom ID), and Journal Date (formatted as MMDDYY).
- Click Copy.
Copying a Journal to a New Sheet
- On the Spreadsheet Journal Import page, click Copy in the Journal Sheets column.
Note: Click Home, if needed, to get to the Spreadsheet Journal Import page. - Select the JE you want to copy. Then, in the New Journal Sheet field, enter a new description.
- Click Copy.
The Journal ID for the new journals will default to NEXT.
Pasting Data into the Template
Do you plan to copy and paste data from an Excel spreadsheet into the Journal Entry Spreadsheet? We recommend formatting your Excel spreadsheet to match the order of columns in your Journal Entry Spreadsheet.
- Before you start, you need to know how many lines of data you have.
- In a new Journal Entry spreadsheet, click the Add Multiple Lines button (+...) and enter the number of lines needed. Adding the appropriate number of lines is critical. You cannot add rows as you traditionally would in Excel.
- Select the data from your Excel spreadsheet and copy (Ctrl + C).
- Return to your Journal Entry spreadsheet, and right-click the first available gray field for line 1 of your JE.
- Select “Paste Special Values” (Ctrl + Alt + V).
Deleting a line from your journal
Do you need to delete a line from your journal? You'll need to use the buttons in your spreadsheet template.
- Select the line you wish to delete. Then click the yellow minus button under Journal Lines.
- To delete several lines. Select the Delete Multiple Lines button (-…). Enter the line numbers you wish to delete. Click Delete.
Importing Spreadsheet JEs to FIN
When you are ready to import your journal entry to FIN:
- Click the Drum/Import Now.

- Enter your PeopleSoft User ID and Password, then click OK.
To find your PeopleSoft User ID - In the Finance System, click the Create/Update Journal Entries tile, and select the Find an Existing Value tab. Your ID will show in the Entered by field.
If you can't remember your password, see the Troubleshooting Errors section at the bottom of this page for instructions to reset it. - The Finance System will load your journal entry and display a message with the journal status. Review this message to confirm the journal imported and note the JE ID. Click OK.
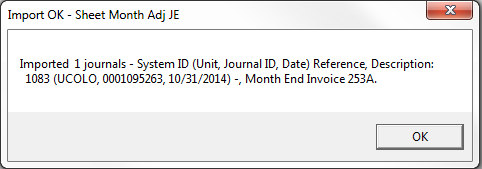
- Your Journal Log will appear with a success message that includes the JE ID. You'll need this JE ID to look up and complete your journal entry in the Finance System.
- If your import failed, see the Troubleshooting Errors section at the bottom of this page.
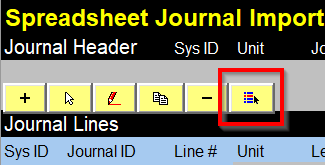
Note - Each time you click the import button, it will try to upload everything in the sheet. If you have multiple journals, you can click the Import Status icon (to the right of the – icon) to control which journals you import.
- Select the files you do not want to import, select the Do not import option, and click OK.
- Then, click the Import Status icon, select the file you wish to import, select Import, and click OK.
Completing Spreadsheet JE Uploads
To complete the journal entry, you'll need to log into the Finance System, add attachments, edit, and submit the journal.
To find your journal entry:
- Log into the Finance System.
- From the Finance & Accounting homepage, click on the Create/Update Journal Entries tile.
- Select the Find an Existing Value tab.
- Enter your JE ID.
- Click Search.
To add attachments: See Adding Attachments
To edit the journal entry: See Editing Journal Entries
To submit the journal entry: See Submitting Journal Entries
Need help troubleshooting an error or navigating the Spreadsheet Template?
Troubleshooting Errors
Here are some of the most common Journal Spreadsheet errors and how to fix them.
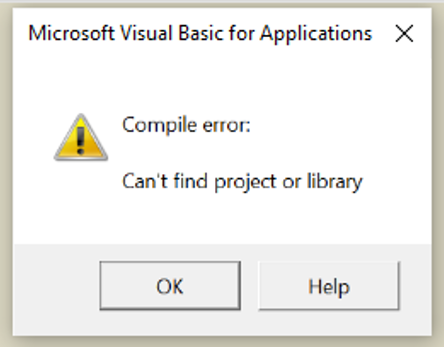


Error #1: "Visual Basic" Error
You open the spreadsheet template, and the Microsoft Visual Basic error message appears:
Most Likely Cause: You opened the file directly from the zip file you downloaded from the website.
Solution: Instead, extract the files and save them to a local folder. Follow the steps for Setting Up the Spreadsheet Template on Setting Up and Configuring Journal Entry Spreadsheet.
Other Possible Cause: You extracted the files but didn't save all 4 files together.
Solution: Make sure you save all 4 files to the same folder. Be sure to save the files in a folder not backed up by OneDrive or SharePoint. A file backed up by OneDrive will have a cloud icon next to it.
Error #2: The buttons do not respond
You click the Setup button, and nothing happens.
Cause: Macros are disabled.
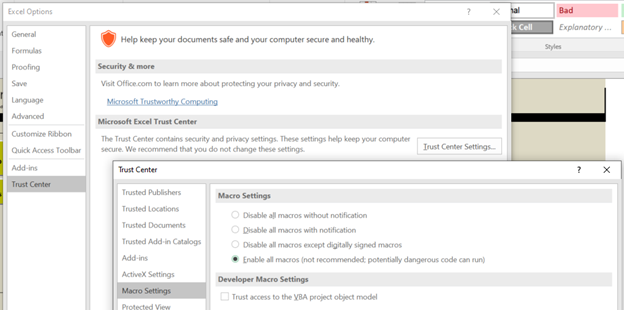
Solution #1: Update the Trust Center Settings in Excel.
Start by, enabling macros in Excel.
- Click File > Options to open your Excel Options.
- Select Trust Center.
- Click Trust Center Settings.
- Select Macro Settings.
- Change the setting to Enable all macros.
- Click OK to save your settings, then close and reopen the spreadsheet.
Next, update your Active X settings - While in the Trust Center Settings, use the menu on the left to select ActiveX Settings.
- Select “Enable all controls without restrictions and without prompting...”
Finally, add the folder where you saved your files as a Trusted Location. - While in the Trust Center Settings, use the menu on the left to select Trusted Locations.
- Click Add a New Location.
- Add the folder where your file is saved to the list of trusted locations. This tells Office that files in this location are safe to run macros from.
- Also, select Allow Trusted Locations on my network. Then, click OK.
- Now, restart Excel to apply the changes you’ve made to the Trust Center settings.
Solution #2: Unblock the file.
- Open Windows File Explorer and go to the folder where you saved the file.
- Right-click the CU_FINPRD_JRNL file and choose Properties from the menu.
- At the bottom of the General tab, select the Unblock checkbox and select OK.
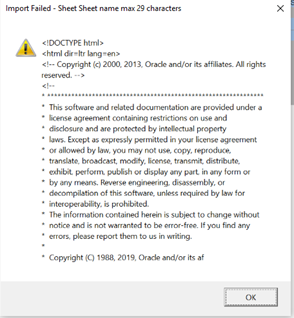
Error #3: "Import Failed" Message
You click the drum button to import the journal and receive an "Import Failed" message.
Most Likely Cause: An expired password. Passwords expire after 6 months.
Solution: Confirm this is the cause by reviewing the Spreadsheet JrnlLog.
- Review the error description. To make this easier to read, select all the Log Message text (click in the cell, then click Ctrl +A), copy (Ctrl +C), and paste it into a Word document.
- Scroll through the message (or Ctrl + F) for "Your User ID and/or Password are invalid."
- Confirm you are using your OUD User ID, which should be 4 alpha and 6-digit characters.
To find your PeopleSoft User ID - In the Finance System, click the Create/Update Journal Entries tile, and select the Find an Existing Value tab. Your ID will show in the Entered by field. - If you used the correct User ID, proceed to reset your password.
To reset your OUD password:
- Click this link and select your campus.
- Click the My Access tile.
- Select the Accounts tab.
- On the accounts tab, click the line for OUDPRD. It will highlight in blue.
Note: If you don't see OUDPRD as an option, contact access@cu.edu for assistance. - Click the Actions dropdown at the top of the table.
- Select Reset Password.
- Set your new password, then click Submit. Your password must contain:
- At least one capital letter;
- At least one numeral;
- At least one special character;
- At least 12 characters in length; and
- Cannot be one of your previous passwords.
- It may spin for a moment before returning to the My Access page.
Other Possible Cause: A data issue within your journal entry
Solution: Review your spreadsheet journal and delete special characters like > *{ % & @ / : } .
Do you still have an error?
If you encounter other errors, let us know. The best way to help us troubleshoot is to email FSS Help (FSS@cu.edu) a screenshot of the error message, a copy of your Journal Log, and a copy of your Journal Spreadsheet.
Navigating the FIN Journal Entry Spreadsheet Template
When you open the Journal Entry Spreadsheet file, it will open to the Spreadsheet Journal Import page. You’ve learned how to use the New button to create new journal entries.
The Journal Sheets column also includes these options:
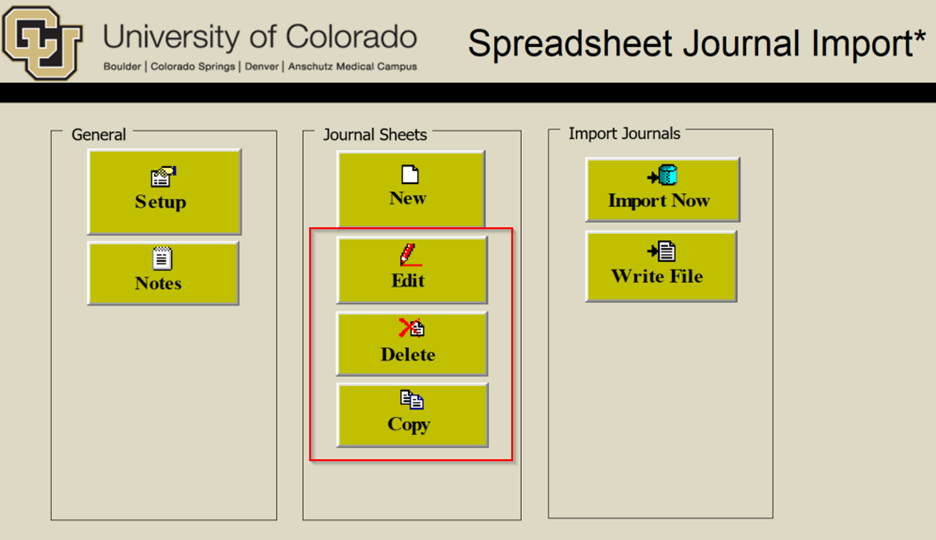
- Edit – Click the Edit button to make changes to an existing journal sheet.
- Delete – Click the Delete button to select and delete journal sheets you previously saved in the template.
- Copy – Click the Copy button to copy a previously saved journal sheet into a new one.
The Spreadsheet Journal Import buttons may be used as follows:
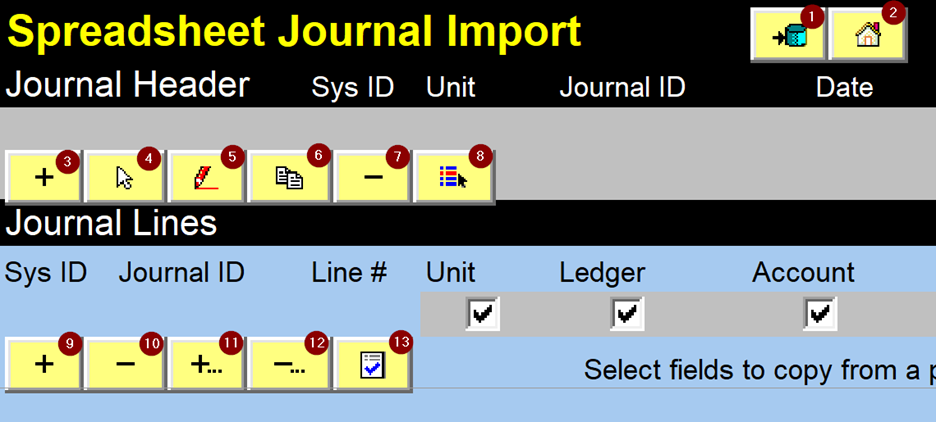
- Imports the journal sheet to the Finance System.
- Returns to the Spreadsheet Journal Import page.
- Creates a new journal header.
- Selects the journal header on whose lines you want to work.
- Edits the journal header fields.
- Copies a journal.
- Deletes a journal.
- Changes import status of a journal.
- Adds a journal line in the current selected journal header.
- Deletes a journal line. Position your cursor on the line and click this button.
- Add multiple lines.
- Deletes multiple lines.
- Checks the amount fields to verify that you have entered the number with the number of decimal points that you have set up. The default number of decimal points is 2.
Have a question or feedback?