Create Your Own Salesforce Reports
Before diving into IOS data, it's crucial to have a basic understanding of the Salesforce Reporting interface. You can then refine your knowledge by reviewing the information below and practicing your report-building using the templates linked below.
Reporting Templates
Anschutz
Boulder
Denver
Springs
Salesforce has a native learning tool where you can take a deep dive into learning the mechanics of reporting.
- Reports & Dashboards for Lightning Experience | 2 Hours
- Lightning Experience for Salesforce Classic Users | 1 Hour
- Lightning Experience Basics | 1 Hour
- Lightning Experience Productivity | 1 Hour
Confirming an accurate audience Report is crucial to ensuring your data is reflecting the appropriate results.
Report Types
- Different Report Types can give the same result but with a different approach. They are defined by the Salesforce object and will dictate which fields are available to use in your report.
- In the Create New Report window, you can select a category from the left panel and search for report types by name. You can also filter by objects or fields.
- Fields included via lookup or part of composite fields (such as geolocation or address) aren’t available as filter options.
- When using keyboard input, move focus to the selected filter option and use backspace or delete to remove the option.
- To display details about a report type, click it in the search results or the Recently Used list.
- The Details panel lists reports created by you and others in your org that are based on the report type and the objects and structure that the report type uses.
- Not sure what Report Type to use?
- Start with the templates above OR
- Select your Report Type, remembering that the available columns will be dependent on the Report Type objects.
Review your Filters
- Start by identifying which fields on your primary object you will use to filter.
- Ensure these Standard Report Filters are applied.
- Check to make sure the filter values are correct.
- Not sure which Filters to use? Submit a help ticket for support
Check for Unique Count
- Reports can often have the same contact listed numerous times, so identifying the unique count is important to confirm the Report criteria is accurate. Having a total of 9,000 unique contacts when expecting 250 is an indicator of incorrect criteria and should be investigated.
- To check the Unique Count:
- Edit the Report
- In the Contact ID column header click the down arrow >> select Unique Count in the dropdown
- Run the Report to see the Record Count versus the Unique Count
- Marketing Cloud Users:
- Do not leave the Unique Count enabled if sending as doing so will make it fail. To remove a unique count:
- Edit the Report
- In the Contact ID column header click the down arrow >> select Remove Unique Count in the dropdown
- Save the Report
- Do not leave the Unique Count enabled if sending as doing so will make it fail. To remove a unique count:
- To check the Unique Count:
Large Reports can take a long time to run and can even result in a failed send. To avoid this, it's best to optimize Reports.
Check your Report Type
- Start with a Report Type that uses the fewest objects, while allowing you to apply criteria without using a cross-filter.
- For example, instead of using a Contacts Report and using an Application Cross-Filter, use the Contacts with Applications Report Type.
- When you need to Report across multiple objects, it's better to have those objects in the Report Type, rather than applying a cross-filter.
Use Efficient Filters
- By limiting the number of records returned, adding a filter can significantly speed up reports.
- Because they limit the amount of data returned by reports, you'd think filters would always make reports run faster. However because each record must be evaluated against each report filter, filters with complex logic can slow down reports. Apart from the performance-slowing filters described in this guide, adding a filter to return fewer records is a surefire way to speed up a sluggish report.
- Filter with EQUALS instead of CONTAINS
- When you set a filter with CONTAINS the report executes many steps to return data, which slows down the report. EQUALS executes in fewer steps, resulting in a faster report.
- Filter with NOT EQUAL TO instead of DOES NOT CONTAIN
- When you set a filter with DOES NOT CONTAIN the report executes many steps to return data, which slows down the report. NOT EQUAL TO executes in fewer steps, resulting in a faster report.
- Don't filter by row-level formulas
- Filtering by a row-level formula slows down reports. If you have a slow-running report that filters by row-level formulas, speed it up by removing the row-level formula filters.
- Remove unnecessary columns
- Much like returning lots of records can slow down a report, returning many columns can slow down a report. Many report types add a dozen or more columns to a report when it’s created. Removing columns you don't need speeds up the report.
- Avoid using the filter 'Contact ID' to include a few people in a larger Report
- For example, if you have a Report of students it seems convenient to include a few people from your office in the Report based on their Contact ID. These Reports should be separate, one for students and a second for those in your office you need to be aware of delivery.
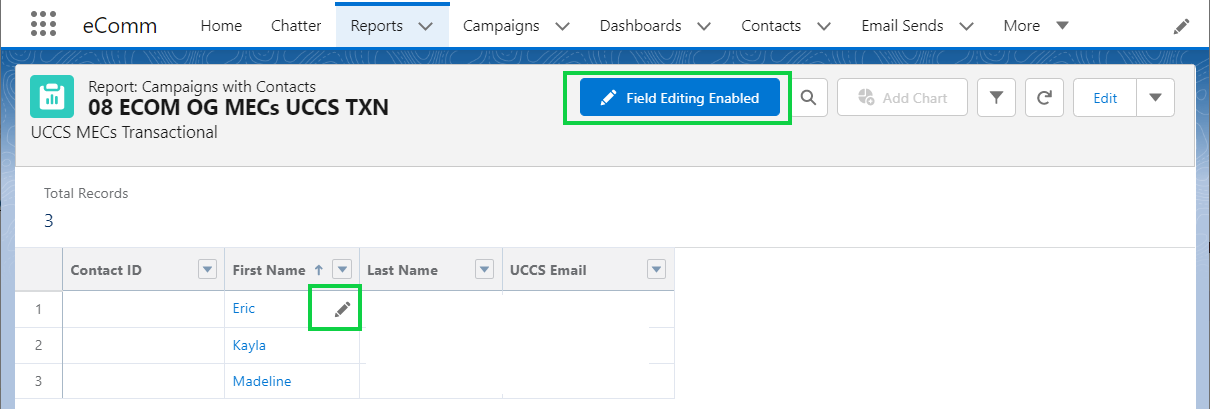
Field Editing Enabled
To enable live editing of fields within a report- Click the Field Editing Enabled button and then edit cells in the Report by selecting the pencil icon. Please note that not all fields are available to be edited via a report.